
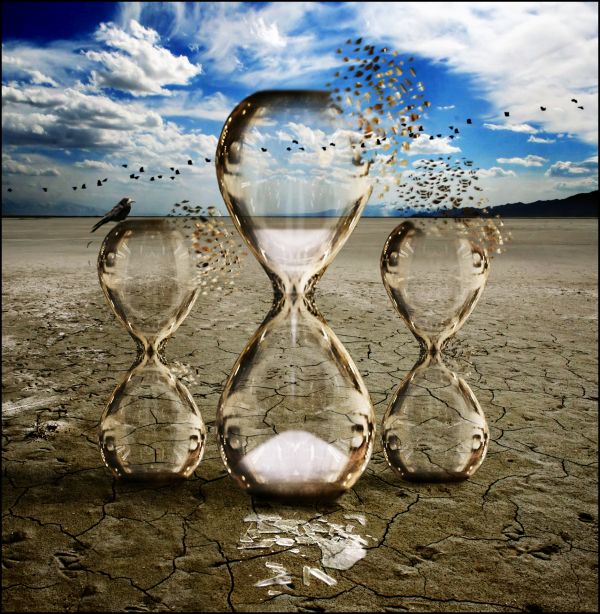
This tutorial will provide the evolution process of one of my works. In the tutorial you'll learn some manipulation methods and have a glimpse on how to create a surreal image, taking in consideration a solid theme or idea, in this case the theme is naturally about time and its (un)possibility to redeem itself.
I've used Photoshop CS4 to create this piece. Visualize the final result here.
These are the sources I've used in the creation of this image, special thanks to Night Fate for providing the background. To get started, download the following sources:
» Background - Night Fate
» Source - Hour Glass
» Glass
» Birds
» Raven
End result:
Author:

Step 1
To get started open the source one (contest's source) and let's build up our own hour glass.Take a look at the picture:
1- Using the Pen Tool (P) select the part I've delimited with a red rectangle, as obvious don't select it as a rectangle, select the glass's area and use it's edges. Gently clear out the spaces between the glass and the metal, you should get something like the 1a image.
1a- Before going any further, duplicate the layer(right mouse click on the layer and click "Duplicate Layer") and set it's Blending Mode to Overlay and opacity 100%.
2- You may want to merge the two layers you got from the step above, since you'll need to duplicate it again. To do this select both layers by pressing the CTRL key and with the left button of your mouse press on both layers, then right click on "Merge Layers".
- Now that you have only one layer, duplicate it. Go on the main menu, in the top and click on Edit > Transform > Flip Horizontal.
- Adjust both layers still you create a real time glass. To do this you may want to use the Zoom Tool (Z) and the CTRL key + left mouse button. You shouldn't transform it, or one side may get bigger/smaller than the other.
3- Now separate the bottom and the upper part, use the Rectangular Marque Tool (M) to help you. Divide both halves by the middle of the object.
- Hide the bottom part, the one with the sand on it. Remove the eye mark on that layer for now.
4- Duplicate the upper part and do the same you've done on the step 2 about adjustment. You need to create an object once again, so apply the Edit > Transform > Flip Horizontal to the duplicated layer and adjust it to the upper part.
- Now merge both layers again and reduce it's opacity to around 70%.
- To create a more natural look use the Clone Stamp Tool (S) and the Smudge Tool in the middle of the object to erase the "mirror" effect.
- Use the Eraser Tool (E) and start cleaning gently the inside area, but not completely. Change the opacity of the eraser as well as it's size often to create a better effect. Make the middle parts nearly unnoticeable like real pure glass. Tip: When going to the edges use less opacity so you don't make them vanish away.

Step 2
- Once our time glass is nearly ready, create a new file, you may want to save the previous file as well. File > New > 1800 vs 1800 Resolution in pixels.- Open the background source image by Night Fate and start to adjust it to your new square shape file.
- Now using the Clone Stamp Tool remove the hole in the bottom of the picture. Tip: Try to make it look as real as possible don't just randomly clone; you can clone some of the ground's cracks and create a similar effect as the existent ones.

Step 3
You should have both files opened now, the new one with the background and the old one with the hour glass we made. You will need to copy the object to the new file, to do this you should:1. Select the object - Use the Rectangular Marquee Tool or Select > All; click on the object's layer; then click CTRL+ C.
2. Paste the object in the new layer - Click CTRL + V.
3. Use the Smudge Tool in the middle to soft the edges, since we pasted 2 halves into one previously.
After this just adjust the object in the background. I decided to place it in the middle for now.

Step 4
Remember the bottom of the glass we hided back there? We will need it now, go to the first file and unhidden it. Do the same method that i described in the last step to copy it to the new file.We only want the white sand inside the glass, so all the rest must be erased, let's start step by step:
1- Once you got the half with the sand or the whole glass which had the sand on it, select the lower part, use the Rectangular Marquee Tool (M). You can delete the layer with the full glass if you wish.
2- As you can see in the picture below, you should clean all the area outside the red rectangle i made, you can use the Rectangular Marquee Tool (M) and the DELETE key (it will delete the are you've selected) if you wish or simply use the Eraser Tool (E).
- Then start cleaning inside too, this time you must use the Eraser Tool (E) with different sizes to be more efficient, remember you only want the sand.

Step 5
Returning to the glass, this layer should be above the sand's one... since it's opacity is lower than the sand one, you'll still be able to see the sand, it will look like the sand it's inside the glass, exactly as we pretend.All you need to do is to adjust the sand shape and size to the glass's one. Use CTRL + T (Transform) if you need.
It should look something like this:

Step 6
Now that the main glass is set, create the other two smaller glasses, one at the right at the main glass and the other at the left:1. Duplicate the main glass one time.
2. Now reduce it's size (CTRL + T). Make it around 2/3 of the main one.
3. Now duplicate this layer, so you have both small glasses with the same size.
4. Place them with the positions i described above. Try to keep equal spaces between the main glass and the small ones.
After this duplicate the main glass and set the layer's blending mode to "Soft Light" at 100% opacity. Do the same to the smaller glasses.

Step 7
Working on the upper sand of the main glass now. You'll need to duplicate the current sand layer we have. Then go on Edit > Transform > Flip Vertical.As you can see you can't really place this layer on the upper part of the glass, it will look fake and ugly, so let's start the manipulation:
1- Use the Eraser Tool (E) and start cleaning the top (the yellowish part), try to clean it in a horizontal line.
2- Place this layer below the glass's as you did with the lower sand.
3- Transform this sand piece to fit the upper lower part of the glass, use the Transform (CTRL + T) and the Warp Tool (Edit > Transform > Warp).
4- Once the sand it's totally adjusted to the glass, use the Smudge Tool to drag down some sand. With a small size, gently pull it down, use the Eraser Tool (E) to clean partially some parts if needed.
You can see the evolution here and how it should look like, I've hidden the smaller glasses so you could visualize it better.

Step 8
To guide you better i'll divide this step into numbers:1- To create a better dropping effect, start by creating a new layer - you can always clone the sand and the shape it as you wish. I've used the Eraser Tool (E) and the Warp tool to do this, same method I've used on the sand's adjustment. Then finally use the Smudge Tool to drag it even more down.
Then I've created another layer and did the same but in a smaller proportion.
2- Once you got the shapes set. Duplicate the layers, so you'll have another two new layers one for the base dropping sand and one for the smaller dropping one. Set the bigger drop's blending mode to Linear Dodge 70% opacity and the second to Screen 100% opacity. (Check the image below if you have any doubts)
3. I created a Curves Adjustment Layer - Layer > New Adjustment Layer > Curves with the setting you can see in the image below (you can set something similar it doesn't need to be exact). Place this layer below all the layers and above the background.

Step 9
Select the smaller glass's layers and the main glass layer and merge them. Now let's apply some Adjustment layers:1. Levels - Layer > New adjustment layer > Levels
2. Using the Quick Mask Mode (Q) select the glass's right sides (in red in the picture), from where the light source is coming. Now apply a Brightness/Contrast adjustment layer (Layer > New adjustment layer > Brightness/Contrast) to the selected areas.
These adjustment layers should be binded to the layers with the 3 glasses, so it will only affect it. Just click on the adjustment layer, click on ALT then with the mouse's left button click on the glass's layer.

Step 10
Let's start the shadowing, we started to build up the light source from the right on the last step by intensifying the luminosity on the glass in it's right side, this means the shadows will be placed on the left side.My biggest goal on this step it's to show you the method, since drawing a line and blurring it until it looks fine depends a lot on the size of the line, position, effect you wish and so on.
1- First of all create a presence shadow, draw a horizontal black line right on the bottom of each glass, use the Brush Tool (B) for this. Use a diameter of around 45 for the main glass and 20 for the smaller ones, you should do this in separated layers. After this go to Filter > Blur > Gaussian Blur and apply it to both layers, the amount will differ from the main glass to the smaller ones: around 25 for the big and 15 for the small. Let the blending mode and opacity as they are: normal and 100%, make sure these layers are at the top of all layers.
2- Focusing the left small glass, draw a black horizontal line with the Brush Tool (B) in a new layer, start on the bottom of the glass and direction it to the left. Apply Gaussian Blue depending on the size of your brush, it should look kinda cloudy. Then set it's blending mode to Soft Light and opacity to 60%.
3- Do the same thing you've just done to the other small glass. The only thing that changes is the opacity, to 100%.
4- And finally the same to the main glass, don't forget the line to this one should be thicker. Also if the shadow gets too intense in the place where it meets the left small glass's shadow, use the Eraser Tool (E) with a small opacity and delete some of it.
The opacity of this layer is 70% on Soft Light.

Step 11
To give the glasses a more realistic and shiny effect you should:- Duplicate you glasses layer or layers, it's ok if you merged them or still have the small in one layer and the big one in another, works the same way.
- Let it be as normal blending mode and 100% opacity. As you can see the glasses have way more intense edges and more brightness.
- Let's create some more deepness by creating some shadows on the left side of the glasses. Remember when you had to create some lights on the right side? It's exactly the same way, but now instead of applying an adjustment layer you'll simply do as you did with the shadowing:
1. In a new layer, draw some black lines in the left side following the glasses edges, use the Brush Tool to do so. Use smaller brushes for the smaller glasses.
2. Apply Gaussian Blur on them to create a little fog/cloud look but not too dispersant.
3. Bind this layer to the one you've duplicated few ago. (Check the image below if you're not sure what i meant with bind)
I made a new layer and added a really soft shadow on the top of the small glasses (using the same black line and Gaussian Blur method), since it looked too bright. Blending mode: Soft Light at 100% opacity.

Step 12
Now merge everything that has to do with the glasses less the ground shadows (obviously the background is not included, this has nothing to do with the glasses). You should end up with an unique layer with all the glass information you've made up until now. Select all the layers with CTRL + Mouse's left button then right click and click on Merge Layers.Now duplicate this layer and set it's Blending Mode to Soft Light and Opacity 35%.
As you can see the edges look much better but the inside looks not so good, the lines are way too intense. Using the Eraser Tool (E) start slowly cleaning the inside area (not completely), you'll need to play with the tool's opacity as well as the eraser's size too. For example you may want to use 60-70% of the eraser's opacity in the exact middle and 30% near the middle's surrounding areas. Don't touch the limit edges and avoid cleaning much the surrounding areas of them.

Step 13
We're done with the glasses structure and look for now. We'll start the most time consuming and tiring part now, it's pretty much about repeating over and over - the fading/breaking apart effect.Before starting this process make sure you duplicate your glass's layer and hide it, you may need it in case you do some major mistake.
- Begin with the main glass, use the Zoom Tool (Z) until the left top part of the main glass fills your screen (as you can see in the picture). Using the Pen Tool (P) with the Paths setting, start by drawing in (a selection) a random shape on the edge of the glass.
- Once you've got this selection shape click on CTRL + C to copy the glass's part you've just selected, then click CTRL + V to paste this area in a new layer.
- Now on the main menu click Select > Reselect and selecting the Glass's layer click on the key DELETE to clean that area from your glass's layer, don't do this on your new layer or you'll end up with an empty layer.
Check below to have a better idea of this method.

Step 14
Keep repeating this process, until you get many shapes off the glass and a considerable part of it fading away, this will take awhile, don't worry you'll get there with patience.Tips:
- Don't make them too bigger neither too small, neither all with the same size and shape!
- Avoid mixing the colors - the brown shapes should be the near brown texture of the glass and not near the yellow one.

Step 15
When you've made all the shapes you wish, let's build a movement effect. The pieces are moving away from the glass, they're going up-right so the tail/movement should be noticeable on it's back at the bottom-left.Merge all the shapes you have into one layer and duplicate it. In the bottom layer you'll apply Motion Blur: Filter > Blur > Motion Blur with an amount of 11 of approximated (check the direction in the image below).

Step 16
Move the Motion Blur layer a little to the bottom-left side, just use the ALT key to move it a really little bit. This layer will create an illusion tail behind the shapes.You should have something like this:

Step 17
Duplicate the Motion Blur layer and move it even more far away but since we're in a big zoom, that space is really really small, this step is to prolongate the tail. The opacity of this layer should be at 60%.Here you can see the difference between no tail and both tail layers:

Step 18
To end this process i added some sand look between the shapes and the glass, right int he edge of both of them.- To do this use the Brush Tool (B) with a size of 2-5, to select the colors use the Eyedropper Tool (I), place the sand depending on the glass's colors, if the near area is brown place the brown sand nearby.
- Apply a soft Gaussian Blur around 0.3-0.8 pixels.

Step 19
Alright, the fading effect for the main glass is now done. You'll need to repeat this process two more times now...In red you can see the zones from where i've created the fading effect on the small glasses.

Step 20
Once you've spent some nice hours doing this process over and over you should end up with something similar to this:
Step 21
Open the broken glass source in the top of this tutorial and let's add it to our environment:- Start by copying the whole image as it is now in a new layer in our work, don't worry about the black background.
- Set it's Blending Mode to Screen.
- Place it in front of the main glass, use ALT or CTRL + T to move + transform if you wish.
- As you can see it already looks good but it doesn't totally fit our scene, let's add some adjustment layers (they should be binded to the broken glass layer):
* Photo Filter - 67% of a medium yellow.
* Vibrance - -39 Saturation.
* Curves and Color Balance (check the image).

Step 22
Move to the background layer, using the Rectangular Marquee Tool select the sky zone, copy and paste it into a new layer. Set the Blending Mode to Overlay and opacity to 62%.
Step 23
Still on the sky, utilize the Quick Mask Mode to select the sky zone, try to keep the mountains out of the selection. Now add a level adjustment layer to it (check the image).Now select the levels layer you've just created and click on the mask, you'll get an auto selection the one you did on quick mask, now go on Select > Inverse and let's create another adjustment layer, Exposure this time (check the image).
Finally add a Curves adjustment layer to the whole background.
Don't forget all the adjustment layers are under the main menu's Layer > New Adjustment Layer.

Step 24
Open the birds source now. Using the Magic Wand Tool (W) on 70 tolerance, click on the sky and click on DELETE, most of the sky should get deleted, the rest delete it using the Rectangular Marquee Tool (M) since it's only some dark clouds at the bottom.Now copy this image to our work and place it near the background image but above the sky layer (the one we made previously). Now adjust the birds to the scene, use CTRL + T.
After placing them, add a soft Gaussian Blur to blend them better, around 0.2-0.5 pixels.

Step 25
Open up the last source, the raven. Render it with the Pen Tool (P), copy the rendered raven to our scene and place it on the left top of the left small glass. You may want to adjust it too using the CTRL + T.Once placed, create a new layer binded to the raven and add soft black brush to it's paws (Use the Brush Tool B). Change this layer's Blending Mode to Soft Light at 100% opacity.

Step 26
Using the Pen Tool (P) select the feather on the raven's tail. Start transforming it with the Warp (Edit > Transform > Warp) until you get a feather shape falling down.Create two feathers, one bigger than the other and place them falling from the raven's back, use ALT for this step.

Step 27
We're on the last steps so merge everything you've done.Duplicate this layer now and go to Filter > Other > High Pass and 60 radius. Now set this layer's Blending Mode to Soft light and opacity to 80%.

Step 28
Let's add a Photo Filter and Color Balance adjustment layers:
Step 29
To intensify the lights in the glasses, i added in a new layer some white spots (use the Brush Tool B) and applied a soft Gaussian Blur to it then changed the layer's Blending Mode to Overlay at 100%.Also added a black frame around the picture:
Select > Select All
Edit > Stroke > 10 pixels

Step 30
The final result should look similar to this:
Tidak ada komentar:
Posting Komentar