 How to create Christmas background with snowflakes and stars in Photoshop CS5In this tutorial, you will learn how to use brushes and custom shapes in Photoshop CS5 to create Christmas illustration in a few simple steps. It’s a simple trick to apply, but very useful. Read on to learn more.
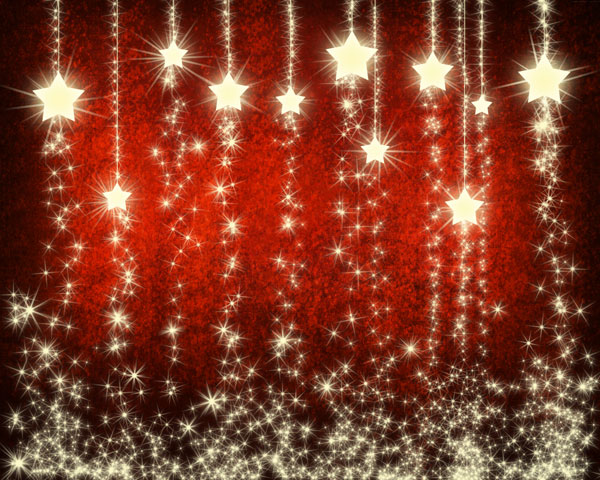
Final Image Preview
Start working by creating a new document (Ctrl+N) in Adobe Photoshop with the size 1280px by 1024px (RGB color mode) at a resolution of 300 pixels/inch. Download from Psdgraphics the next Red grunge background and insert it on a new layer in our main document.

Now download the next sets of brushes for in Adobe Photoshop, named: c130_splatter and stars_and_blinks. Create a new layer and select the next brush from c130_splatter set. The brush’s color is black (set the Opacity to 60% in Options bar).

Use this brush to paint on the background as shown:

Set Fill to 30% for this layer.

Make a copy of the last made layer and apply on the copy the next filter: Filter>Blur>Gaussian blur.

Set Fill to 30% for this layer and change the Blending mode to Hard Light.

Create a new layer and select again the next brush of the color #C78987 from c130_splatter set.

Use this brush to add some brushstrokes on the background as shown:

On the next new layer we’ll use the same brush from the earlier mentioned set of brushes. The brush color is #903E23.

Set the Blending mode for this layer to Color Dodge.

Create a new layer and select the Soft Round brush of black color (set Opacity to 20% in Options bar).

Use this brush to make darker the edges of the canvas.

Set Fill to 50% for this layer and change the Blending mode to Multiply.

Click Create new fill or adjustment layer from bottom part of the Layers panel and select Hue/Saturation.

Drag the sliders to the right to increase the Hue and Saturation values of the color range.

Click again on Create new fill or adjustment layer from bottom part of the Layers panel and click to Curves to adjust the curve shape as shown to make a little color corrections.

We’ve got the next result:

Using the Line Tool (U) with different weight value, we can represent the threads for hanging the stars. They have the color #FDF8C1.

Combine in a group all the threads’ layers (press CTRL button to select the necessary layers and hold on the left mouse’s button while dragging the selected layers on Create a new group icon from bottom part of the Layers panel). Set Opacity to 70% for the group.

Select the Custom Shape Tool (U)in the Tools bar, in the Options bar click the Shape to open the selection menu. Find 5 Point Star at the bottom of the menu, and then double-click a shape thumbnail to select it.

Click and drag to draw a star of the color #FDF8C1.

Click on Add a layer style icon from bottom part of the Layers panel and select Outer Glow.

Add Inner Glow.

We’ve got the next result:

Make ten copies of the star’s layer and apply the Free Transform (Ctrl+T) command to change the copies’ sizes, placing them as below:

On the next new layer we’ll use again the next brush from c130_splatter set. The brush’s color is white.

Use this brush to paint on the background as shown. Place this layer under the stars’ layers.

Set the Blending mode for this layer to Overlay.

Create a new layer and select the next brush from stars_and_blinks set. This brush will be helpful in drawing the garlands. The brush has the color #FDF9CA.

We need to customize our brush in Brushes panel (F5), select the Brush Tip Shape. Click and drag any of the sliders to change the size, the spacing and brush angle as show. The Preview window displays the changed brushstroke.

Go to Shape Dynamics:

Now you can paint the garlands as shown. This layer needs to be situated under the stars’ layers.

Make a copy of the last made layer and select for the copy the next filter: Filter>Blur>Gaussian blur.

We’ve got the next result:

Insert the mask on the layer by choosing Add layer mask on the bottom part of the Layers panel and choose the Soft Mechanical brush of black color (set Opacity to 10% in Options bar).

Use this brush to paint in the mask to hide a little bit the sparks as it is demonstrated below:

Create a new layer and use again the brush from earlier applied set (stars_and_blinks) to represent many rays under the stars. The brushes have the same color. Place this layer under the layers containing the stars.
Set Fill to 20% for this layer.

Make a copy of the recently made layer and choose for the copy the next filter: Filter>Blur>Gaussian blur.

We’ve got the next result:

Set Fill to 50% for this layer and change the Blending mode to Pin Light.

Click Create new fill or adjustment layer from bottom part of the Layers panel and click to Curves to adjust the curve shape as shown to make a little color corrections.

We’ve got the next result:

Click again Create new fill or adjustment layer from bottom part of the Layers panel and select Hue/Saturation.

Drag the sliders to the right to increase the Hue, Saturation values of the color range and drag the slider to the left to decrease the Lightness.
Finished!

Tidak ada komentar:
Posting Komentar