
Today we are going to be making a Forest Fairy Wallpaper. Fairies or Faeries are these wonderful symbols of nature and harmony. I decided given the time of year it is this would be a perfect time.
Let’s begin. Start by clicking here and downloading a new image to create a brush with. With the LeafBrush.jpg saved to your machine. Open it in PhotoShop. Then go to Edit > Define Brush Preset… name the New Brush “Leaf”. Then close that file you will not be needing it any more.
Next save this file. Open the Forest.jpg file in PhotoShop.

Next download and open the CobbleStone.png here. Place the Cobble Stone into the Forest document. Place it just over the forest bed.
Next scale down the height to 40% and the width to 92%. You do this by going to Edit > Transform > Scale. Once you have scaled the Cobble Stone Go back to the Transform selection and select perspective. Then use what you think is best to make it look like it is part of the forest floor. Set the layer blend to “Lighter Color”

CTRL+Click on the CobbleStone layer to make a selection. Then select the base layer and using the Magic Wand tool copy the selection to a new layer. Then move the newly created layer just above the cobblestone and grab your eraser tool set the opacity to 20% and the hardness to 0. Erase from the center of the stone but leave a bit of the groundcover covering the stone. This way it gives it more of a feel like nature is reclaiming it. Set the layer to luminousity.

Once again CTRL+Click the CobbleStone layer. Make a new layer and fill the selection with black. Set the fill to 0%. Open your Blending options. We are going to add a Gradient Overlay. Once you have The Gradient Overlay option selected Change the Starting color to (#7D910F) and the Ending color to (#AEC31F). Set the opacity to 100% and hit OK.

Next select your Pen Tool and make a selection of the Forest floor around the outer edge of the coblestone using the base layer as a reference. Once you have a sufficient amout outlined with the pan tool. Select the Paths Palette and CTRL+Click the work Path layer to make a selection. Go back to your layer palette and make sure that the base forest layer is the active layer. Copy the select to a new layer. Finally move it above the Gradient overlay layer.

Make a new layer and grab your Pen Tool. What we are going to do now is Enhance the Sunlight beaming through the trees. Make your outline look like the image below:

With your selection made fill it with White. Then go to Filter > Blur > Gaussian Blur Set the Radius to 60.0 and Hit ok. Next Set the Layer Opacity to 10%.

Now we need to add our main focal point “The Fairy”. Download the fairy file here if you have not already. Place her in the main tutorial and place the tip of her boot in the center of the CobbleStone. Scale her down so she is not larger then life. Then we are going to add a few slight blending options so she looks like she fits better. Go into the layer blending Option and select “Drop Shadow”. Set the color to Black and the mode to multiply. Make the Opacity 20% and the Angle to 135. And Set the Distance and Size to 5. Then Select the “Inner Glow” and set the color to Black again. Make the opacity 10% and the size to 51.

Next CTRL+Click the Fairy layer to make a selection. Make a new layer and fill the selection with Black. Then go to Filter > Blur > Gaussian Blur Set the Radius to 30.0 and Hit ok. Next go to Edit > Transform > Rotate and rotate the object to a 50 degree angle. Now place the object shoe tip to shoe tip. Set the Layer Fill to 60%

This next step can be done one of two way. With both you need to make nice with your pen tool. I will explain the hard way then I will explain the way I did it. Ok. This next step we are going to change the color of the Fairy’s clothes. The long way is to use the pen tool and cut around only her clothing and Then make a selection and Copy the clothing into a new layer. Then adjust the hue to a greenish color. This is very time consuming and can get a little annoying if you do not like the pen tool. The way I did this was duplicate the fairy layer. Then hit CTRL+U and set the hue to -90. Then useing the pen tool cut out her body and leave the clothing. Finally set the Opacity to 60%.

Just as before when we enhanced the Sunbeam we are going to enhance the shadowing. Again Use the pen tool to make a selection like below:

Make a new layer and fill it with Black. Then go to Filter > Blur > Gaussian Blur Set the Radius to 80.0 and Hit ok. Then set the file to 30%
Next we need to enchance the brighter beams just like we did before. So grab your pen tool and make outline of all the smaller more focused light beams. Make a new layer and fill those selections with white. Then go to Filter > Blur > Gaussian Blur Set the Radius to 50.0 and Hit ok.

Remember the Leaf Brush you made now is when we are going to use it. Select your brush tool and make sure the leaf pattern is selected. Set the brush size to 50. Then we are going to change the brush dynamics. Select brush Dynamics then set Size Jitter to 100%, Minimum Diameter to 25%, and Angle Jitter to 30%. Next select Scattering. Set the Scatter to 148%. Lastly select Color Dynamics. Set the Hue Jitter to 20%, Saturation Jitter to 10%, The Brightness Jitter to 22%, and the Purity to -43% and hit Ok. Then select a nice redish brown color for your foreground. Then reselect the Pen Tool.
With the Pen Tool Selected make a swirling pattern around the fairy. When you have the pen line the way you like Right Click and choose “Stroke Path” Make sure simulate pressure is NOT selected and hit OK. Next CTRL+Click the Fairy layer to make a selection. Then erase some of the leaves so they look like they are swirling around her. Finally add a Slight Motion blur of between 2 -4 pixels. You should have something like below:

Duplicate the leaf layer and set the Opacity to 50% and the Layer Mode to linear Blur.

This next part is totally optional. I just think it adds to the scene. Search for some woodland creatures. I chose a Rabbit and a Tree frog.

The rabbit is what I will explain since I actually had to edit him a bit. First find a good large photo of a hare on google. Then using the Pen Tool Cut him from the back ground and place him in our wallpaper. Scale him down to look proportional to the rest of the image. Next select your Pen Tool and make a selection of the Forest floor around the bottom of the rabbit and delete that section from the hare. Then go into the blending option and select inner glow. Set the opacity to 40%, the color to Black, The mode to Normal, Finally set the distance to 5 and hit OK.

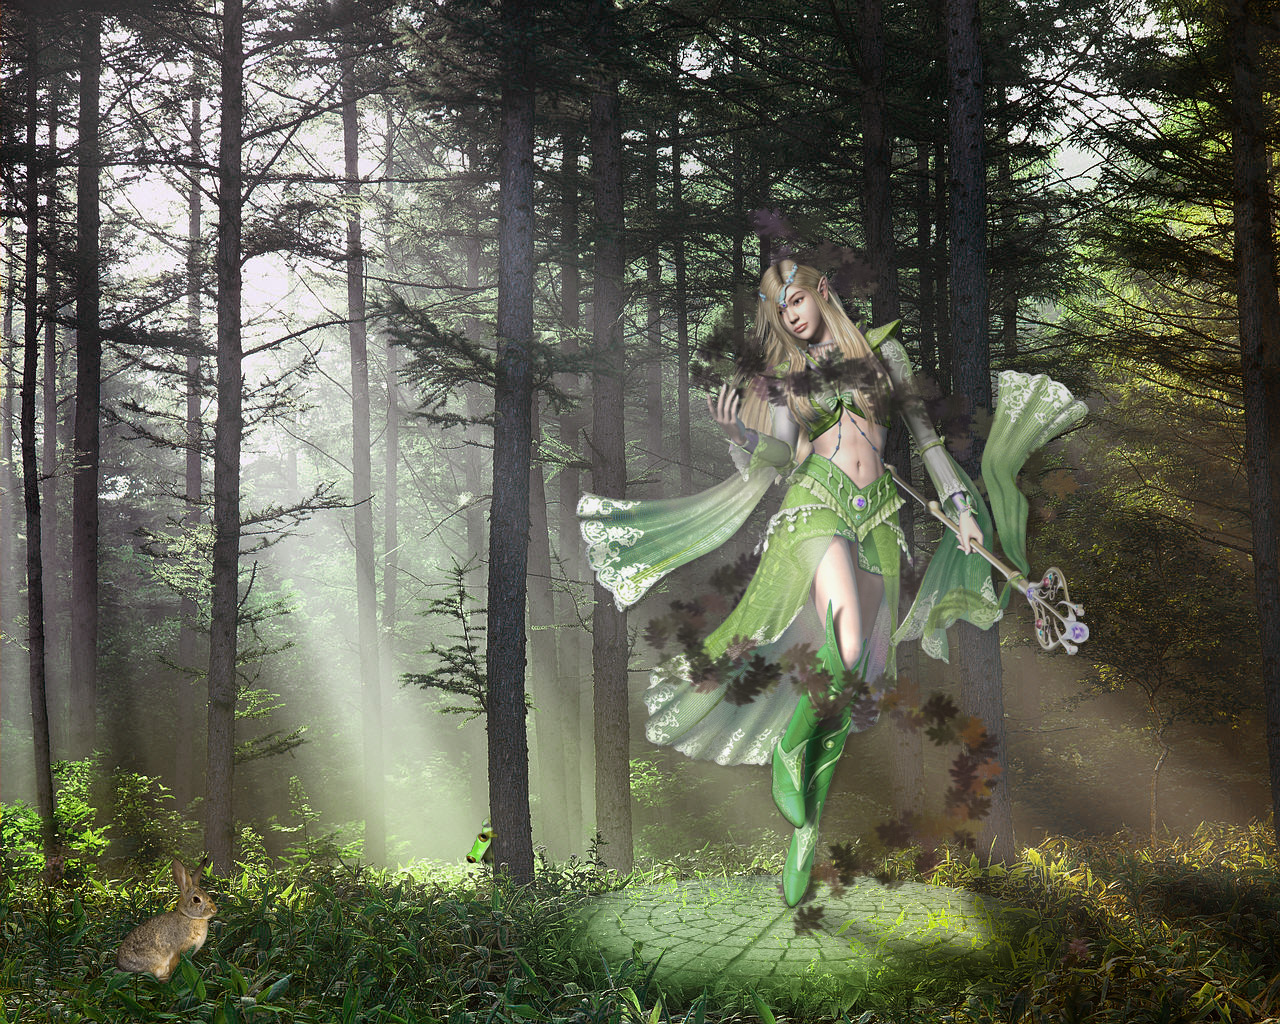
Make a New Layer. Now we are to the final Blending option. Select your bursh and choose the Size 45 Airbrush with 50% flow. Then use these 4 colors to fill the new layer with ( #1b82e6, #1fe5e1, #62e121, #e3e11b ). Once you have the new layer filled to your liking. CTRL+Click the Fairy again to make a Selection of her then ATL+Click the two leaf layer to remove them from the selection. Finally CTRL+Click the Rabbit layer to add his selection and hit Delete to remove the selections from the Color Fill layer. And Lastly set the layer Mode to Hue and the fill to 40%. And your Done. I hope you enjoy.
Please feel free to add links to your versions and I will Post them so everyone can see.

Tidak ada komentar:
Posting Komentar