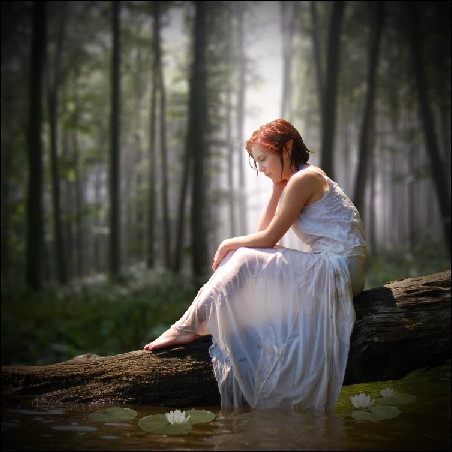
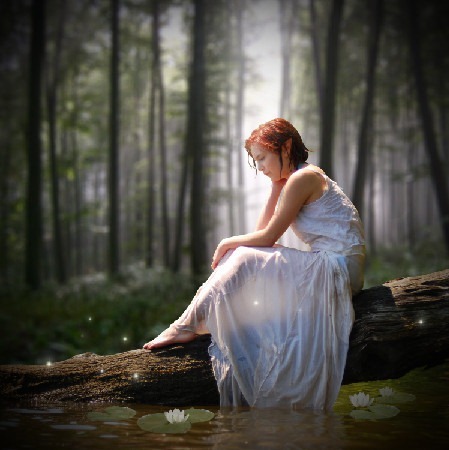
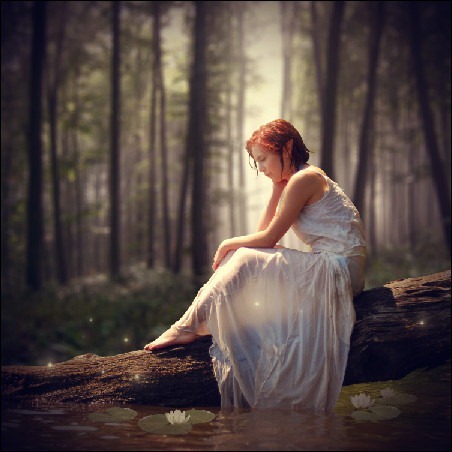
This photo manipulation tutorial will show you how to create this realistic fantasy image by combining several photos together and finishing it with water lilies and fairy dust. You will learn how to compose an image using multiple photos, simulate depth of field, and warp a persons ear to an elf ear.
Preview of Final Results
Magical Forest Photo Photoshop Tutorial
Tutorial Details
- Program: Adobe
 Photoshop CS2
 - Difficulty: Easy
- Estimated Completion Time: 1 to 1.5 hours
Resources
Step 1 - Create the Photoshop document
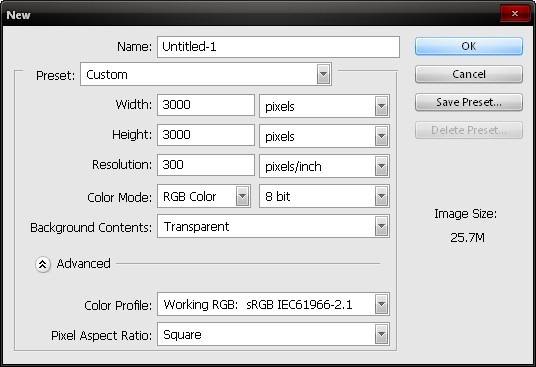
To start, we will need to create a new image file, go to the Menu bar and click File > New, and then input the following values on their respective fields:
- Width: 3000 pixels
- Height: 3000 pixels
- Resolution: 300 dpi
- Color Mode: RGB Color; 8bit
- Background Contents: Transparent
Step 2 - Create the forest background
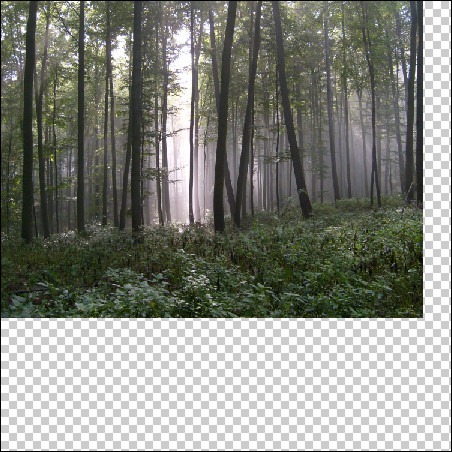
On this step, we will be creating our background. We will start by opening the stock image: Enchanted_forest 15 and transferring it to our 3000x3000 canvas by dragging it using the Move tool (V). To use the Move tool, simply press V on the keyboard and left-click on the image and then drag that image to the canvas. The image below shows the stock image after it has been dragged to the canvas.
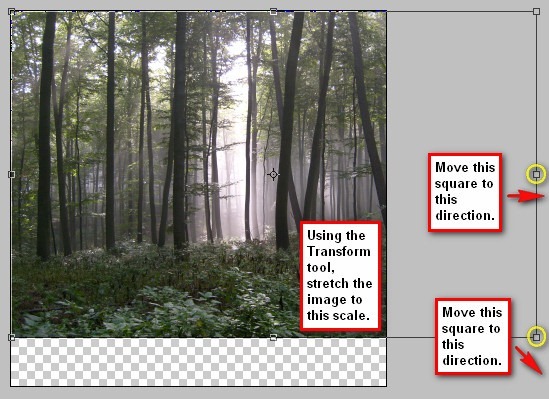
Now that it is in place, we will transform it. To transform we will need the Transform tool (Ctrl/Cmd + T). To use the Transform tool, simply put your cursor on the squares and then drag it to the direction of your choice. In this tutorial, we will follow the direction stated on the images below.
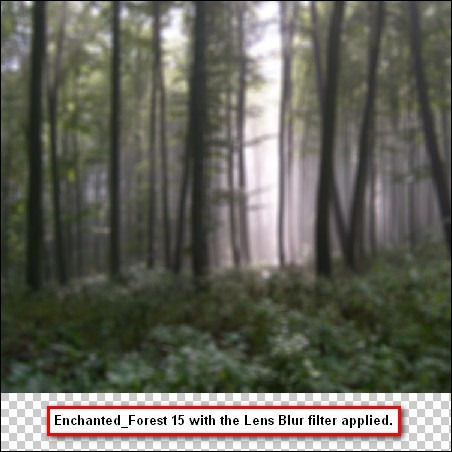
Next, we will be applying a Blur filter to the background to give it a small DOF (Depth of field) to emphasize our subject later on. To activate the Blur filter, go to Filter > Blur > Lens Blur. Once the box opens, let us apply the following settings:
- Check More Accurate
- Iris
- Shape: Octagon (8)
- Radius: 41
- Blade Curvature: 0
- Rotation: 0
Once you’re done, the result should be similar to the image below:
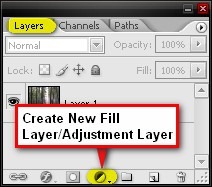
Now we will be increasing the contrast of the white areas and dark areas of our image and for us to achieve a good output, we will need a Gradient Map filter. To activate that, just click on the Create New Fill Layer/Adjustment Layer button located on the Layer window which is just on the lower left side of the screen. See image below:
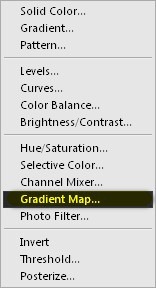
Click on that button and when the contextual menu appears, select Gradient Map.
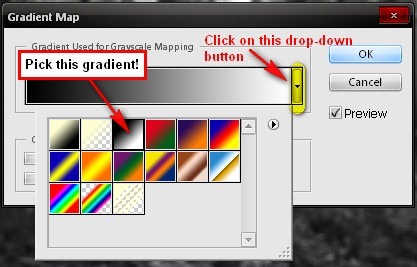
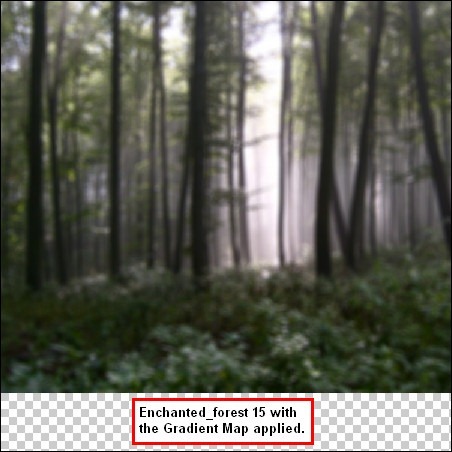
After clicking on Gradient Map, a box would appear, and then just click on the drop-down button to show the available Gradients. Pick the Black and White gradient as shown below:
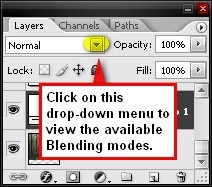
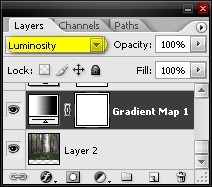
You will notice that upon clicking on the B&W gradient, the color of your work is now B&W! To apply the contrast change using the Gradient Map, we will change its Blending mode. The simplest way to change the Blending mode is through clicking on the drop-down menu with the text Normal on the layer window.
Let’s change the Blending mode to Luminosity.
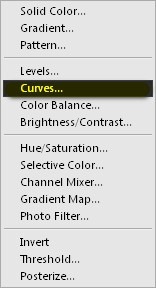
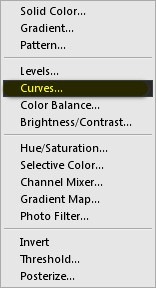
Next, let’s apply a Curves adjustment layer. To activate that just press the Create New Fill Layer/Adjustment Layer button and pick Curves from the contextual menu.
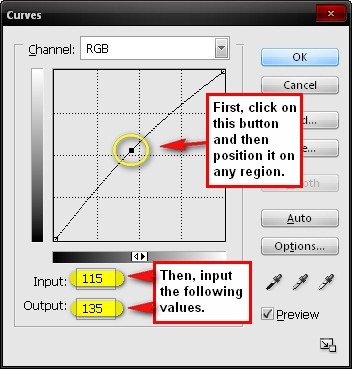
When the Curves tool opens, input the following on their respective fields:
Now, we will paint light to amplify the mood the forest creates. To do that, let’s first activate our Brush tool (B).
When you have it activated, we will now change its settings to the settings below:
- Brush size: 600px
- Hardness: 0%
- Opacity: 25%
- Flow: 100%
Note: To reduce the Hardness, right click on the image while the Eraser tool (E) is activated, then you’d see the Hardness scale, which is at default – 100%, just move the slider to the left to get 0%.
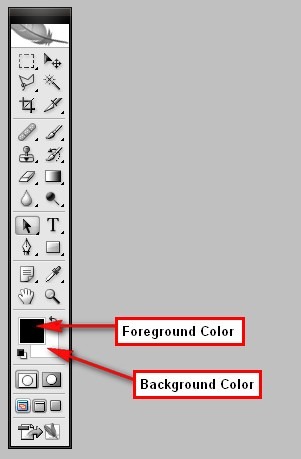
Also, we would need to change the Brush color. To change it, click on the Foreground Color on the Tools menu to bring up the Color Picker tool.
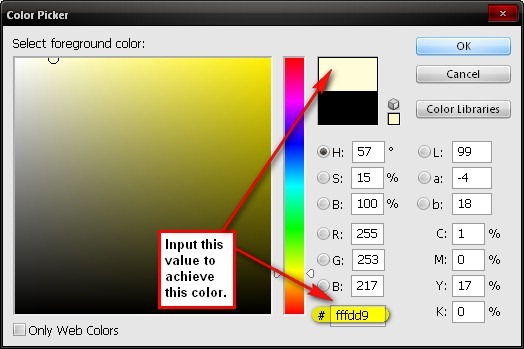
When the Color Picker tool opens, input the following values to the “#” box: fffdd9
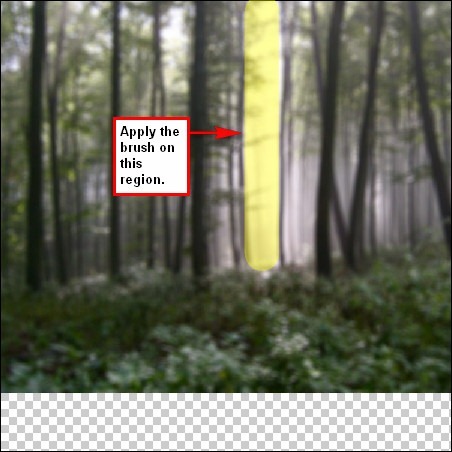
Before we apply the brush, we would need to create a layer first. To do that, just press Ctrl/Cmd + Shift + N and then a box would come out. It will automatically ask you for the layer’s name; let’s name this layer: Light. Now, we’re all set to paint using the Brush tool (B). Use the brush on the region shown on the image below:
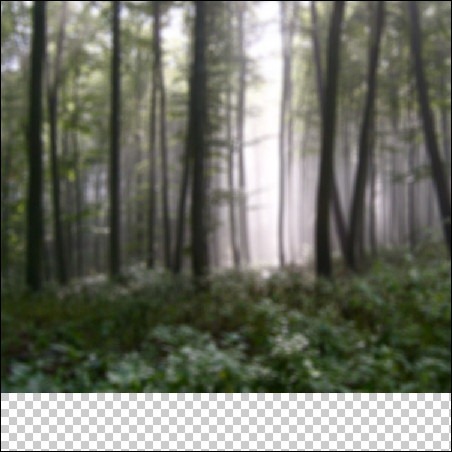
The result should be similar to this:
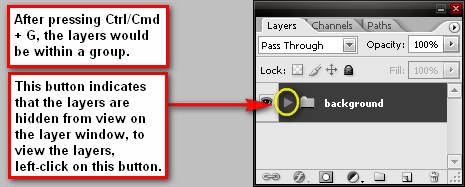
When you’re done, duplicate the layer “Light” by pressing Ctrl/Cmd + J. We duplicated it to increase the effect. Before continuing to the next step, let’s group the layers that we had just created. To group the layers, click on all the layers that we have made and press Ctrl/Cmd + G. After doing that, you’d notice that all the layers are now inside the group. Let’s rename this group to Background. To rename a group, simply click on the words “group 1” (etc) and a text box would appear and you may now rename it.
Step 3 - Create the lady on the log
Now in this step, we will be adding our subject – the lady on the log. First, let’s open the stock image – River 12. We will only be using the lady, the log and the small part of the river, and to be able to utilize those parts, we will need to cut it from the rest of the image. We can accomplish that through the Polygonal Lasso tool (L).
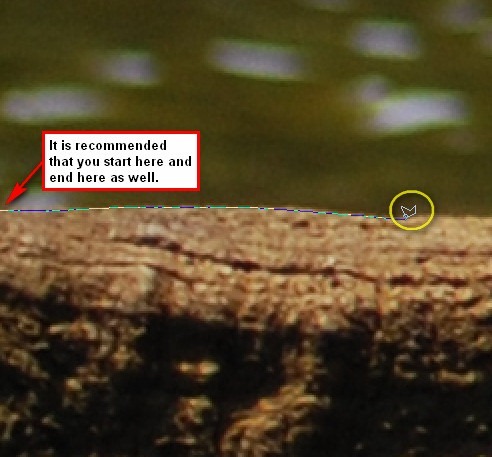
Now we will be cutting our subject from its original background, and we would need to do it accurately. For us to be precise, let’s zoom in on the image. Press Z to zoom in up to 200% or you may also type in the zoom level you want on the Navigator window. See image below:
On using the Polygonal Lasso tool, you first have to click on a point on the image and drag the cursor to the edges of the subject until you reach your starting point.
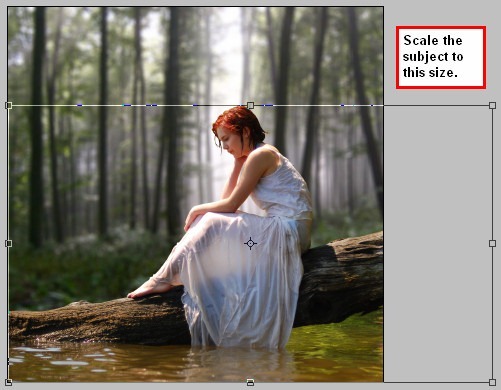
Once you’re done, drag the image within the selection (the dash lines from the end result of the Polygonal Lasso tool) to our canvas using the Move tool (V). Then once it is on the canvas, let’s transform it to a scale similar to the image below:
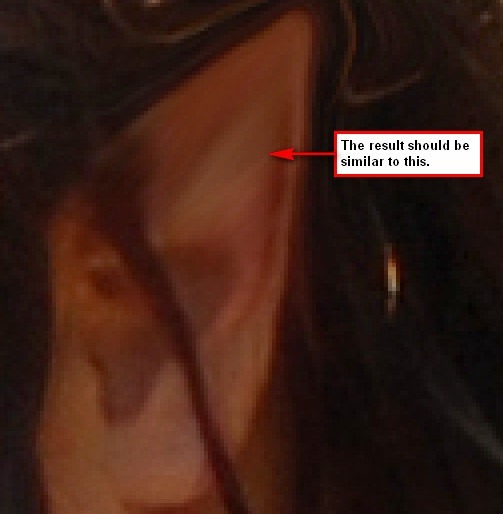
Now we’re going to change her ears to make her look like an elf. To do that, we’re going to utilize the power of the Liquify tool. Open the Liquify tool by pressing FILTER > LIQUIFY and when the box opens, apply the following settings:
- Brush size: 43
- Brush density: 43
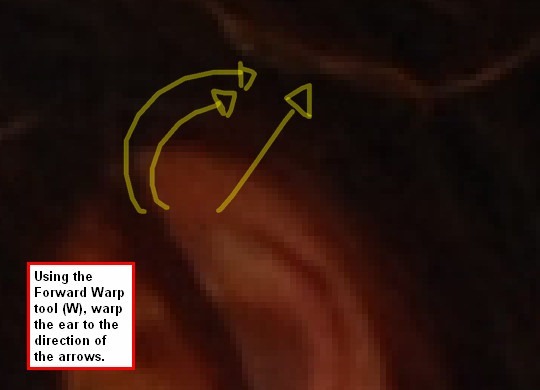
Then zoom in to the ear of the girl using the Zoom tool (Z) in the Liquify box. Zoom in to 400% for precision. When you’ve zoomed in, press W to activate the Forward Warp tool – this is the tool that we’re going to use to transform the human ear to an elf ear. Now we’re all set, let’s just follow the instructions on the image below.
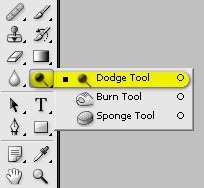
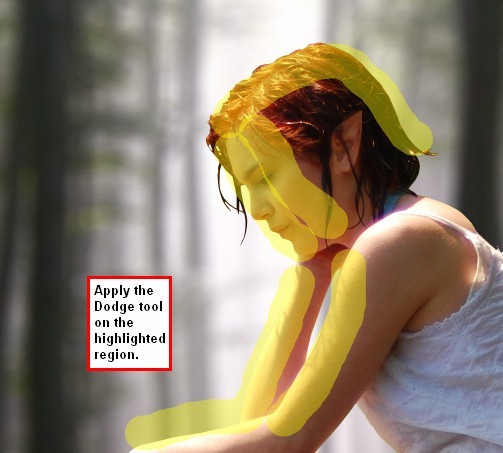
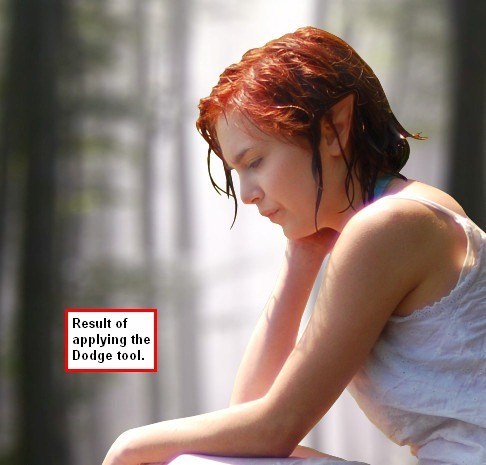
Next, let’s brighten up the woman’s face to bring out her beauty and also to enhance the light. We will be using the Dodge tool for this, activate the Dodge tool (O) from the Tools menu.
Use the following settings for the Dodge tool:
- Brush size: 200 px
- Range: Midtones
- Exposure: 15%
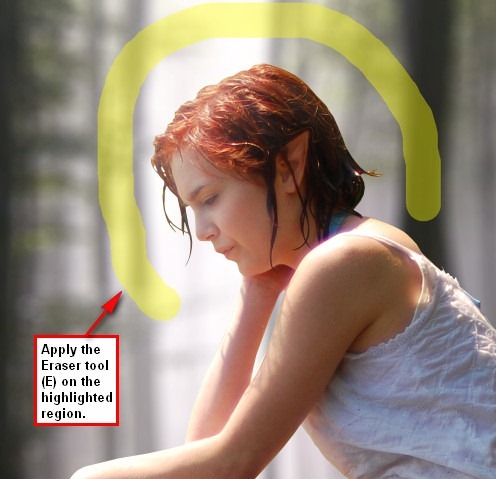
Now, enhance the light more by erasing on the edge of the woman’s face to bring out the light from the background. Activate the Eraser tool by pressing (E) and when it is activated, use the following values:
- Brush size: 500 px
- Hardness: 0%
- Opacity: 100%
- Flow: 100%
Use the Eraser on the region shown on the image below:
Now that that’s done, group the layers that you had just created and then name the group to Elf.
Step 4 - Add water lilies
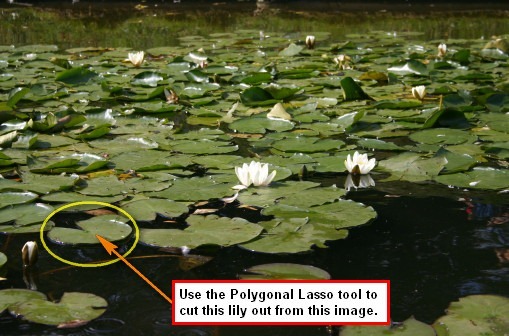
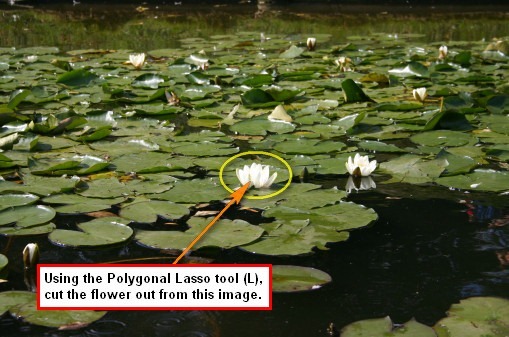
In this step, we will be adding water lilies on the surface of the water. To start, let’s open the stock image: Water lilies. Upon opening, activate the Polygonal Lasso tool (L) because we would need to cut one lily from the image. See image below:
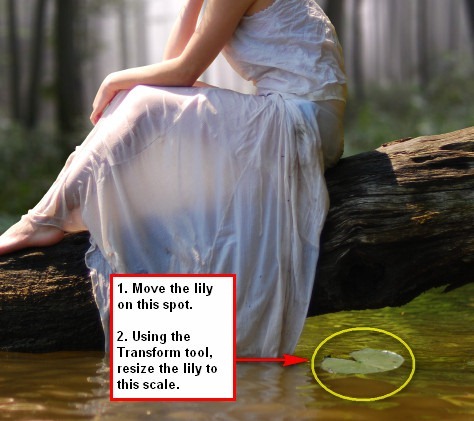
Now after cutting that, let’s proceed to moving it to our canvas. Use the Move tool (V) once again to transfer it to our canvas. Upon moving, rename the lily’s layer to lily 1 and then activate the Transform tool (Ctrl/Cmd + T) and resize the lily as seen on the image below.
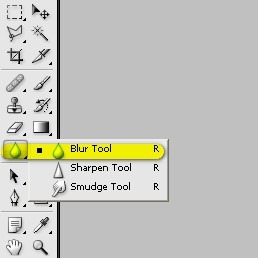
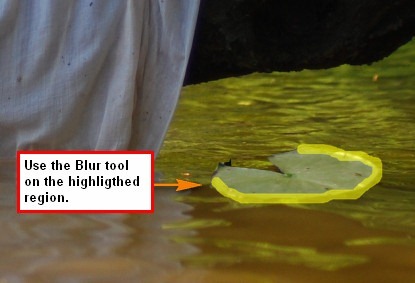
After that, we would need to blur the edges of the lily to make it look more authentic. Activate the Blur tool by pressing R.
Once activated, use the following values:
- Brush size: 30px
- Mode: Normal
- Strength: 100%
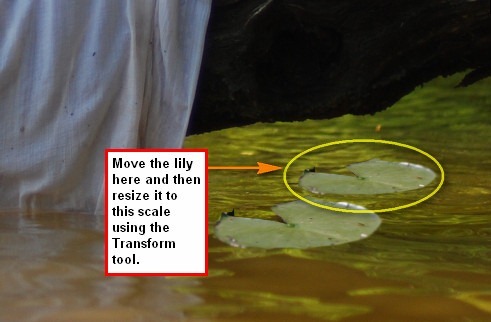
Now we’re going to add more lilies to the image. To do that, click on the layer: lily 1 or our original lily layer and then hit Ctrl/Cmd + J to duplicate it. After that you’d notice that a new layer has appeared with the name of lily 1 copy. Activate the Transform tool and resize this image as seen below:
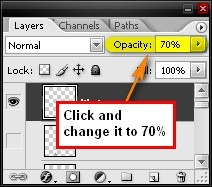
To give it depth, let’s change the Opacity of that layer. To do that, reduce its Opacity to 70% from the Layer window.
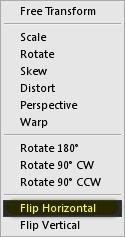
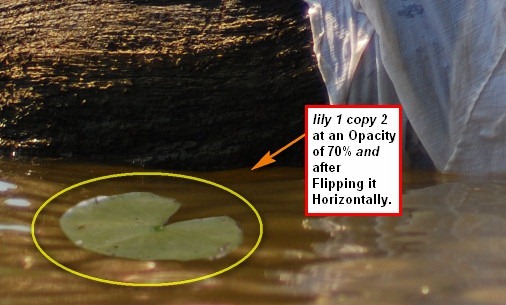
Duplicate lily 1 again then activate the Transform tool. This time we won’t be scaling it, we would still retain the same size but we would be changing its position. Upon activation of the Transform tool, right click anywhere on the image and then hit Flip Horizontal.
After flipping it horizontally, change its Opacity to 70%.
Duplicate lily 1 once again (lily 1 copy 3) and then activate the Transform tool. Resize and position it similar to the image below:
Note: To change the position of the layers, just click on a layer and then drag it to the desired position.
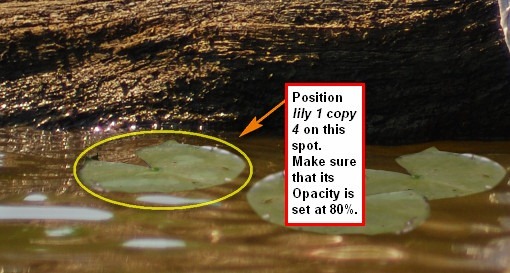
Duplicate lily 1 one final time (lily 1 copy 4); reduce its Opacity to 80% and then position it to the spot indicated in the image below:
Now we will be adding the water lily flowers. Open the stock image: Water lilies once again.
Move the image that you selected with the Polygonal Lasso tool to our canvas and then rename it to Lily 2.When it is on our canvas; let’s change its Brightness/Contrast to blend in with the image. To do that, select the layer lily 2 and then go to Image > Adjustments > Brightness/Contrast, when it opens input the following values:
- Brightness: -63
- Contrast: -52
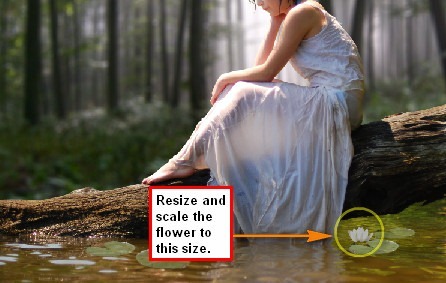
After that resize and scale it to the size shown on the image below:
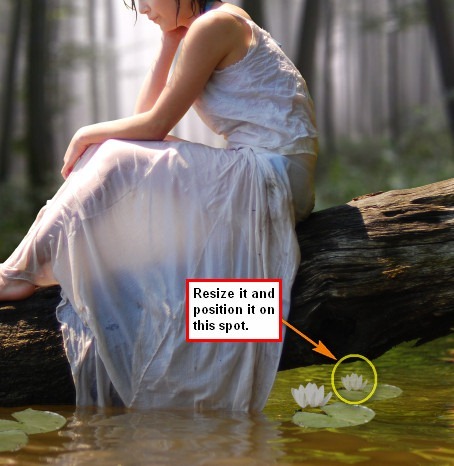
Next, let’s add more lily flowers. To do that, we will do the technique we used earlier with the lilies – duplication and opacity reduction. First, click on lily 2 and then hit Ctrl/Cmd + J to duplicate it. The result will be a new layer with the name: lily 2 copy. When this appears, reduce its Opacity to 80% and then resize the new layer and position it as seen on the image below:
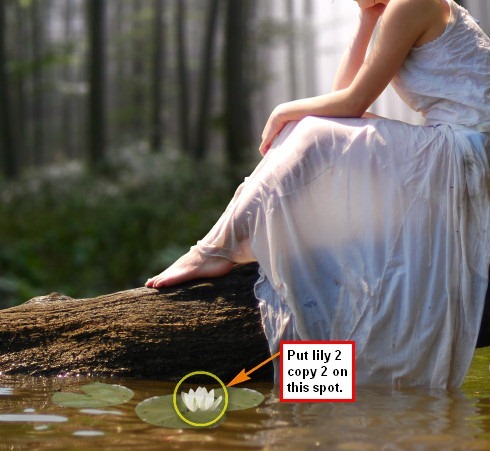
Duplicate lily 2 once again (lily 2 copy 2), but this time, change its Brightness to +40 because the sun is shining brightly on the part where we will be putting it. After you do that, activate the Transform tool and reposition the image according to the image below:
When you’re done, select all these layers and group them. Name the group to water lilies.
Step 5 - Create a Vignette
In this step, we will learn how to create a vignette which will help enhance the focus on our subject. To start, go to the Menu bar and click on File > New and use the same settings we used to create our canvas. (Refer to Step 1). Take note, the background contents should be white.
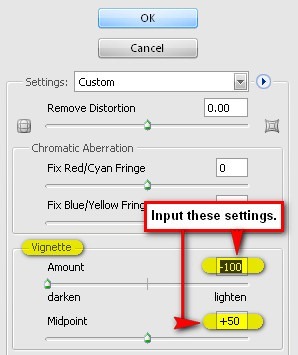
- Once it has been created, go to Filter > Distort > Lens Correction. Find the tab Vignette and use these settings:
- Vignette amount: -100
- Midpoint: +50
Now that that’s done drag the vignette to our canvas using the Move tool (V) and put it on top of all the layers that we’ve created, and then set the following:
- Blending mode: Multiply
- Opacity to 100%
After that click on the vignette layer that we’ve just created and then duplicate it (Ctrl/Cmd + J). We duplicated it to create two vignettes, each at 100% on a Multiply blending mode. The result of the vignette should be similar to the image below:
Step 6 - Add the magical lights
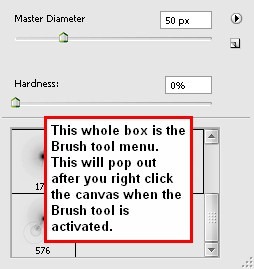
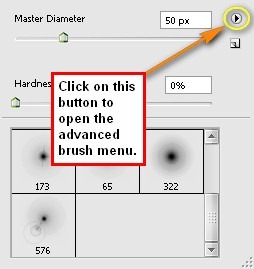
In this step, we would be adding magical creatures that produce light. In some fantasy stories, these creatures are called Wisps. Anyway, let’s start by creating a new layer above the vignette layers. To create a new layer again, just press Ctrl/Cmd + Shift + N and then name this new layer: wisps. Now activate the Brush tool (B) and then let’s open the downloaded brush pack: kuschelirmel star brushes. To open that, you should have the Brush tool activated. After activation, right click anywhere on the canvas to show the Brush menu. Refer to the images below:
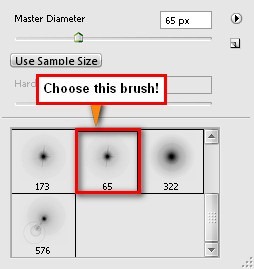
Now after the star brushes have been loaded, it’s time to choose the brush to be used. Choose this brush:
Then let’s set the brush settings to the following:
- Brush size: 40 - 60 px
- Hardness: star brush default
- Opacity: 100%
- Flow: 100%
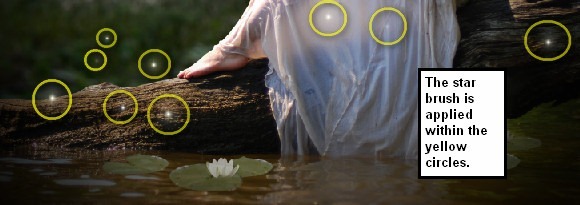
Now we’re all set to paint! Follow the instructions on the image below:
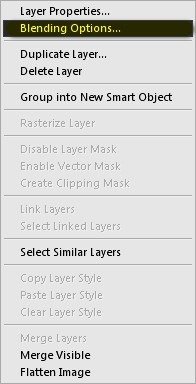
Next, let’s change the blending mode of the wisps layer. There are ways to enhance the Blending mode of a layer, one is from the Layer window and the second one or the more advanced way is through right clicking the layer. So, let’s right click on the wisps layer and choose Blending options... from the contextual menu.
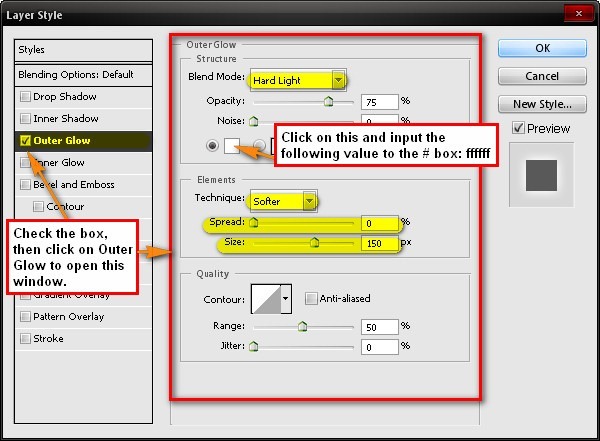
When the Blending Options… box opens, apply the following settings: Click on Outer Glow on the Styles menu.
- Outer Glow structure:
- Blend mode: Hard Light
- Opacity: 75%
- Elements:
- Technique: Softer
- Spread: 0%
- Size: 150 px
Step 7 - Retouch the image
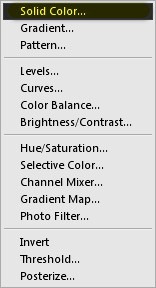
Now it is time, we enhanced the color of our image. We’re going to give it a fantasy artwork finish. Let’s start by adding Solid Colors. To do that, click on the Create New Fill Layer/Adjustment Layer button from the Layer window. When the contextual menu opens, click on Solid Color.
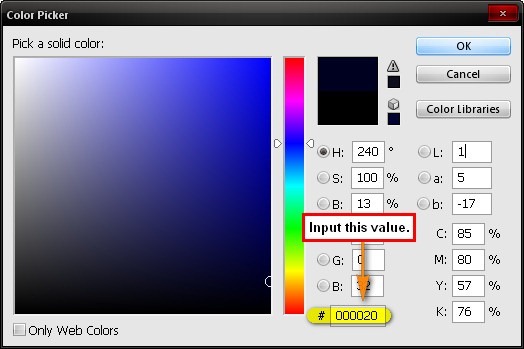
In the Color Picker window, enter in #000020
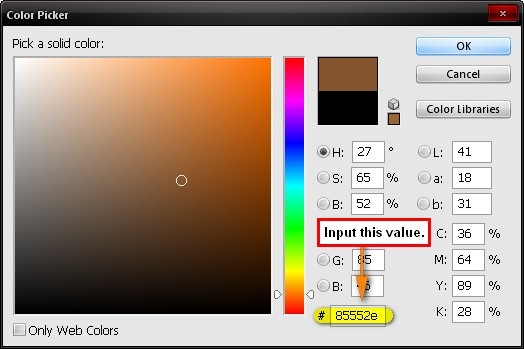
When you have it on the Layer window, change the Blending mode to Exclusion and the Opacity should still be retained at 100%. Next, let’s create the second Solid Color. Set the color to 85552e.
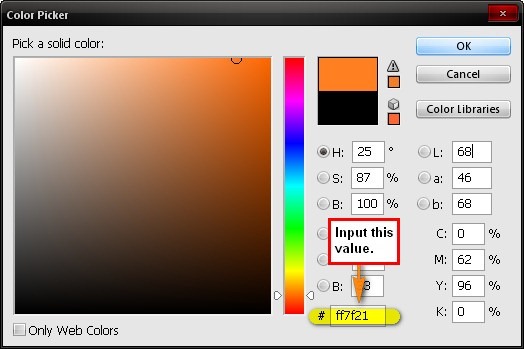
Then change the Blending mode to Soft Light and its Opacity to 40%. Next, let’s create Solid Color 3. Set the color to #ff7f21.
Then, change the Blending mode to Soft Light and the Opacity to 10%. The result of these solid colors blended together should be similar to the image below:
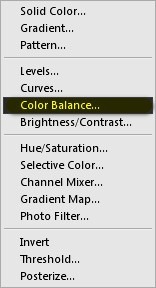
Next, let’s use a Color Balance adjustment layer from the Create New Fill Layer/Adjustment Layer button. Click on Color Balance from the contextual menu.
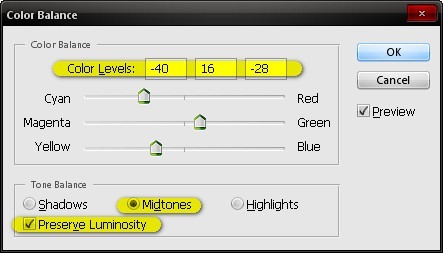
When the Color Balance box opens, apply the following:
- Color Levels: -40, +16, -28
- Tone Balance: Midtones
- Preserve Luminosity: Checked
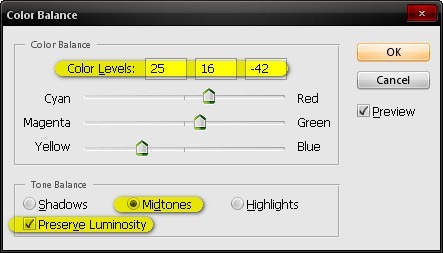
Next, let’s create another Color Balance adjustment layer but this time input the following values:
- Color Levels: +25, 0, -42
- Tone Balance: Midtones
- Preserve Luminosity: Checked
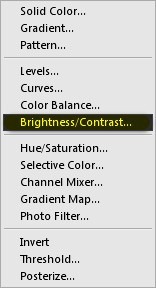
Now, let’s create a Brightness/Contrast adjustment layer.
When the Brightness/Contrast box opens, input the following values:
Next, let’s create a Curves adjustment layer. (For a recap on how to use the curves tool, refer to step 2)
Input the following:
Next, let’s create another Color Balance adjustment layer. This time input the following values:
- Color Levels: +25, 0, -25
- Tone Balance: Midtones
- Preserve Luminosity: Checked
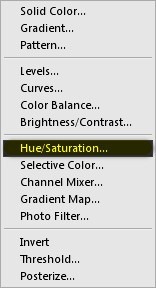
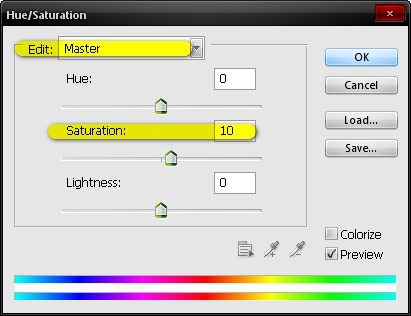
Finally, let’s enhance the color by creating a Hue/Saturation adjustment layer.
Input the following when the box opens:
- Edit: Master
- Saturation: +10
Final Results
![step7e_result[7] step7e_result[7]](http://photoshoptutorials.ws/images/stories/51a5adf03582_D47F/step7e_result7.jpg)
![step7e_result[7] step7e_result[7]](http://photoshoptutorials.ws/images/stories/51a5adf03582_D47F/step7e_result7.jpg)






![step7e_result[7] step7e_result[7]](http://photoshoptutorials.ws/images/stories/51a5adf03582_D47F/step7e_result7_3.jpg)

Tidak ada komentar:
Posting Komentar