
In this tutorial, I’m going to show you how to use the Pen tool in Photoshop to create your own custom shapes. I’ll take you through a series of exercises that will guide you through the basic, essential functions of the Pen tool.
About The Pen Tool
The pen tool is one of the few tools available to you in Photoshop that works with Vector Graphics as opposed to Raster Graphics. Vector Graphics use mathematical statements and points in order to define their shape and other characteristics, and therefore are very scalable. In other words, vector graphics can be scaled to any size without ever losing quality.With the Pen Tool, we can create lines and curves that can be put together to create custom shapes. If we combine the pen tool with some of the other vector shapes, we can create some intricate, scalable objects (I’ll be covering additional vector tools in other tutorials).
Getting Started
In order to help familiarize yourself with the pen tool, I’m going to take you through a series of examples that will show you how to draw and create some custom shapes.To begin, Create a New Document (I’m using 284×284 in my example, with default Photoshop Preferences).
Next, let’s enable the Grid. Go to View > Show > Grid, or Ctrl + ‘. Also Enable Snap (View > Snap, or “Shift + Ctrl + ;“).

We enable grid + snapping so that when we draw using the pen tool, we can easily make precise shapes, and curves with little effort.
Now select your Pen Tool from the toolbar, and set it up to work on Shape Layers in the Options Bar.

Select a foreground color of your choice.
Drawing with the pen tool is easy. Simply position your cursor where you’d like to begin drawing, and click to create your first anchor point. Subsequent anchor points will all be connected to the last point drawn, allowing you to create custom shapes. To complete a shape, click the first anchor point.
Go ahead an try it. See what you can create using basic anchor points. I managed to make a very primitive star.
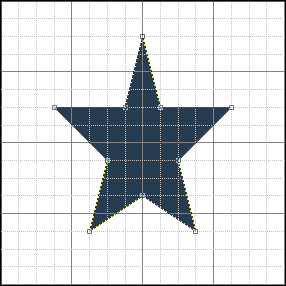
That’s simple enough, right?
Drawing Curves with the Pen Tool
You may have already noticed that something interesting when drawing curves, and dragging after clicking to create an anchor point. The lines begin to curve!Go ahead and try it. After creating an anchor point, hold down the mouse button and drag in the direction you want your line to curve.
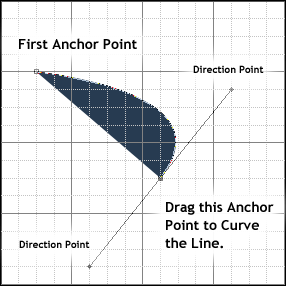
If you follow the below layout, you should be able to create a primitive circle shape.
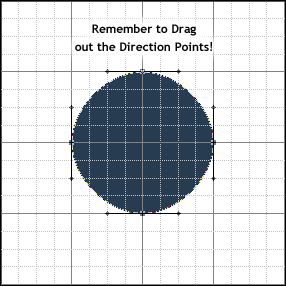
If you’re still having trouble, here’s a video that illustrates how to create the circle. When you see the icon change into a black pointer, that means that I’m DRAGGING once I create a point.
The curves characteristics are based on the length of these direction points, and at what angle they are drawn at. After some time practicing with them, you should become more familiar with drawing more complex curves. It should also be noted that you can change any directional points with the pen tool by holding Ctrl, or Ctrl + Alt.
Example:
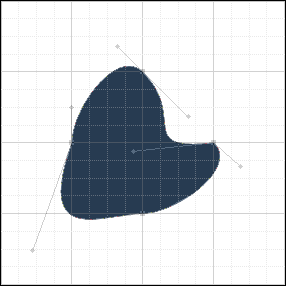
Example Shapes
Let’s take what we’ve learned so far, and apply it in some basic design. If you’re using the same sized document as I am (with default Photoshop grid preferences), you should be able to Copy + Paste these templates in your document, and follow my anchor points easily.First let’s make a Rounded Rectangle. We already have a custom shape that does this, but sometimes designs call for modified rounded boxes of sorts.
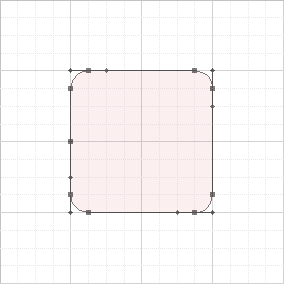
The Rounded Rectangle Shape uses basic curves, and is very simple to create. With some slight modifications, we can make rectangles with only 1, 2, or 3 of the corners rounded, while keeping the rest sharp corners.
Here is another template that focuses on “S” shaped curves, as seen in frequency waves.
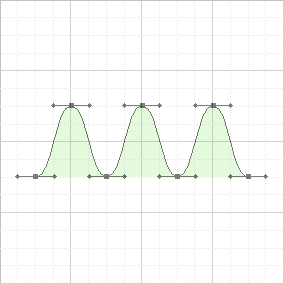
“S” curves are used all the time in more complex shapes. They are created by dragging the Directional Points of two sibling anchor points in the same direction.
For our last example, let’s make a “Pen Tool” custom shape!
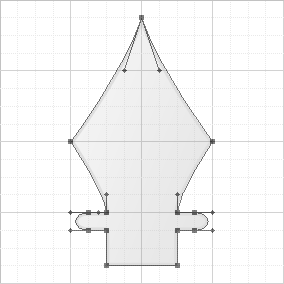
Creating an exact copy of this shape will require you to have some knowledge of the “Convert Point Tool” as well. Once your points are made, go back with the Convert Point Tool, click a point, then click and drag out the point so that you can manually modify the direction handles for custom curves. Try following the video below:
See how easy it really is? With a little practice and imagination, you can literally design anything you wish with the pen tool.
Conclusion
The Pen Tool provides a very simple way to work on custom shapes and paths inside of Adobe Photoshop, and allows users to easily create scalable objects. There are limitations to what can be done in Photoshop in terms of vector graphics, but that’s what we have Adobe Illustrator for!If you create a custom shape that you’d like to use later, you may decide to save it as a custom shape. To do this, right click the shape with the Pen Tool, and select Define Custom Shape. Remember, custom shapes can be changed to any size and NEVER LOSE QUALITY!
It only seems fitting to end this passage with a quote by Edward Bulwer-Lytton, “The pen is mightier than the sword.” In this case, I’d compare the sword to an ordinary brush used in Photoshop. However, each serves its place in Graphic Design, so it’s up to you as the designer to decide where to utilize each respectively!

Tidak ada komentar:
Posting Komentar