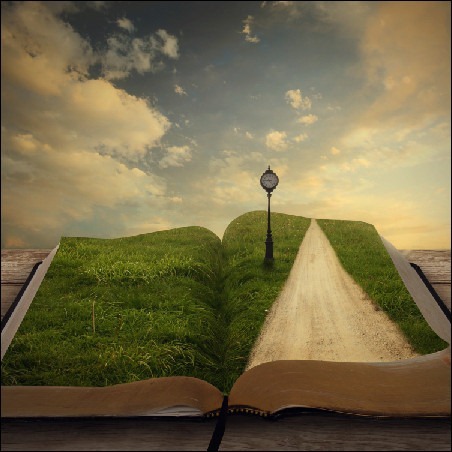
 Learn how to create this surreal photo manipulation in Photoshop. You’ll learn the basics of combining stock photos, how to blend them in by adding light and shadows, and complete it with a vintage photo effect.
rview of Final Results
Story Book Coming to Life Photoshop Tutorial
Tutorial Details
- Program: Adobe
 Photoshop CS2
 - Difficulty: Medium-Hard
- Estimated Completion Time: 1 hour
Resources
Step 1 - Create a new image
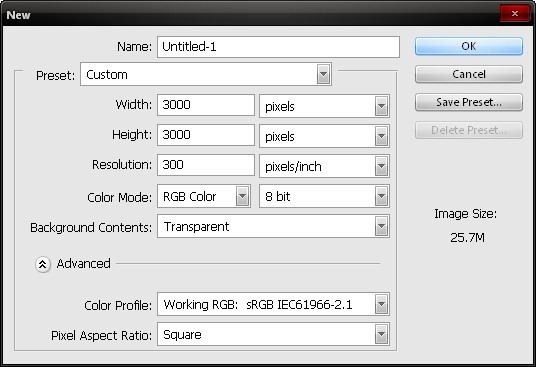
We will be creating a square canvas for this image so to begin, let’s create a new Photoshop document with the following settings:
- Width: 3000 pixels
- Height: 3000 pixels
- Resolution: 300 dpi
- Color Mode: RGB Color; 8bit
- Background Contents: Transparent
Step 2 - Create the background
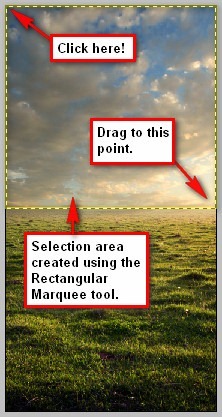
In this step, we would be creating our background, specifically the table and the sky. Let’s start by creating our sky. Open the stock image: Premade Background 20. We would only need the sky in this image so activate the Rectangular Marquee tool (M) and click on a point on the edge of the image and drag the mouse down to where the sky meets the ground. See image below:
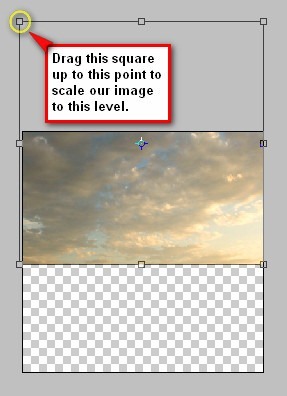
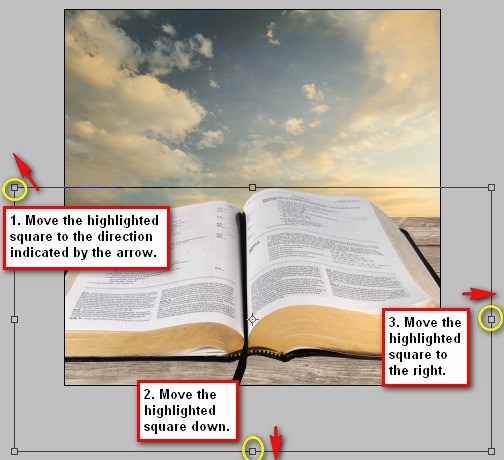
Now that you’ve selected the sky, activate the Move tool (V) then left click on the selected part of the image and drag it to our 3000x3000 canvas. As you can see, the image on our canvas is rather small so we would have to resize that. Activate the Transform tool (Ctrl/Cmd + T) and then right click on the image to bring up the contextual menu, when the menu pops up, click on Scale. Now the Scale tool helps in accurately resizing an image. To resize, just move the square buttons located on the edges of the image.
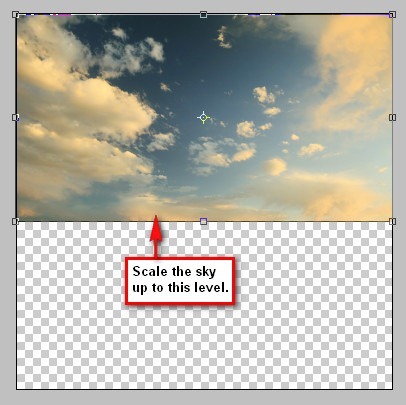
After that, let’s open the stock image: Orange Sunset. We would be adding this image to enhance the look and feel of our sky. thepirActivate the Rectangular Marquee tool (M) and then select the sky, and then drag that selected layer to the canvas. Once the new sky is on our canvas, activate the Transform tool (Ctrl/Cmd + T) and then scale the image as seen below:
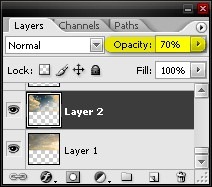
Now that our new sky has been transformed, let’s change its Opacity so it would blend in with the sky layer under it. On the Layer window, go to Opacity and reduce its level to 70%.
If you’d look carefully there are some clouds from our first sky layer appearing on the second sky layer. This doesn’t look good, so we would need to brighten that part.
To brighten that region we would be using the Brush tool (B). First, let’s create a new layer (Ctrl/Cmd + Shift + N) and when the box opens, change the name to brighten. Now, activate the Brush tool (B) and input the following settings:
- Brush size: 1000 px
- Hardness: 15%
- Opacity: 100%
- Flow: 100%
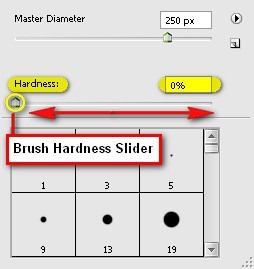
Note: To reduce the Hardness, right click on the image while the Eraser tool (E) is activated, then you’d see the Hardness scale, which is at default – 100%, just move the slider to the left to get 0%.
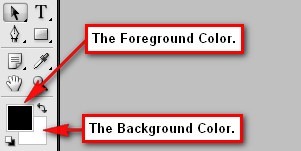
We would also need to change the color of the Brush to white. There are many ways to change the brush’s color, but for now, we will be learning how to change it instantly from black to white and vice versa. From the tools menu, you’d notice a black box and a white box.
Now to interchange these colors, simply left-click on the canvas and then press X and you’d notice that the two colors are changing positions. i.e. Black becomes the background color and the White color becomes the Foreground color. Now, let’s set the Foreground color to White. Activate the Brush tool (B) and paint white over the region shown on the image below:
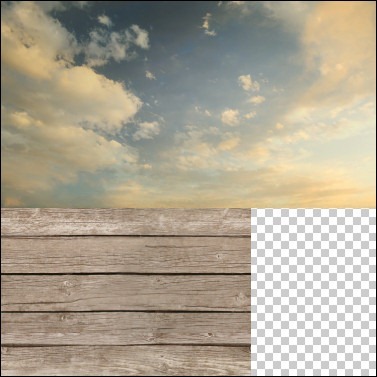
Now that the sky is done, let’s add the table texture. Open the stock image: Tileable Wood Texture and activate the Move tool (V) and then drag this image to our canvas.
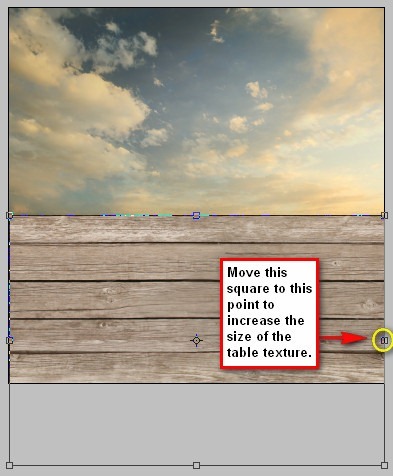
We would need to resize that, so activate the Transform tool (Ctrl/Cmd + T) and increase the size of the image as seen below:
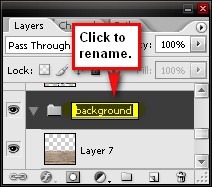
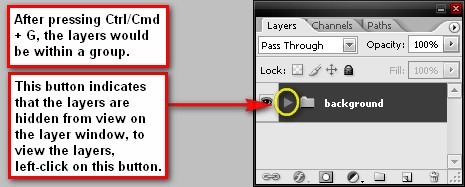
When you’re done, let’s group these layers by clicking on all the layers that we have clicked and pressing Ctrl/Cmd + G. After doing that, you’d notice that all the layers are now inside the group. Let’s rename this group to Background. To rename a group, simply click on the words “group 1” (etc) and a text box would appear and you may now rename it.
Step 3 - Create the book
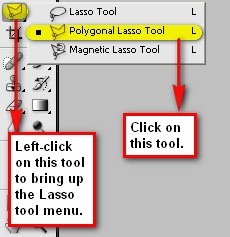
In this step we would be adding the book on our canvas, so to start, let’s open Book 2. Now, on this image, it would be quite difficult in selecting a part of the image, since we can’t use the Rectangular Marquee tool (M) on accurately selecting the book. So what we’re going to use is the Polygonal Lasso Tool (L). To activate the Polygonal Lasso Tool (L), follow the instructions on the image below:
To use the Polygonal Lasso tool (L) you simply have to left-click on a point on the book’s surface and then drag your mouse carefully around the book until you reach the point where you began. When you’re done, a selection area would appear on the places you dragged your mouse onto.
Now we’re ready to remove the book from its background. Activate the Move tool (V) and drag the selected image to our canvas and then rename the book’s layer to book. To rename a layer, simply click on the words “layer 1” (etc) and the text box would appear and you may now rename it.
Activate the Transform tool (Ctrl/Cmd + T) because we would need to resize the image. See further instructions on the image below:
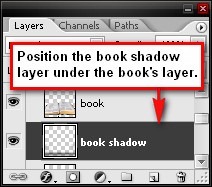
Now, let’s proceed to making the book’s shadow. Let’s create a new layer (Ctrl/Cmd + Shift + N) and name this layer book shadow. Make sure that this layer is under the book’s layer.
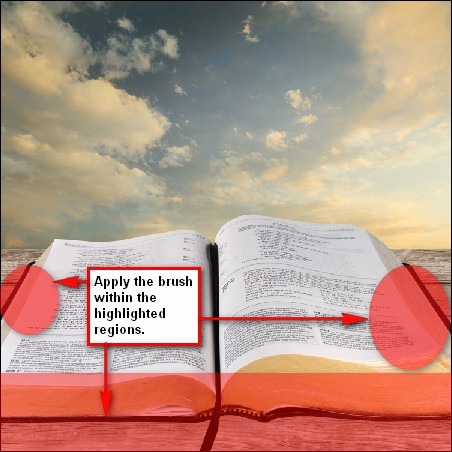
Activate the Brush tool (B), set the foreground color to Black and then use the following brush settings:
- Brush size: 1300 px
- Hardness: 0%
- Opacity: 15%
- Flow: 100%
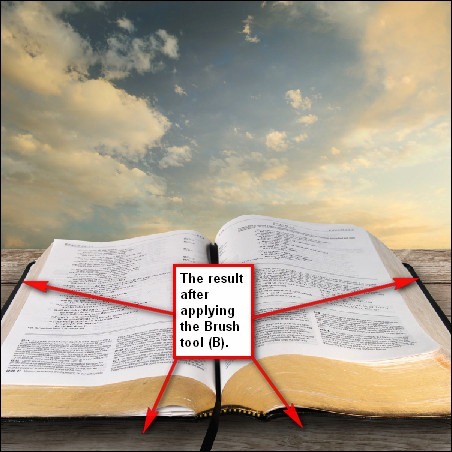
Before we begin, click on the book shadow layer to make sure that you are going to brush in the shadow on the right layer. Now, it’s time to apply the brush. See image below:
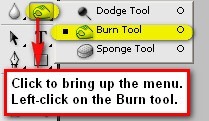
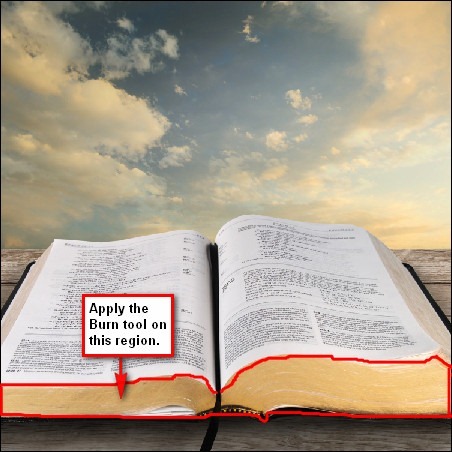
To add the shadow’s intensity, we will be utilizing the Burn tool (O) on the book to darken the part where little light is hitting it.
Activate the Burn tool (O) and input the followings settings:
- Brush size: 400 px
- Range: Midtones
- Exposure: 25%
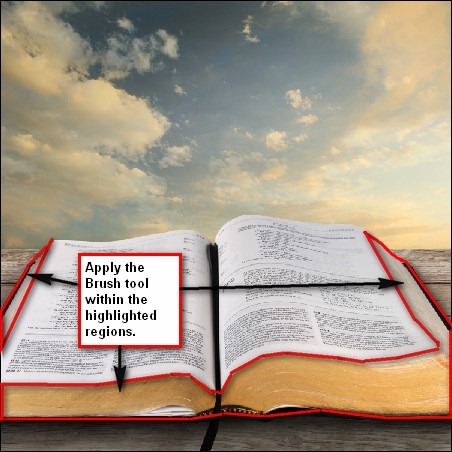
Now, we will darken the book to further increase the way it blends with the image. To do that, let’s create a new layer (Ctrl/Cmd + Shift + N) and name it darken the book. Let’s put this layer on top of all the layers that we’ve created since our aim is to darken the book itself. To start, activate the Brush tool (B) and then use the following settings:
- Brush size: 300 px
- Hardness: 0%
- Opacity: 15%
- Flow: 100%
Apply the brush on the region shown on the image below:
Now that we’ve finished creating the book and its shadow, we’ll now proceed on to the next step, but before that, let’s group these layers (Ctrl/Cmd + G), let’s rename this group to book.
Step 4 - Add the grass on the book’s open page
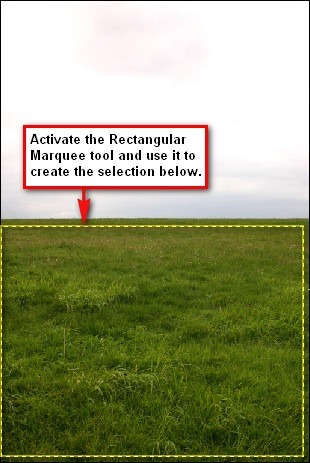
In this step we would be adding the grass on the book’s open page and make it appear like the scene in a book came to life. To start, let’s open Grassy Field and then activate the Rectangular Marquee tool (M).
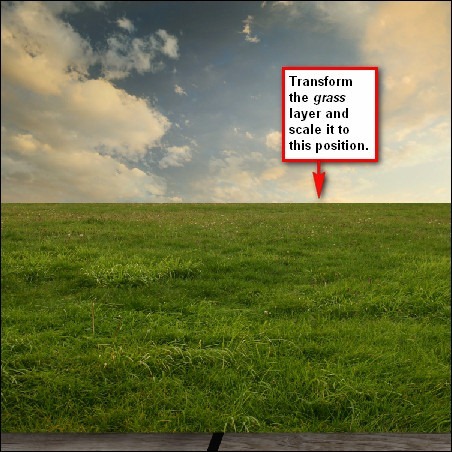
Now drag the selected area using the Move tool (V) on our canvas and rename the image as grass. Activate the Transform tool (Ctrl/Cmd + T) and then resize the grass layer as seen on the image below:
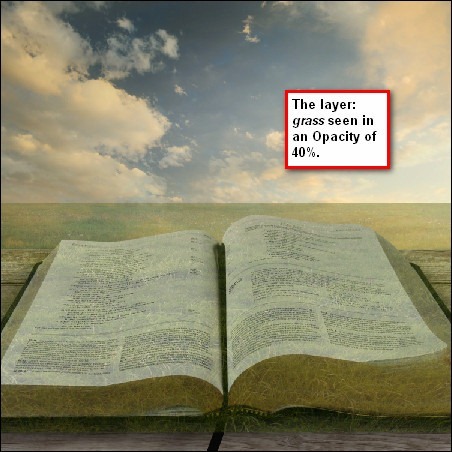
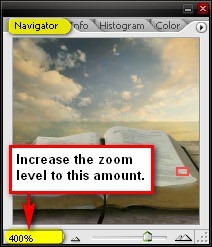
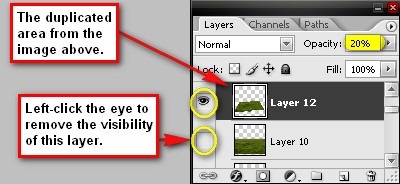
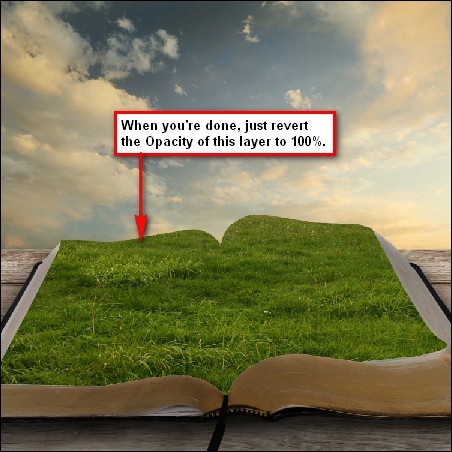
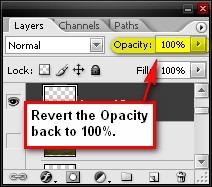
Now that we’ve transformed it, we shall be removing the grass which is outside of the book’s page. To do that, we shall be using the Polygonal Lasso tool (L). Before cutting it, it would be best to reduce the Opacity of the grass layer to 20% so you would be able to cut the grass with the book as the guide. You may also want to zoom in to the image up to 400% for more accuracy. To increase the zoom level, go to the Navigator window and change the zoom level to 400%.
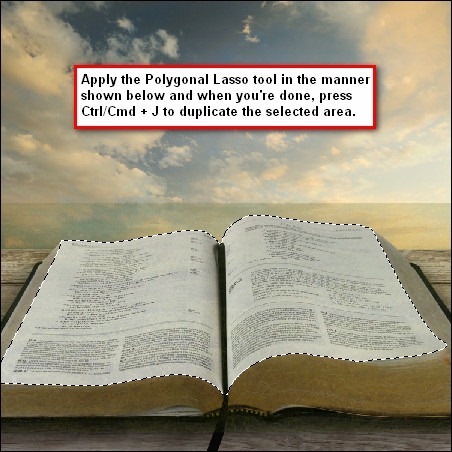
Now for the process of removing the excess grass – follow the instructions on the images below:
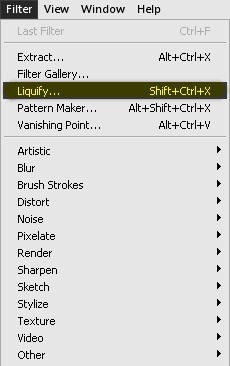
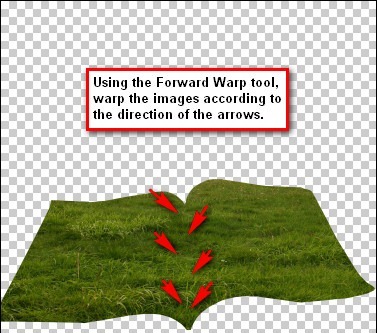
Now for the next part, we will be distorting the grass layer to make it blend in with the book and in order for us to do that we would need the effectiveness of the Liquify tool. To activate that tool, go to Filter > Liquify.
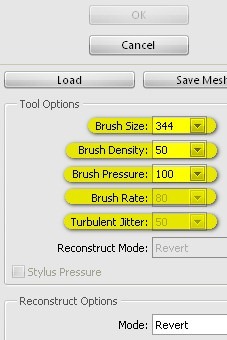
You may also use the shortcut keys to open the Liquify tool by pressing Shift + Ctrl/Cmd + X. When the Liquify tool opens, use the following settings:
- Brush Size: 344
- Brush Density: 50
- Brush Pressure: 100
- Brush Rate: 80
- Turbulent Jitter: 50
- Reconstruct Mode: Revert
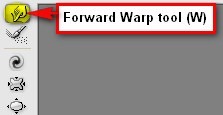
To begin the Liquifying process, click on the Forward Warp tool.
For more accuracy, it is advised to zoom at the level of 25% or higher if you wish to.
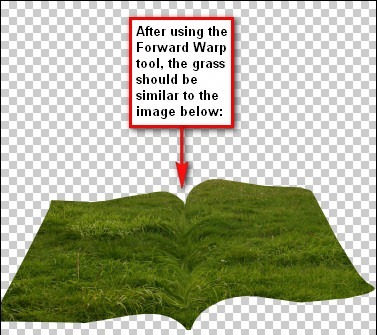
Now when you’re done with liquefying, just press OK.
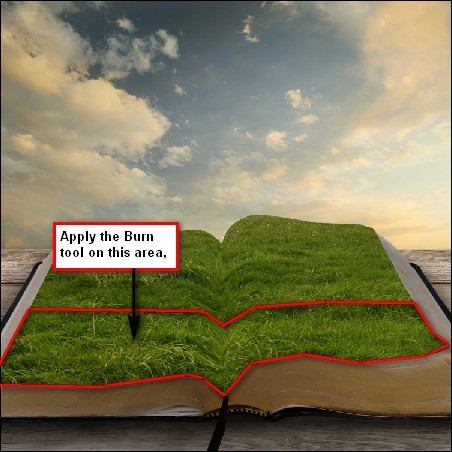
Next, let’s edit the light on the grass, we’ll darken and brighten the necessary areas.
Activate the Burn tool (O) and input the following settings:
- Brush size: 300 px
- Range: Midtones
- Exposure: 25%
Then apply the Burn tool (O) on the area shown on the image below:
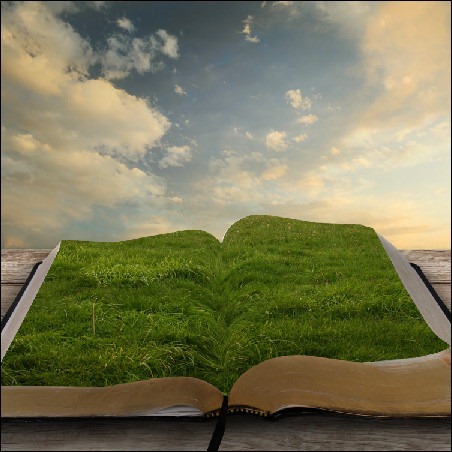
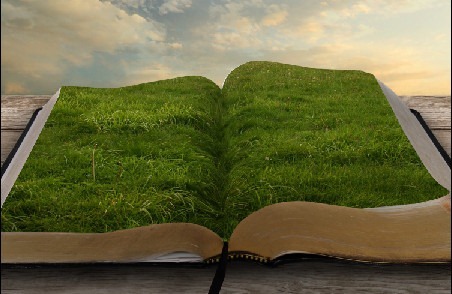
The result should be similar to this:
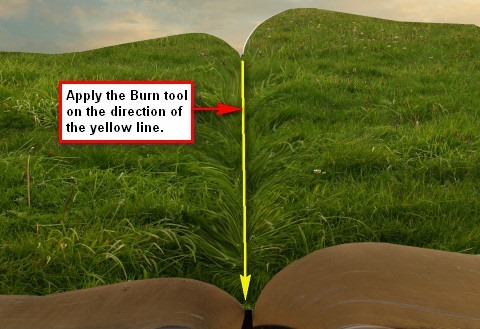
Activate the Burn tool (O) once again and use it on the region shown on the image below:
Step 5 - Add the dirt road on the grass
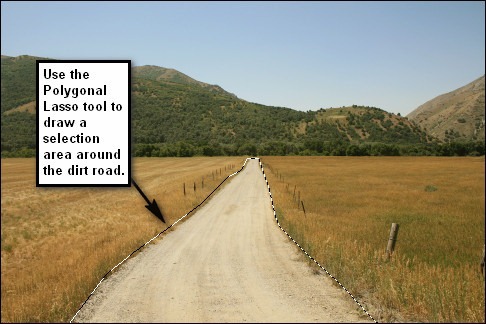
What we are going to do here is that we would be adding a small road on the grassy field on the book’s open page. To start, let’s open Long Road and then activate the Polygonal Lasso tool (L) to select the road on this image.
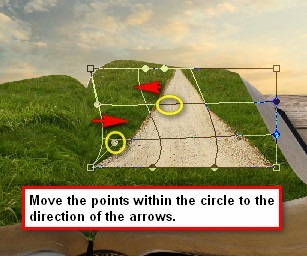
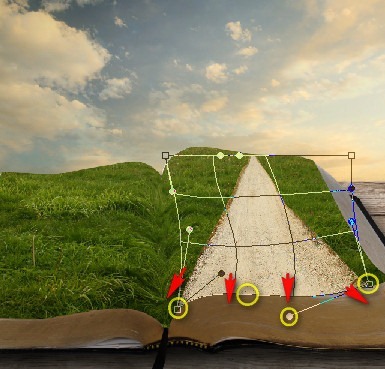
After you’ve created the selection area, use the Move tool (V) again to transfer it to our canvas. Once in the canvas, rename the layer to road. Next, we will be transforming the road to blend in with the grass. Click on the road layer and then activate the Transform tool (Ctrl/Cmd + T). Right click on the image to bring up the contextual menu, and then when the menu opens, click on Warp. Now warping is quite similar to the Liquify tool but it differs because it isn’t as free as the Liquify tool, you can only warp a few select areas designated by the points and lines on the warp grid. Now for the Warp process, just follow the instructions seen on the following images:
The result should be similar to this:
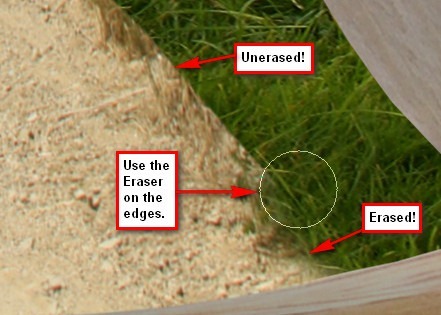
After that, we’ll have to erase some edges of the road to make it blend with the grass. Activate the Eraser tool (E) and input the following settings:
- Brush size: 100 px
- Hardness: 100%
- Opacity: 100%
- Flow: 100%
Use the following zoom setting on the Navigator window:
See image below for instructions:
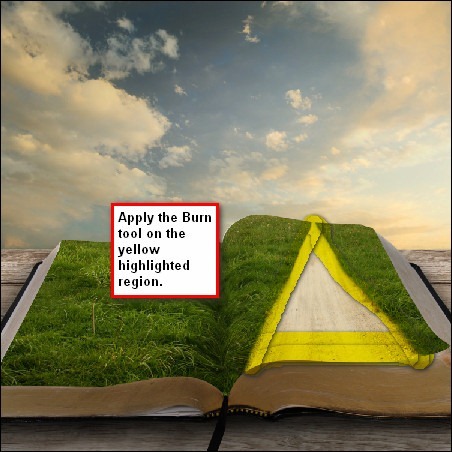
Next, let’s darken the edges of the road; activate the Burn tool (O) and input the following settings:
- Brush size: 200 px
- Hardness: 0%
- Range: Midtones
- Exposure: 25%
Apply the Burn tool on the region indicated on the image below:
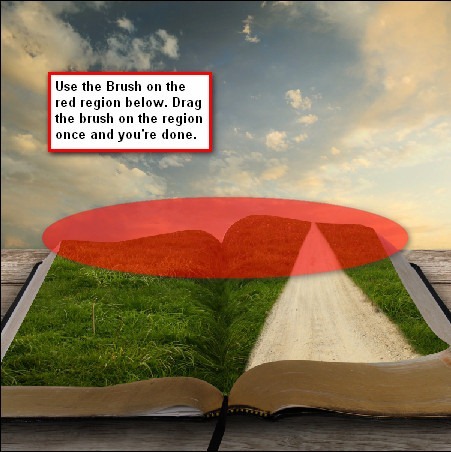
Next let’s create a new layer (Ctrl/Cmd + Shift + N) and name it light and position it above all the layers. We’re going to paint some light on the part of the book where the light shines. Activate the Brush tool (B) and input the following values:
- Brush size: 1000 px
- Hardness: 0%
- Opacity: 15%
- Flow: 100%
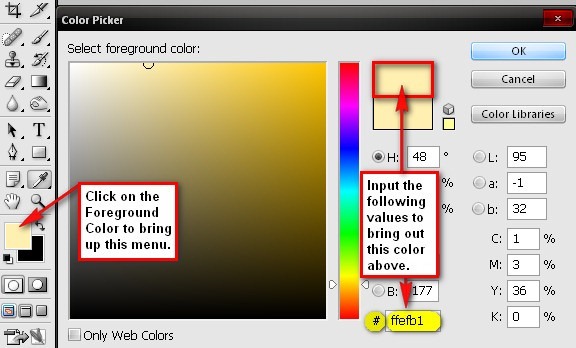
Now we would also change the Brush’s color, to do that, click on the Foreground Color box to activate the Color Picker menu.
We’re now ready to brush in some yellow light on the image. To proceed, follow the instructions below. After that, select all the layers that we just did and press Ctrl/Cmd + G to group them. Rename the group now to grass.
Step 5 - Add the street clock
What we are going to do here is that we would be adding our street clock. To do that, let’s open the Street Clock stock image. You’d notice that this image is saved in the PSD format, which means we can just use the Move tool (V) to drag the street clock to our canvas without cutting it from its background.
After you’ve moved it to our canvas, change the layer’s name to street clock and then change its Brightness/Contrast to make it blend with the rest of the images. First, make sure that the Street clock image is selected and then click on Image > Adjustments > Brightness/Contrast and then apply the following settings:
- Brightness: 5
- Contrast: -15
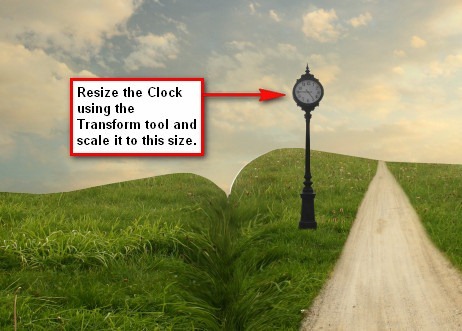
Next, let’s transform the image and make it smaller. See image below:
After that, let’s create a new layer and rename it as clock shadow. Put this layer under the Street Clock layer because we’re going to create the clock’s shadow.
Activate the Brush tool (B) and input the following settings:
- Brush size: 175 px
- Hardness: 0%
- Opacity: 15%
- Flow: 100%
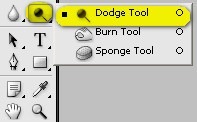
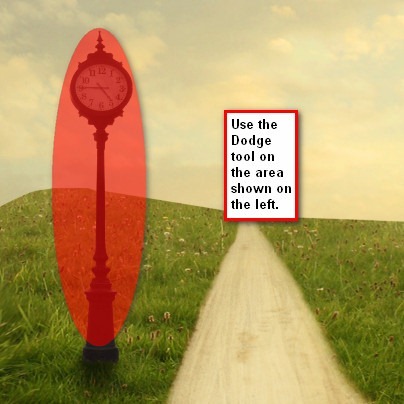
Next, let’s brighten the clock by using the Dodge tool (O).
Use the following settings for the Dodge tool (O).
- Brush size: 150 px
- Range: Midtones
- Exposure: 25%
Use the Dodge tool (O) on the area shown on the image below:
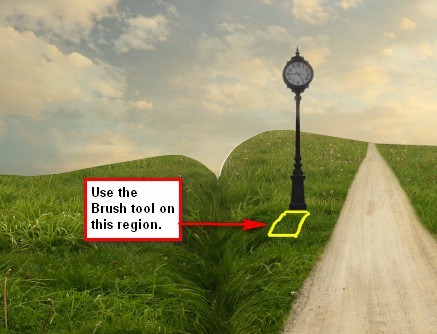
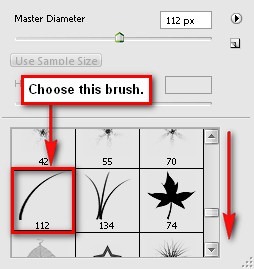
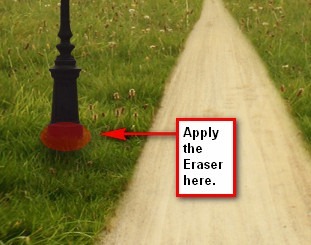
Next, activate the Eraser tool (E) once again because we’re going to make the clock look like it really is rooted on the grass. We’re going to change the shape of our brush to the shape of grass. To do that, make sure the Eraser tool is activated and then right click on the image to bring out the Eraser menu. When the menu shows, click on the scroll bar located on the side of the menu and choose the brush as seen on the image below:
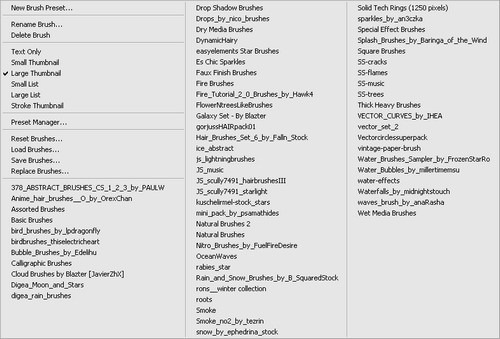
Take note that this brush would appear only if the brushes loaded are the default brushes, but if that’s not the case, we would need to revert it back to the default ones - to do that click on the button shown on the image below to bring up the advanced menu.
After pressing that button a menu will pop-up.
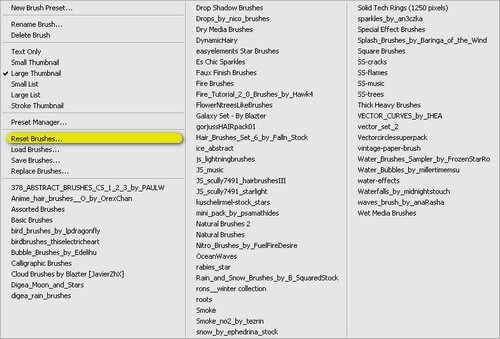
Choose Reset brushes from that menu.
Now we’re ready, let’s use the following settings for the Eraser tool (E):
- Brush size: default size of the grass brush (112)
- Hardness: default size of the grass brush (100%)
- Opacity: 100%
- Flow: 100%
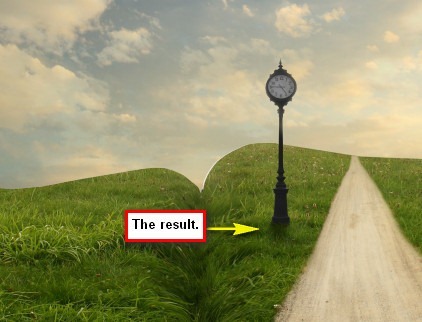
The result should be similar to this. After that, group all the layers that we’ve created on this step and name it object.
Step 5 - Create a Vignette
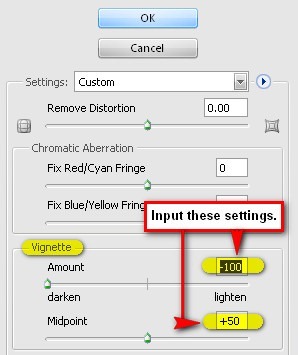
In this step, we will learn how to create a vignette which enhances the focus on the center of the image. To start off, go to the Menu bar and click on File > New and use the same settings we used to create our canvas. (Refer to Step 1). But take note, the background contents should be white. Once it has been created, go to Filter > Distort > Lens Correction. Find the tab Vignette and use these settings:
- Vignette amount: -100
- Midpoint: +50
Now that that’s done drag the vignette to our canvas using the Move tool (V) and put it on top of all the layers that we’ve created, and then set the following:
- Blending mode: Soft light
- Opacity to 40%
After that click on the vignette layer that we’ve just created and then duplicate it (Ctrl/Cmd + J). This time set the following values:
- Blending mode: Multiply
- Opacity: 25%
Step 6 - Retouch the image
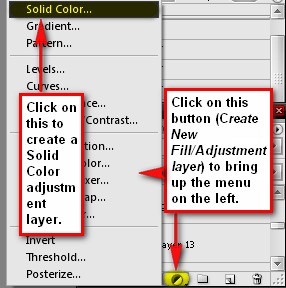
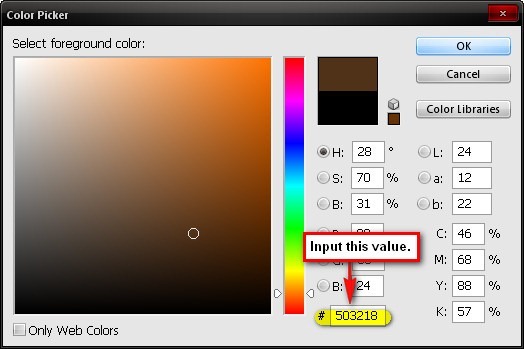
What we are going to do here is that we would be enhancing the look and feel of our image. To start, let’s create a Solid Color adjustment layer. To do that, click on the button on the Layer window as shown on the image below:
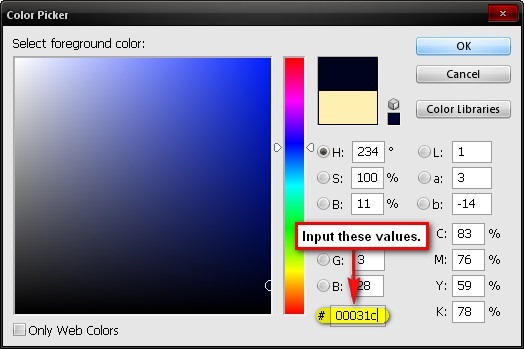
Once you click on Solid Color, a menu will pop up. When it shows, input the following value on the # box.
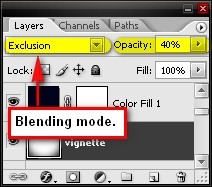
When that’s done, let’s change the Blending mode and the Opacity. The Blending mode can be found left to the Opacity changer on the Layer window. Just click on the word Normal and a menu will pop up.
Use the following values:
- Blending mode: Exclusion
- Opacity: 40%
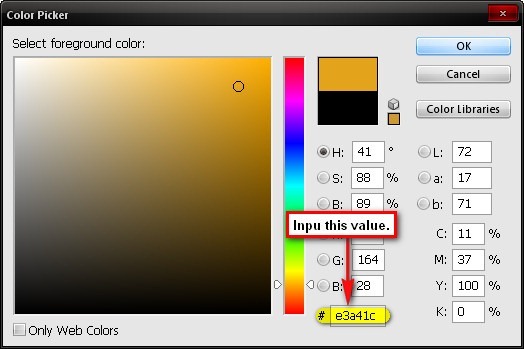
Next, let’s create another Solid Color adjustment layer; this time input the values below:
Then change the following:
- Blending mode: Soft Light
- Opacity: 40%
Let’s create another Solid Color adjustment layer; this time input the following values:
Use the following settings:
- Blending Mode: Soft Light
- Opacity: 10%
So far, the image should be similar to this:
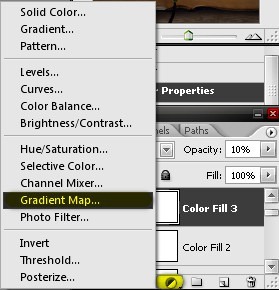
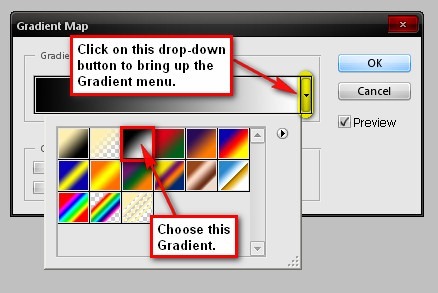
Now, let’s create a Gradient Map adjustment layer.
When you’re done, press OK. On the Layer window, change the following settings:
- Blending mode: Luminosity
- Opacity: 50%
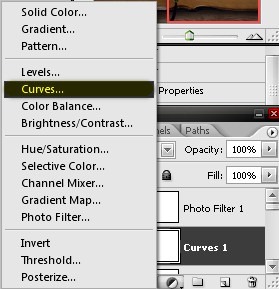
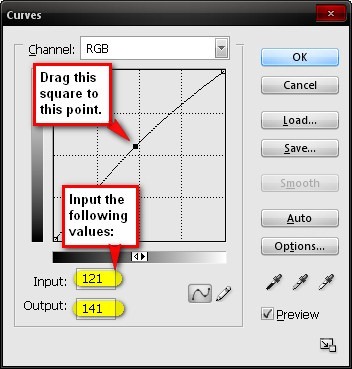
Next, let’s create a Curves adjustment layer.
Step 8 - Make the image look dreamy
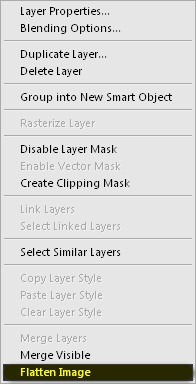
In this step we will be flattening our image and more importantly, we would try to make it look a bit dreamy. Before we move on, make sure you have saved the file as a PSD. Now we will be flattening the layers, to do that, right-click on any layer to bring up its menu and click on Flatten Image.
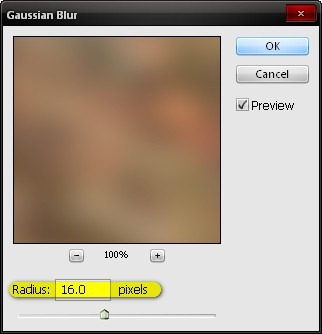
Once it is flattened, duplicate (Ctrl/Cmd + J) that single layer then go to Filter > Blur > Gaussian blur on the Menu bar and input the following:
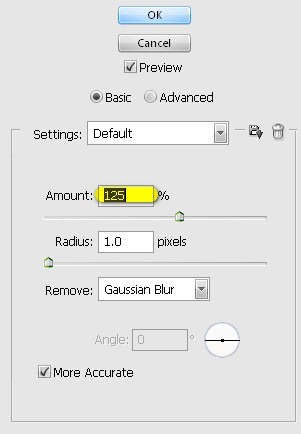
Now your image is blurred, now this is a bit too dreamy, to achieve the dreamy effect, change its Blending mode to Lighten and the Opacity to 30%. Once you’re done, flatten the image. After that, let us sharpen the image to bring out some details but still maintaining the soft contrast. Go to Filter > Sharpen > Smart Sharpen and input the following values:
- Basic: Checked
- Settings: Default
- Amount: 125%
- Radius: 1.0 pixels
- Remove: Gaussian Blur
- More Accurate: Checked
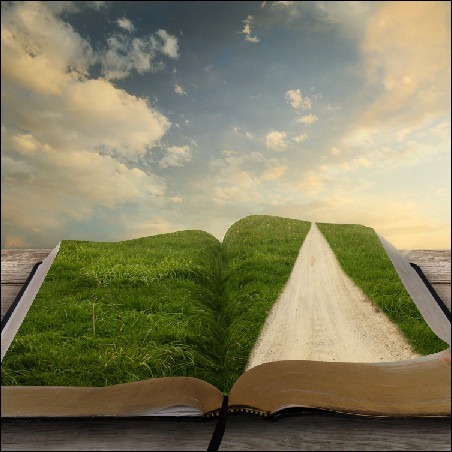
Final Results
 Learn how to create this surreal photo manipulation in Photoshop. You’ll learn the basics of combining stock photos, how to blend them in by adding light and shadows, and complete it with a vintage photo effect.














Tidak ada komentar:
Posting Komentar