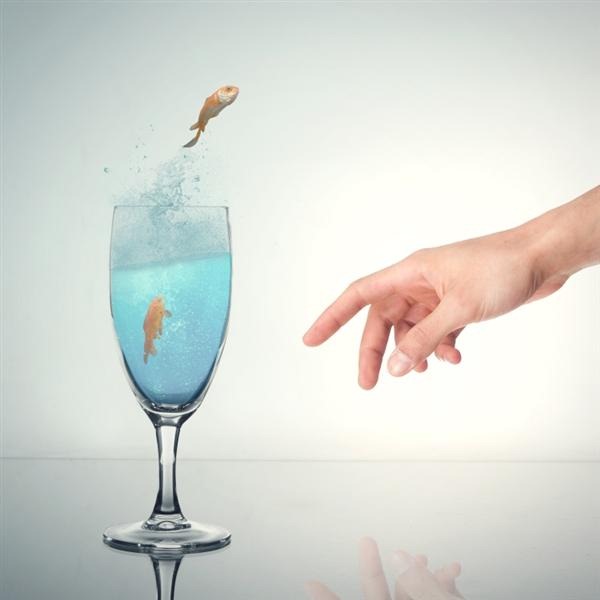
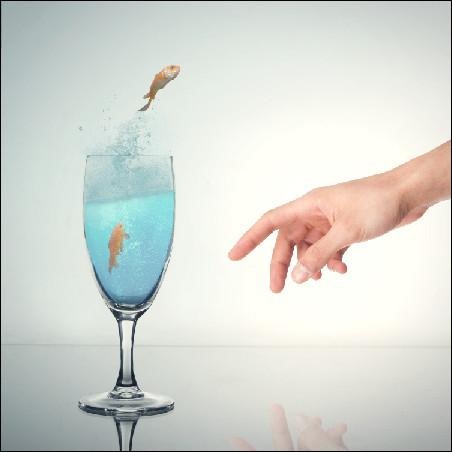
In this photo-manipulation tutorial, we are going to learn how to create a fish jumping out of water with a lot of splashes from its glorious jump. We will learn how to create water splashes through the use of Photoshop brushes, blend images together, and form realistic water inside the glass complete with bubbles.
Preview of Final Results
How to Make a Fish Jump Out of Water Photoshop Tutorial
Tutorial Details
- Program: Adobe Photoshop CS2
- Difficulty: Hard
- Estimated Completion Time: 1 to 2 hours
Resources:
Step 1 - Create the Photoshop document
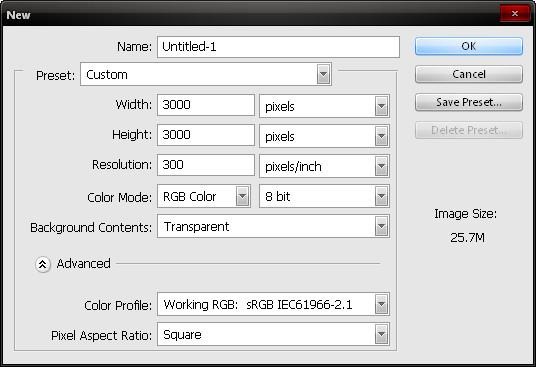
To start, we will need to create a new image file, go to the Menu bar and click File > New, and then input the following values on their respective fields:
- Width - 3000 pixels
- Height - 3000 pixels
- Resolution - 300 dpi
- Color Mode - RGB Color; 8bit
- Background Contents - Transparent
Step 2 - Create the glass and the room
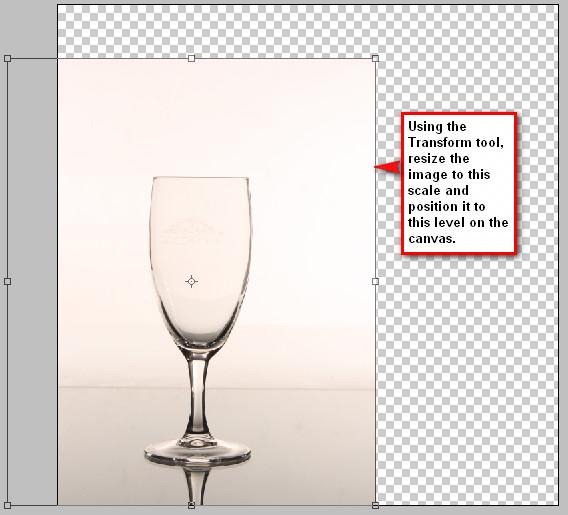
In this Step, we will be making the room with the glass; we will also be using a Gradient to enhance the feel of the room. Open the stock image - Glass 001 and left-click on it and then drag the glass to the new canvas using the Move tool (V). When you’ve done that, activate the Transform tool (Ctrl/Cmd + T) because we would need to reposition the glass for composition purposes.
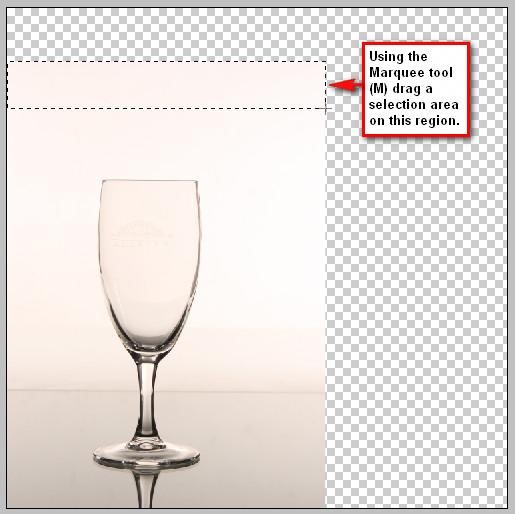
Now you might be wondering what happens to the extra space, well we would still make use of that extra space. In order for that to happen we would need to stretch some parts of the background. Activate the Rectangular Marquee tool (M); this tool’s purpose is for creating a selection area or merely selecting an area on the image; to use it, just left-click on a point and drag the mouse to form a rectangle selection area.
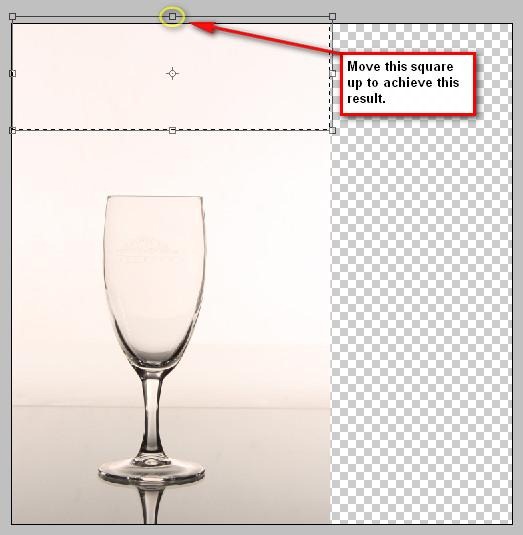
Once you’ve created a selection area, activate the Transform tool (Ctrl/Cmd + T) and pull it up to increase its length. See image below:
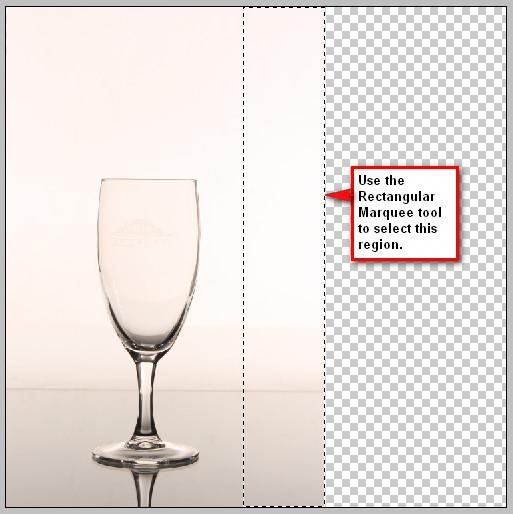
Now, after you’ve done that let’s activate the Rectangular Marquee tool (M) once again to create another selection area.
Activate the Transform tool (Ctrl/Cmd + T) and follow the instructions on the image below:
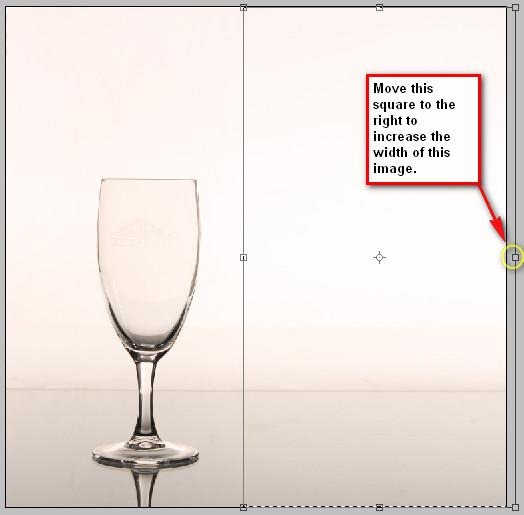
ow the background and our subject are in its intended composition, we would now fix the color and enhance the look of the background. First let’s adjust its Saturation because the image looks too warm and we don’t want that since we’re going to add water and splashes in it, in short, we want it cool.
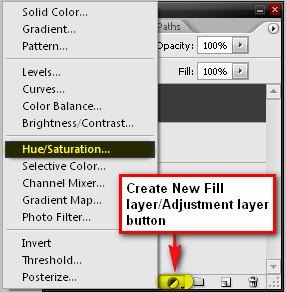
Let’s create a Hue/Saturation adjustment layer. To do that click on the Create New Fill layer/Adjustment layer on the Layer window and when the menu pops up, click on the Hue/Saturation button.
Before you proceed, make sure that all the selection areas have been deselected. To deselect, simply press Ctrl/Cmd + D. Now let’s input these values for our Hue/Saturation adjustment layer:
- Edit - Master
- Hue - 0
- Saturation - -65
- Lightness - 0
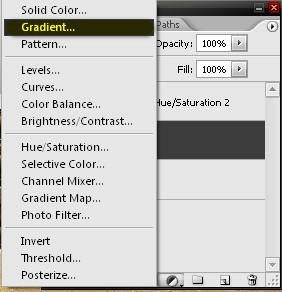
After doing that you’d notice that the image tone has now become a little more neutral. Now, it’s time we added the Gradient, to add some corners and to simply furnish the aesthetic value of this piece. Click on the Create New Fill layer/Adjustment layer button and pick Gradient.
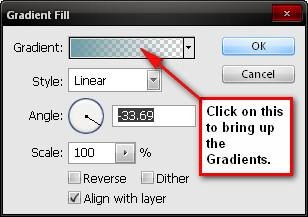
Once the Gradient menu is open, input the following values on their respective places:
- Style - Linear
- Angle - -33.69
- Scale - 100%
- Reverse - Unchecked
- Dither - Unchecked
- Align with layer - Checked
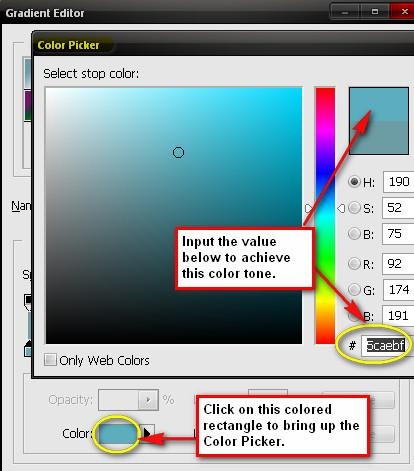
Then once you’ve done that let’s pick another Gradient. See images below -
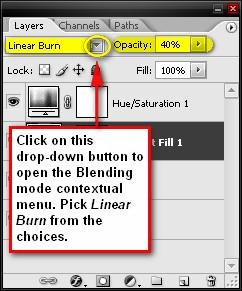
When you’re done put the Gradient layer under the Hue/Saturation layer so as to produce a neutral finish. You could put the Gradient layer above the Hue/Saturation layer just to check how Saturated that gradient is. Next, let’s change the Blending mode and Opacity of our Gradient.
- Blending mode - Linear Burn
- Opacity - 40%
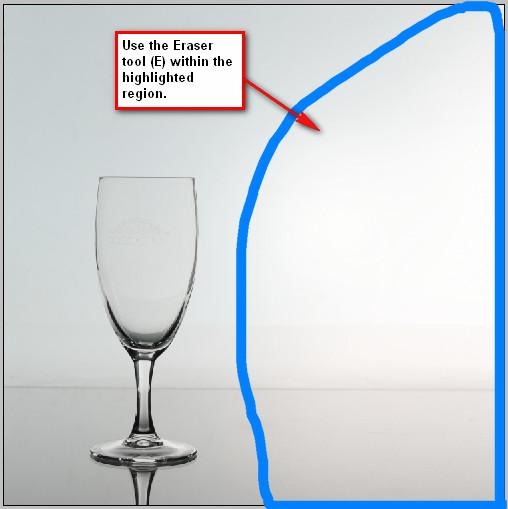
We would also need to erase a region on our Gradient to give out a more luminescent image. Activate the Eraser tool (E) and use the following values:
- Brush size - 1500 px
- Hardness - 0%
- Opacity - 100%
- Flow - 100%
Note - To reduce the Hardness, right click on the image while the Eraser tool (E) is activated, then you’d see the Hardness scale, which is at default – 100%, just move the slider to the left to get 0%.
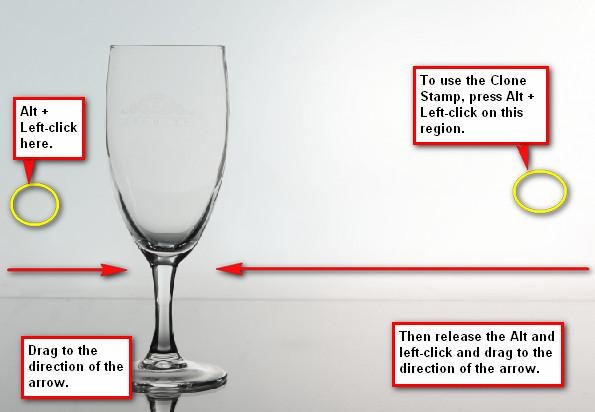
Now let’s clean up the background, activate the Clone Stamp tool (S); the Clone Stamp tool from its name clones a region and applies that area to the region of your choice. Now upon activating it, use the following values:
- Brush size - 300 px
- Mode - Normal
- Opacity - 100%
- Flow - 100%
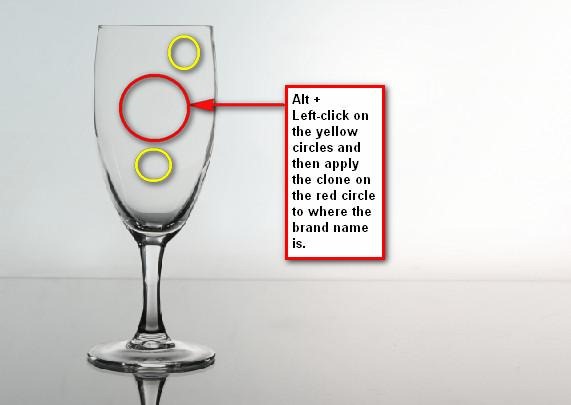
Also, we would also be removing the brand of the glass. To do that, we would need to activate the Clone stamp tool (S) once again.
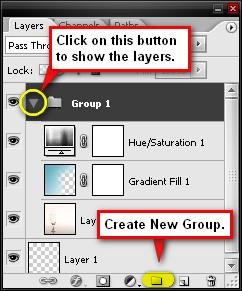
That ends the first Step, but before we proceed to Step 2, let’s group these layers. To make a group, select all the layers that we have made and press Ctrl/Cmd + G and then instantly all those layers would be included in that group. To do it manually, click on the Folder button on the Layer window which is just to the right of the Create new Fill layer/Adjusment layer button then select all layers and drag them to that group. You may also do it the hard way if you wish, go to Layer > New > Group from the menu bar then drag all the layers to the group folder.
Step 3 - Create the water inside the glass
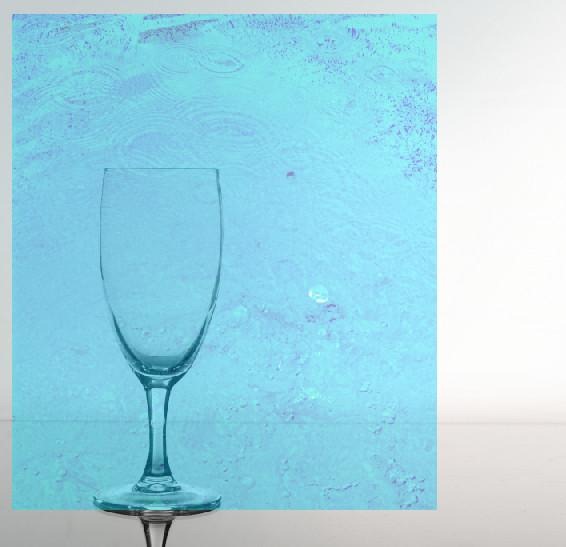
Now on this Step we are going to be adding water inside the glass and do some blending modes to it to give a realistic feel to it. To do that we would need two water texture images. From the Water textures group, choose the Water 4 image. Using the Move tool (V), drag that image to the canvas. Position the water texture to the position as seen from the image below.
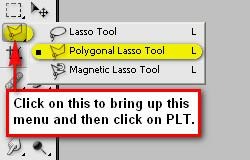
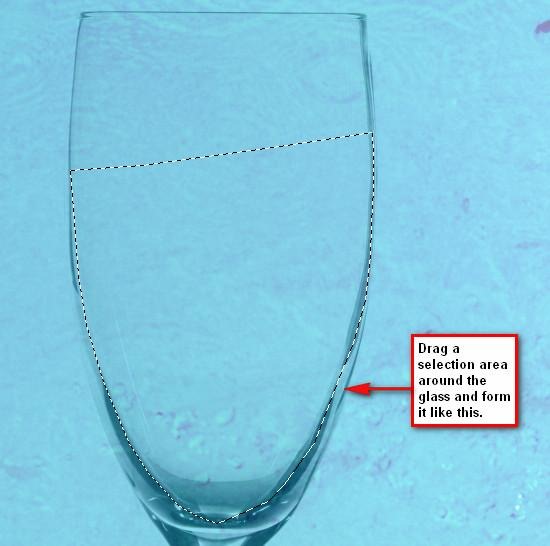
Now, we’re going to use the Polygonal Lasso tool (L). This tool is great for precisely selecting regions in a picture; to use this tool left-click on a region and then drag a selection area around it.
Now, press Ctrl/Cmd + J to duplicate the image within the selection area and after that, delete the original water texture image. Change the duplicated layer’s name to 1. To change a layer’s name, double click on the words “layer 3” then a text box would appear and you can now change the text.
After doing that, change the following settings of layer 1 to:
- Blending mode - Hard light
- Opacity - 15%
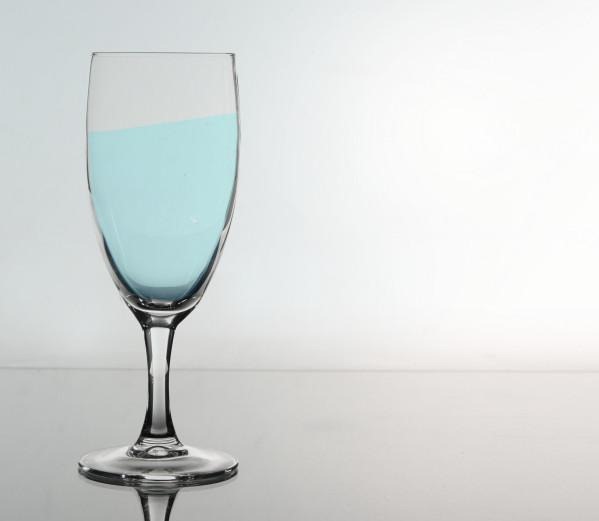
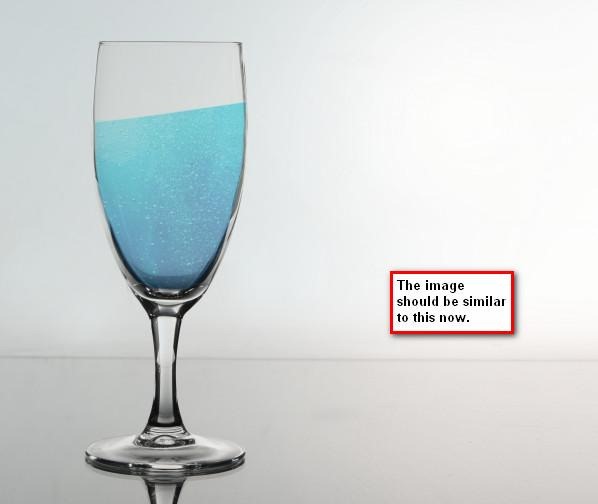
- The image should be now similar to this:
Now we will be adding the second water texture, let’s open the stock - Water background. Use the Move tool (V) to transfer it to our canvas. When you’ve transferred it rename the new layer to 2. We would be doing the same thing as we did in the previous Step, we will drag a selection area around the same region we did for the layer 1 so now let’s activate the Polygonal Lasso tool (L). When you’ve finished making the selection area, apply the following Blending mode and Opacity value:
- Blending mode - Multiply
- Opacity - 40%
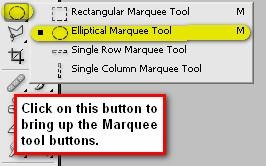
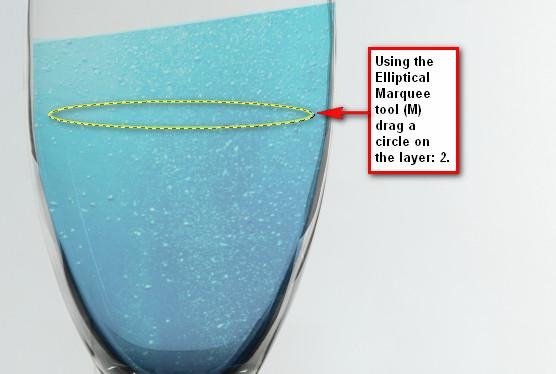
Now let’s add a 3d look to the water in the glass. Click on the layer - 2 and then activate the Elliptical Marquee tool (M).
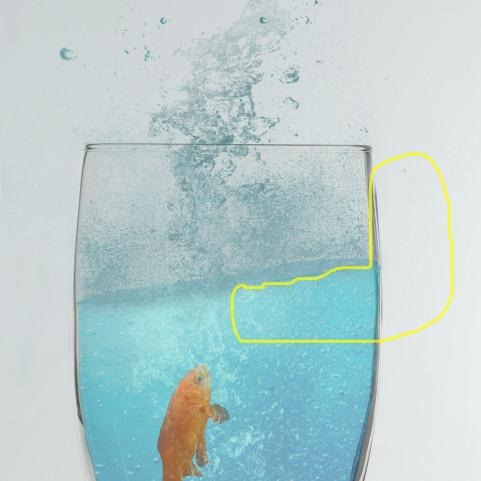
With that activated, follow the instructions on the image below:
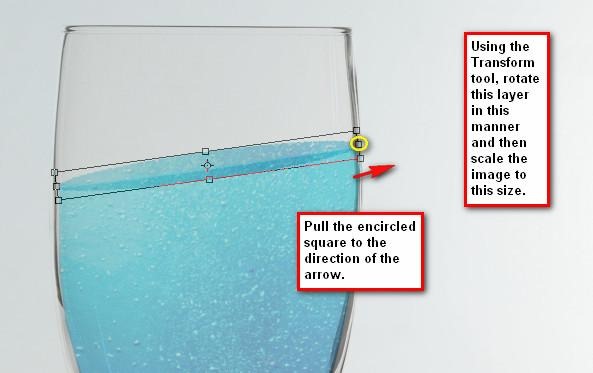
After selecting an area, let’s duplicate that by pressing Ctrl/Cmd + J and rename that new layer as 3d. Activate the Transform tool (Ctrl/Cmd + T) then scale the image as seen below:
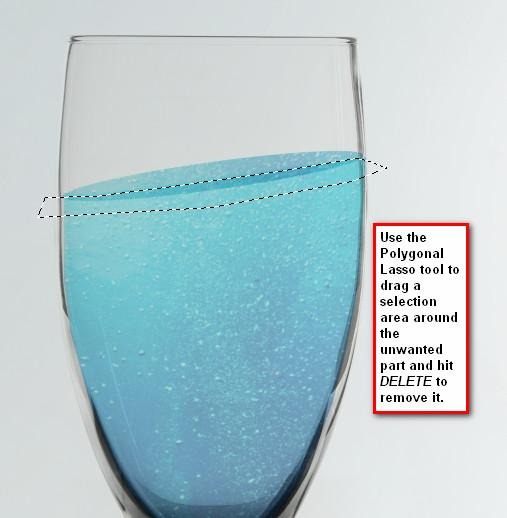
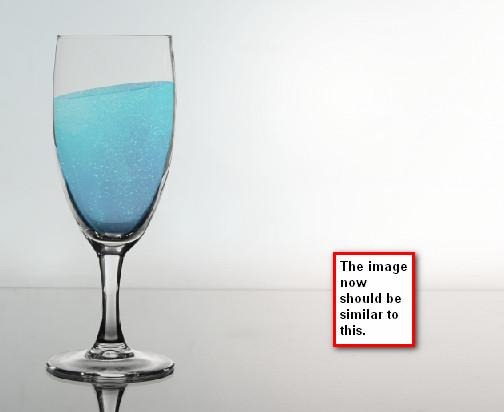
We would need to erase the excess water so activate the Polygonal Lasso tool and let’s erase the unwanted area of the layer, 3d.
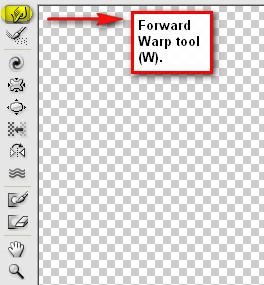
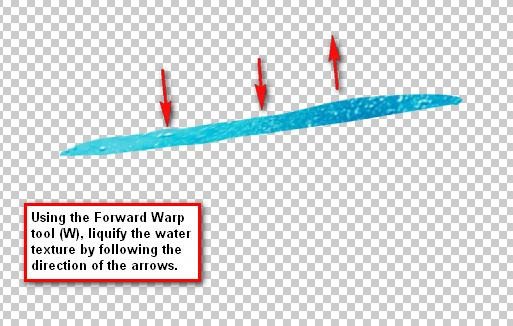
The water on the glass still seems unrealistic, so we should add a little liquefied movement on the surface to give it the illusion of motion. While the layer 3d is active, go to Filter > Liquify from the Menu bar or press Shift + Ctrl/Cmd + X and then when the Liquify box opens activate the Forward Warp tool (W)
Next, input the following values on the Tool Options box on the right side of the Liquify box:
- Brush size - 160
- Brush density - 50
- Brush pressure - 100
- Brush rate - 80
- Turbulent Jitter - 50
- Reconstruct mode - Revert
See image below for further instructions:
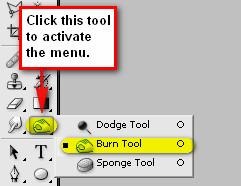
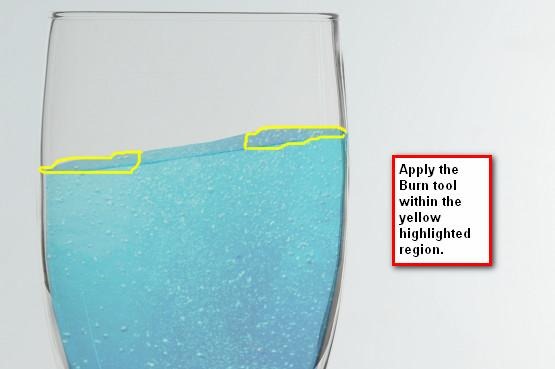
Now we will be darkening the sides of the layer “3d”. To do that activate the Burn tool (O) and input the following values:
- Brush size - 150 px
- Hardness - 0%
- Range - Midtones
- Exposure - 25%
Now we’re done with the water in the glass, it’s time we grouped these layers. Rename the group to water in the glass.
Step 4 - Add the goldfishes
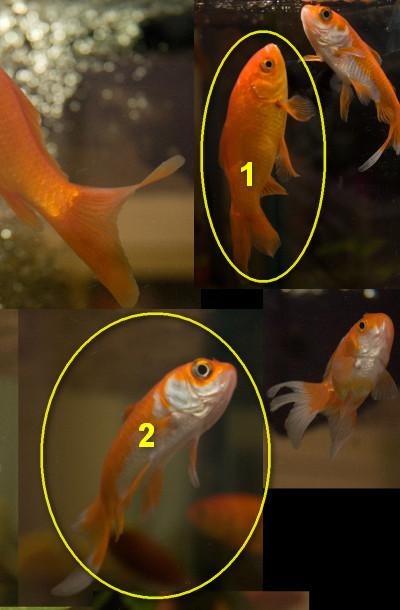
In this Step we would be adding the fishes, particularly the aquarium favorite – the goldfish. Let’s open the stock image Gold Fish. This stock image features a lot of gold fishes inside, but we would be choosing only two.
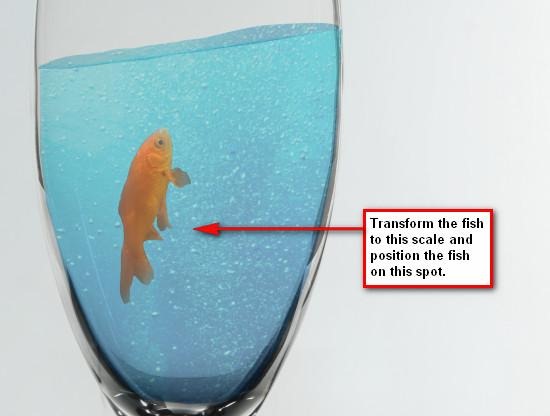
First let’s separate gold fish #1 from the background. To do that let’s use the Magnetic Lasso tool (L) which is also located on the Lasso tool menu. Once you’ve dragged a selection area around goldfish # 1, click on it , activate the Move tool (V) and drag it to our canvas and put it on top of all the layers and groups we have created. Name this layer to goldfish #1. Let’s scale this layer down using the Transform tool (Ctrl/Cmd + T).
See image below:
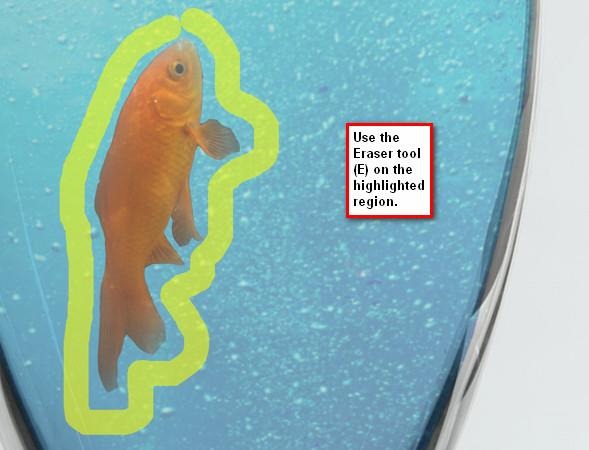
Next, we would need to soften the edges of the fish, activate the Eraser tool (E), and use the following values:
- Brush size - 100 px
- Opacity - 60%
- Flow - 100%
Then let’s change the color of the fish; click on its layer and then from the Menu bar, go to Image > Adjustments > Color Balance.
Use the following values:
- Color Levels - +30, 0, -18
- Tone Balance - Midtones
- Preserve Luminosity - Checked
Then finally let’s edit its brightness and contrast. To do that, go to Image > Adjustments > Brightness/Contrast and input the following:
- Brightness - +25
- Contrast - +17
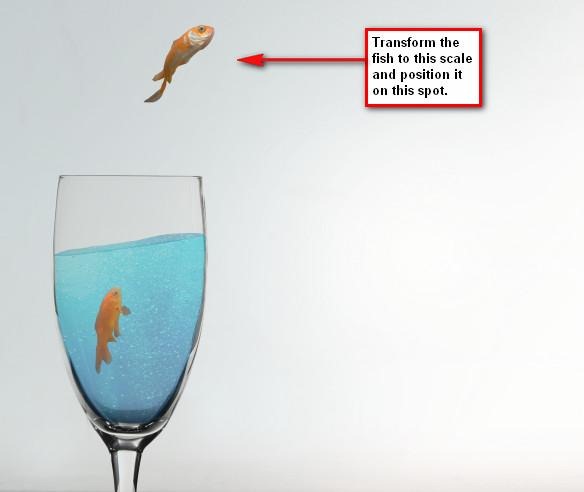
Now, that that’s done, it is time we added the second goldfish. Let’s go back to the stock image – Gold Fish; let us now cut gold fish # 2 from its background using the Magnetic Lasso tool (M). When you’ve done that, activate the Move tool (V) once again so we could transfer the image to our canvas. Once transferred, rename it to gold fish # 2. Activate the Transform tool (Ctrl/Cmd + T) and scale the fish as it is in the image below:
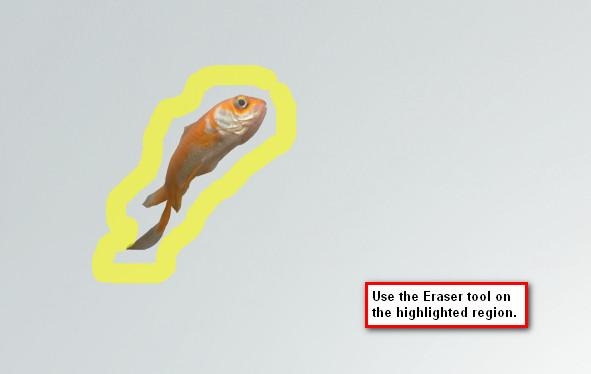
We would need to soften the edges of the gold fish, so activate the Eraser tool (E) again and use the following settings:
- Brush size - 100 px
- Opacity - 60%
- Flow - 100%
Finally, let’s enhance its brightness and contrast. Use the following values:
- Brightness - 15
- Contrast - 7
Now after we’ve added the fishes, let’s group them and rename that group to fishes.
Step 5 - Add the splashes
In this Step, we would be adding the splashes created by the fish that jumped out of the water. For that to be possible, we would need the help of the Photoshop brushes.
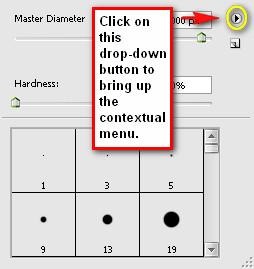
After downloading the brushes, transfer them onto this directory - Adobe > Adobe Photoshop CS 2 or 3 or 4 > Presets > Brushes. Once you’re done with that, activate the Brush tool (B) and then right click on the image to bring up the contextual menu. Once open, click on the drop-down menu.
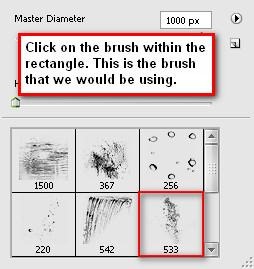
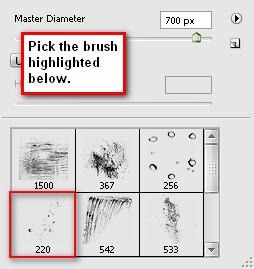
Once the menu opens click on Replace brushes… and then click on the new downloaded brush Water brushes sampler from the Brushes directory of Photoshop. Once it opens, click on the brush shown on the image below:
Now we will be applying the brush on our canvas, so let’s create a new layer. To do that, press Ctrl/Cmd + Shift + N and then a box would appear which is titled “New Layer”, rename that layer to splash 1.
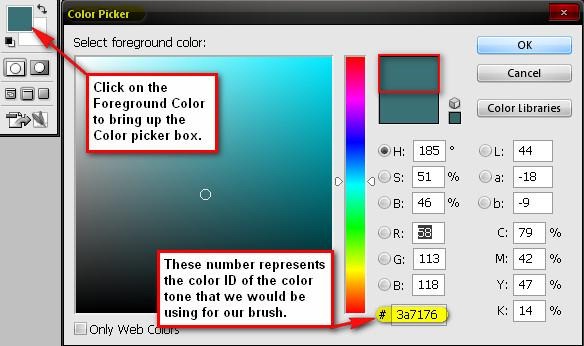
Next, we would need to change the color of our brush. Let’s go to the Color Picker box and change its color.
Next, input the following values for the brush:
- Brush size - 700 px
- Hardness - Default hardness of the selected brush
- Opacity - 100%
- Flow - 100%
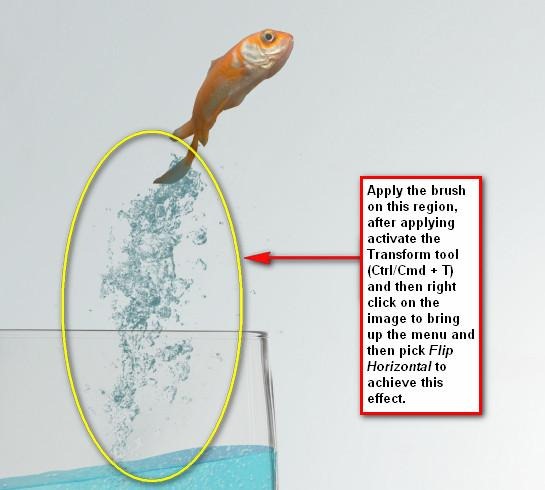
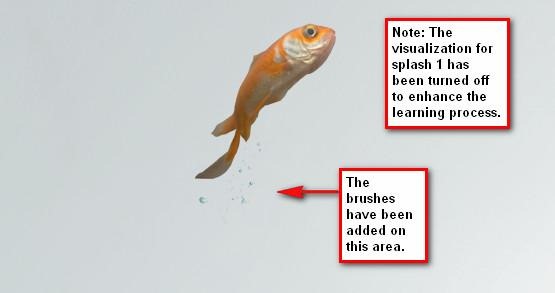
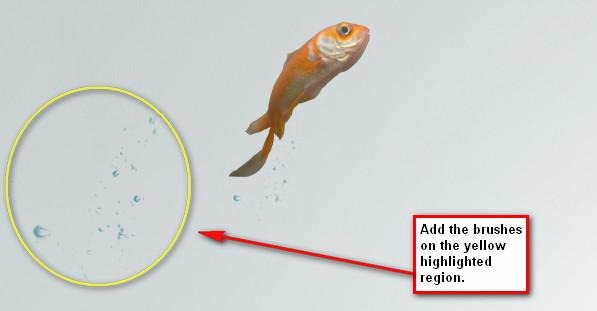
Before applying the brush you have to make sure that layer splash 1 is selected.
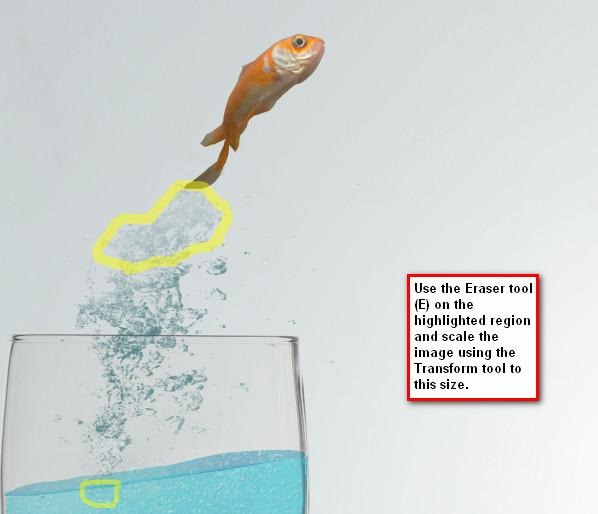
Obviously, the water splash that we created looks unreal so we would need to erase some parts and resize it a bit.
Let’s create a new layer once again, but this time, rename it to splash 2. Still with the same set of brushes, let’s use the brush highlighted on the image below:
We would need to change the color of this brush so activate the Color Picker and use this color value:
Once you’ve done that, change the brush settings to the following:
- Brush size - 200 px
- Hardness - Default hardness of the selected brush
- Opacity - 100%
- Flow - 100%
Still on the same layer, let’s add another brush stroke but let’s use different brush values:
- Brush size - 400 px
- Hardness - Default hardness of the selected brush
- Opacity - 100%
- Flow - 100%
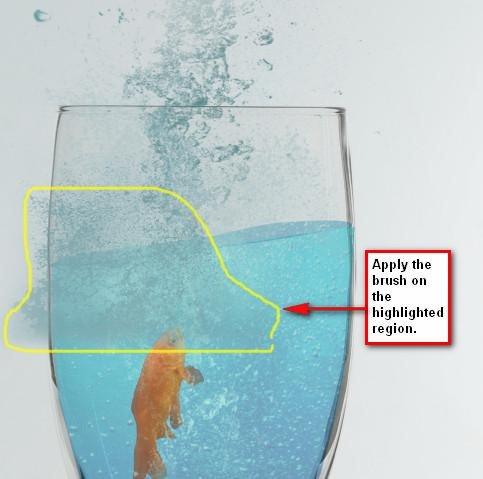
Let’s move on to the creation of our next splash. Create a new layer (Ctrl/Cmd + Shift + N) and name that layer - splash 3. Activate the Color Picker and input the following value:
Now, activate the Brush tool (B) and use the brush that we used on splash 1. Once the brush is active, use the following brush values:
- Brush size - 900 px
- Hardness - Default hardness of the selected brush
- Opacity - 100%
- Flow - 100%
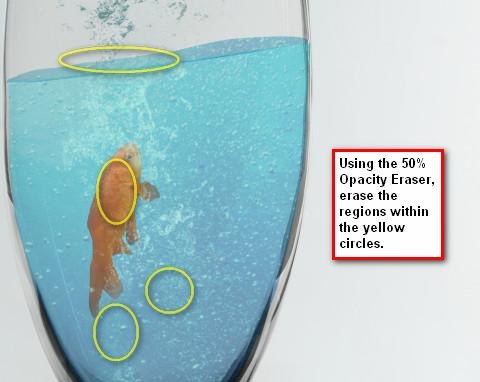
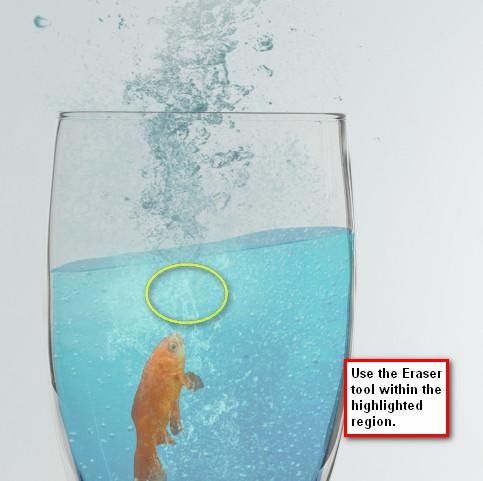
Activate the Eraser tool (E) for we would need to erase the unwanted parts of the brush that we applied. Use the following settings for the Eraser tool (E).
- Brush size - 175 px
- Hardness - 0%
- Opacity - 50%
- Flow - 100%
Let’s create a new layer again, and then rename it splash 4. Activate the Brush tool (B) and then use the following brush which is still from the brush set – Water brushes sampler:
Now let’s change the brush’s color, click on the Foreground Color to bring up the Color Picker box and input the following:
Then change the following settings to:
- Brush size - 1000 px
- Hardness - Default hardness of the selected brush
- Opacity - 100%
- Flow - 100%
Activate the Eraser tool (E) and use the following values:
- Brush size - 125 px
- Hardness - 0%
- Opacity - 100%
- Flow - 100%
After erasing that, reduce the Opacity of that layer to 60%. Now we will be creating another layer for our next splash. Create a new layer and name it Splash 5. For our brush, let’s use the same brush that we used in Splash 4. We would need to use a different color tone though; open the Color Picker and apply the following:
With that color in our brush, activate the Brush tool again and apply the brush like it was done on the image below:
Now, we would need to activate the Eraser tool once again because we would need to remove the unwanted regions of the brush to make it look more realistic.
Now, for the next splash, create a new layer and then rename it Splash 6. Use the following color value:
As for the brush, pick the same brush we used for Splash 1. Use the following brush values:
- Brush size - 500 px
- Hardness - Default hardness of the selected brush
- Opacity - 100%
- Flow - 100%
Activate the Eraser tool once again and use the following brushes:
- Brush size - 250 px
- Hardness - 0%
- Opacity - 100%
- Flow - 100%
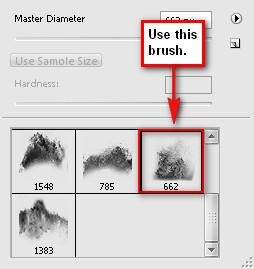
Create a new layer again and name it Splash 7. Activate the brush tool and use the brush that we used for Splash 5. Activate the Color Picker and use the following color value:
Use the following brush settings:
- Brush size - 662
- Hardness - Default hardness of the selected brush
- Opacity - 100%
- Flow - 100%
Activate the Eraser tool again and use the following values:
- Brush size - 90 px
- Hardness - 0%
- Opacity - 100%
- Flow - 100%
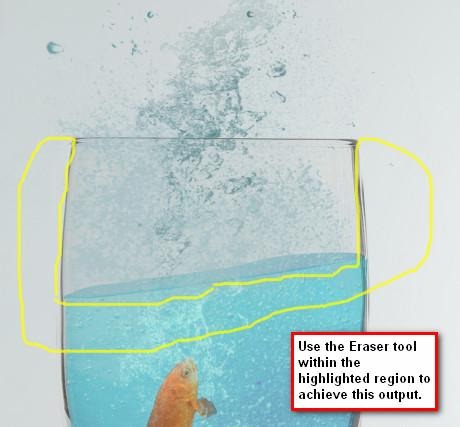
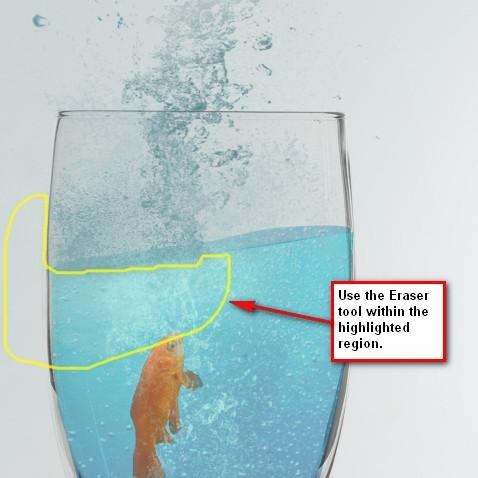
Now we’re almost done with the splashes, just two more. For the second to the last layer, create a new layer and rename it to – Splash 8. Then we would be using the same brush, the same brush values and the same color tone that we used for Splash 7.
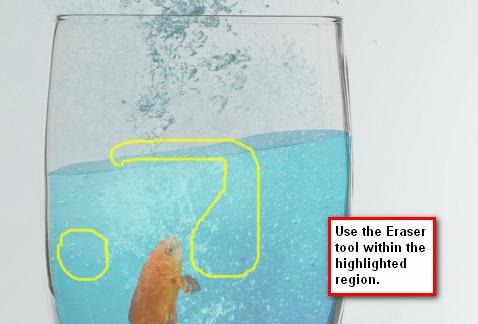
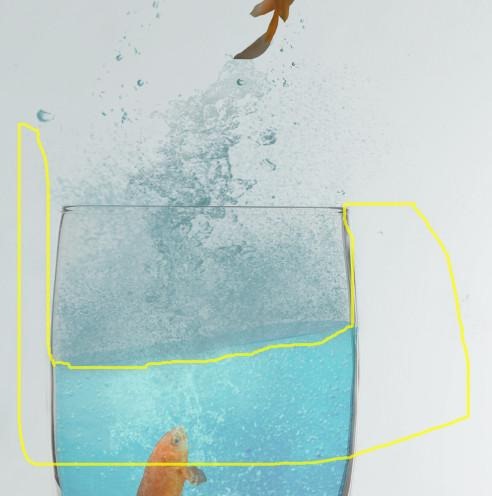
Activate the Eraser tool once again; use the same brush values as the Eraser tool that we used for Splash 7. Apply the Eraser on the region shown on the image below:
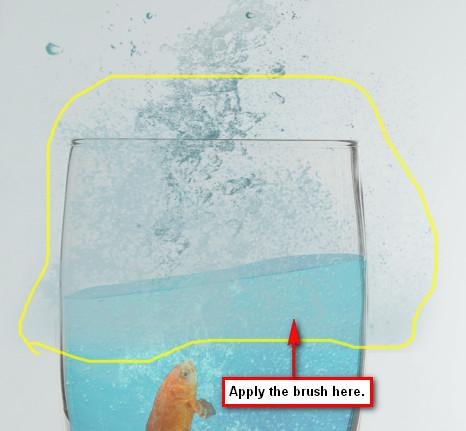
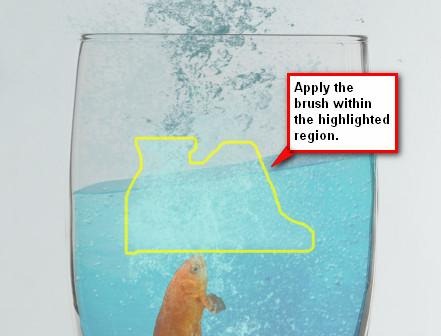
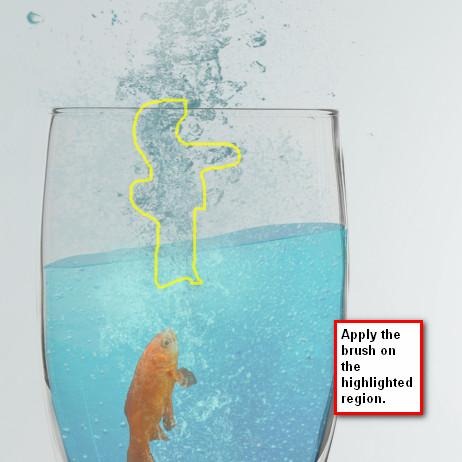
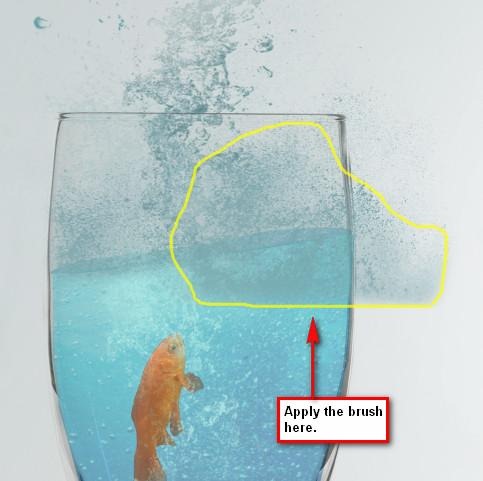
Finally, for our last splash, let’s create a new layer and then name it to Splash 9. For our brush, we would be using the same brush and the same color tone that we used on Splash 7 and 8. This time we would be altering the Brush size. Use the following settings for Splash 9.
- Brush size - 1100 px
- Hardness - Default hardness of the selected brush
- Opacity - 100%
- Flow - 100%
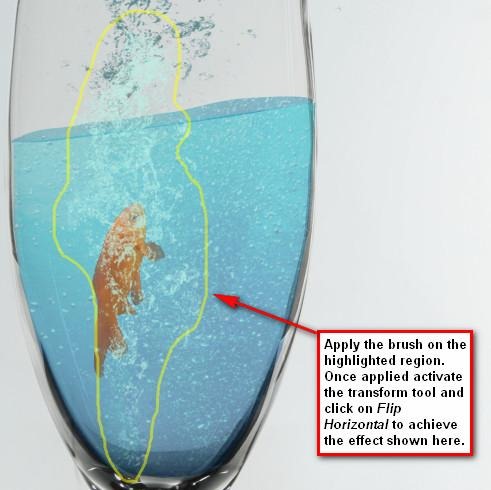
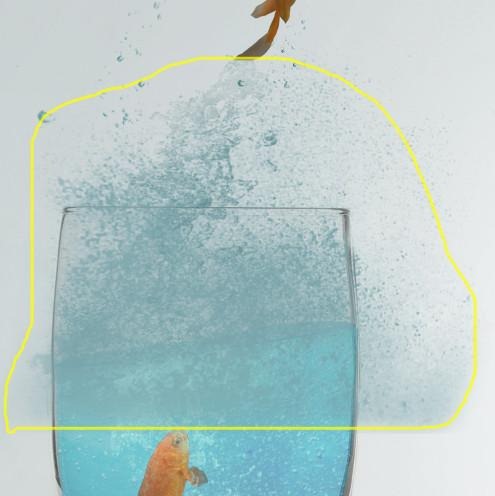
Apply the brush on the highlighted region shown on the image below:
And finally, let’s activate the Eraser tool and use the following values:
- Brush size - 175 px
- Hardness - 0%
- Opacity - 100%
- Flow - 100%
Use the Eraser tool on the highlighted area shown on the image below:
After that, reduce Splash 9’s opacity to 50%. Before we proceed to the next Step, group all the splashes that we have created and name that group to splashes.
Step 6 - Add the hand
In this Step, we would be adding the hand and its reflection on the surface of the table. So let’s open Hand 014 and move it using the Move tool (V) to the canvas. Yes you read that right just move it directly without deleting the background. Once on the canvas, rename it to hand 1. Remember to put this directly above all the layers that we have created.
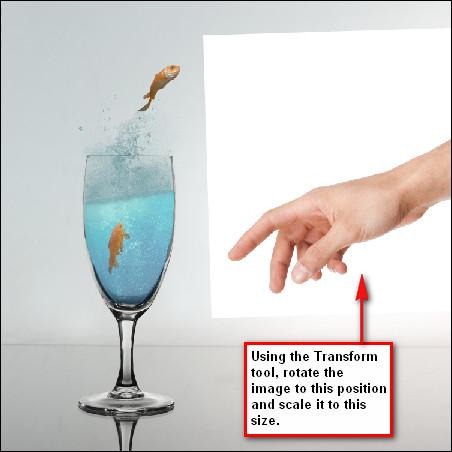
Once transferred, activate the Transform tool (Ctrl/Cmd + T) and then rotate the image and then after rotating scale the image. See image below -
After that, activate the Magic Wand tool (W), once activated, the mouse pointer would change to a wand. Left-click on the white spaces surrounding the hand and automatically, the white space would be selected. Hit DELETE to remove this white space.
Now let’s increase the hand’s saturation since its color looks dull. Click on the hand 1 layer and then press Ctrl/Cmd + U to activate the Hue/Saturation adjustment layer for this specific layer. Once the box opens, use the following values:
- Edits - Master
- Hue - 0
- Saturation - +15
- Lightness - 0
Now, we would need to darken some parts of the hand and in order for that to happen, duplicate hand 1 by pressing Ctrl/Cmd + J and when the duplicate appears change the blending mode and opacity to:
- Blending mode - Multiply
- Opacity - 30%
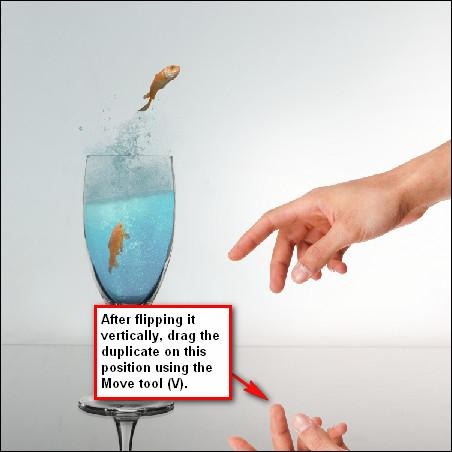
Let’s create the reflection, click on hand 1, duplicate it and then activate the transform tool (Ctrl/Cmd + T); right click on the image to bring up the menu and when the menu opens, click on Flip Vertical.
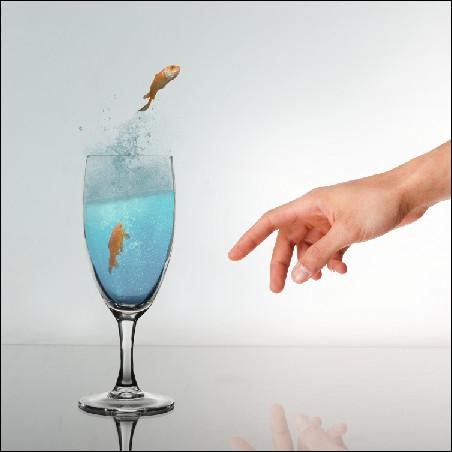
To make it look more like a real reflection, change the Opacity of the duplicated hand 1 layer to 25%. The result should be similar to the image below:
Finally, group these layers and name that group to hand.
Step 7 - Add a vignette
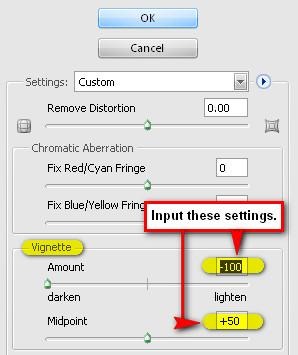
Now we’re going to add a vignette to increase the focus on the subjects. To start off, go to the Menu bar and click on File > New and use the same settings we used to create our canvas. (Refer to Step 1). But take note, the background contents should be – WHITE. Once it has been created, go to Filter > Distort > Lens Correction. Find the tab Vignette and use these settings:
- Vignette amount - -100
- Midpoint - +50
Now that that’s done drag the vignette to our canvas using the Move tool (V) and put it on top of all the layers that we’ve created, and then set the following:
- Blending mode - Soft light
- Opacity to 40%
After that click on the vignette layer that we’ve just created and then duplicate it (Ctrl/Cmd + J). This time set the following values:
- Blending mode - Multiply
- Opacity - 25%
Step 8 - Retouch the image
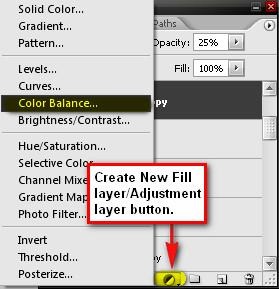
Now, let’s give the image a retouch to enhance its overall color, its brightness and its contrast. So let’s start with enriching the color. Click on the Create New Fill layer/Adjustment layer button and when the menu pops up, click on Color Balance.
When the Color Balance box is open, input the following values:
- Color Levels - -15, 0, +8
- Tone Balance - Midtones
- Preserve Luminosity - Checked
Now, let’s enhance the Brightness/Contrast, from the Create New Fill layer/Adjustment layer button, click on Brightness/Contrast from the contextual menu and when the box opens, input the following:
- Brightness - +8
- Contrast - +3
Finally, let’s spice up the color. From the Create New Fill layer/Adjustment layer button, pick on Solid Color. When the box opens, input the following value:
When this Solid Color appears on the Layer window, change the Blending mode and the Opacity to the following:
- Blending mode - Exclusion
- Opacity - 30%
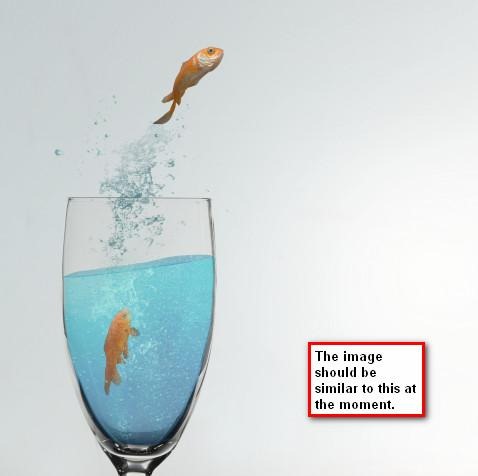
The image should be now similar to this:
Final Results
 ow the background and our subject are in its intended composition, we would now fix the color and enhance the look of the background. First let’s adjust its Saturation because the image looks too warm and we don’t want that since we’re going to add water and splashes in it, in short, we want it cool.


Tidak ada komentar:
Posting Komentar