
In this tutorial, you will learn how to create 3D text in Illustrator then transfer it to Photoshop to apply the effects.
Preview of Final Result

Dazzling 3D Text Effect Photoshop Tutorial
Step 1 - Create a New Document
Open Photoshop. Choose File > New or press Ctrl/Command + N. I'm using wallpaper size of 1440px (width) X 900px (height) but you can use any size you wish.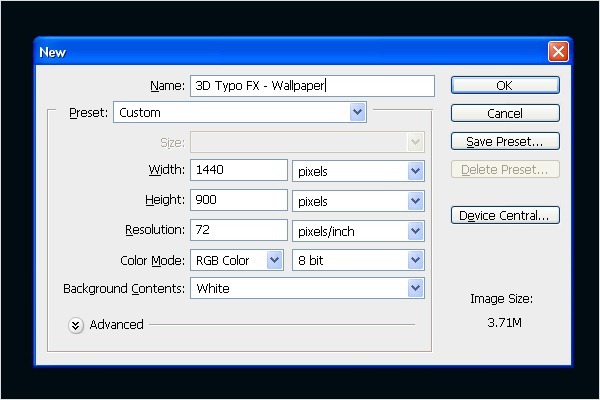
Step 2 - Creation of 3D Text
We are going to start creating 3D text with the help of Illustrator. First you need to type the text in Illustrator. You can use any text you want. I'm just using the text "FX". Open Illustrator, select the Type Tool and write the text. After typing change the font to "Hobo Std Medium".
Step 3 - Coloring the Text
Change the color of the text. For "F" use blue (#094569) and for "X" use dark orange (#AB7D1B). Your image should look like the one below.
Step 4 - Adding 3D Effect to the Text
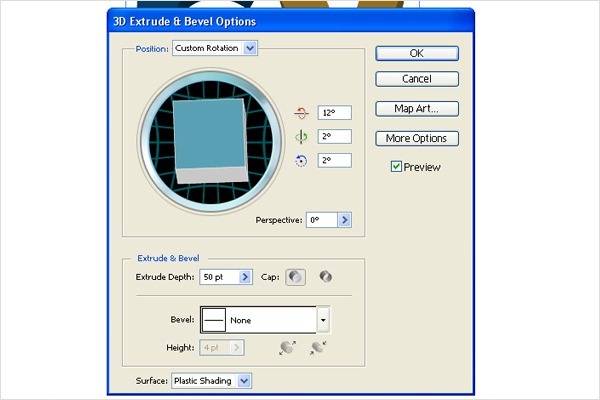
You need to create 3D solid text. To do that go to Menu > Effect > 3D > Extrude & Bevel...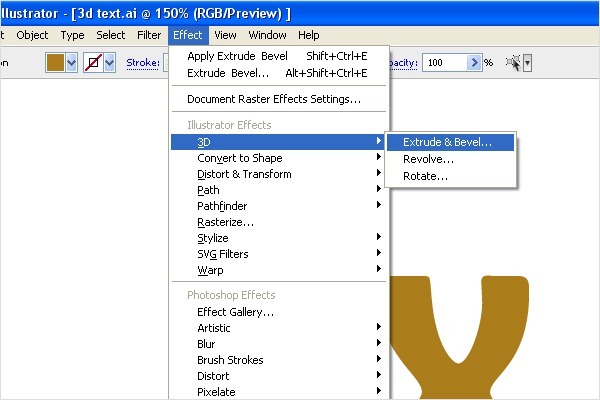
Step 5 - Placing the Background Color
Once you´re done with the 3D text move back to Photoshop and change the background color to blue (#000b12).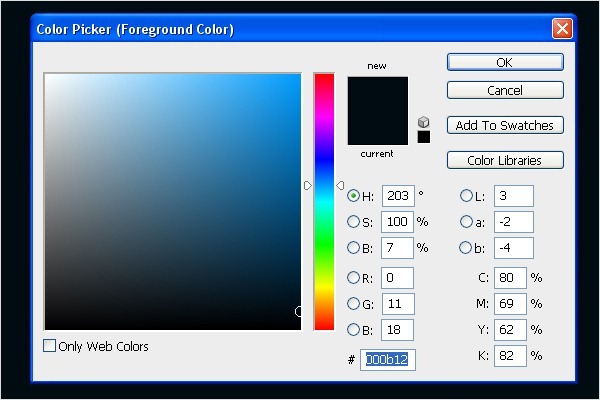
Step 6 - Placing 3D Text in Photoshop
In this step you're going to place the 3D text in Photoshop. Copy the text from Illustrator and paste it in Photoshop. Select the layer with the text, right click on it and choose Rasterize Layer.
Step 7 - Separating Text
Now you are going to separate the text into two parts. Select the Rectangular Marquee Tool (M) and make selection of the letter "X". Press Ctrl + X to cut and Ctrl + V to paste the letter. Align the text accordingly.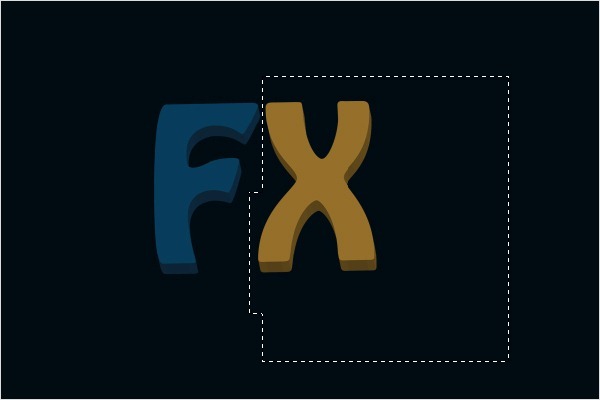
Step 8 - Dodge Tool Settings
You need to create highlights on the text. Select the Dodge Tool (O) from tools and follow the brush settings as you can see in the image below.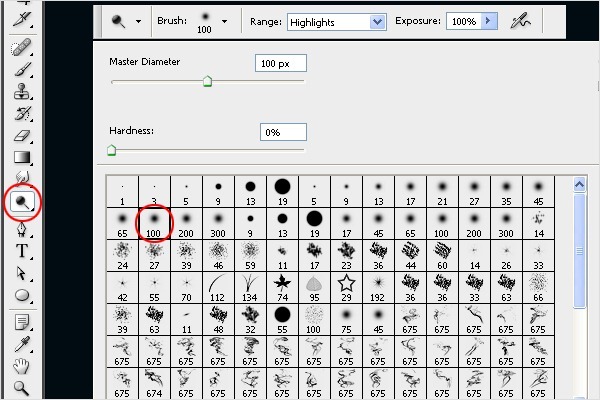
Step 9 - Adding Highlights
Paint with the Dodge Tool over the areas you want to highlight. You can get inspiration from the image bellow.
Step 10 -Adding More Highlights
Follow the step 9 and create more highlight spots on the circled areas.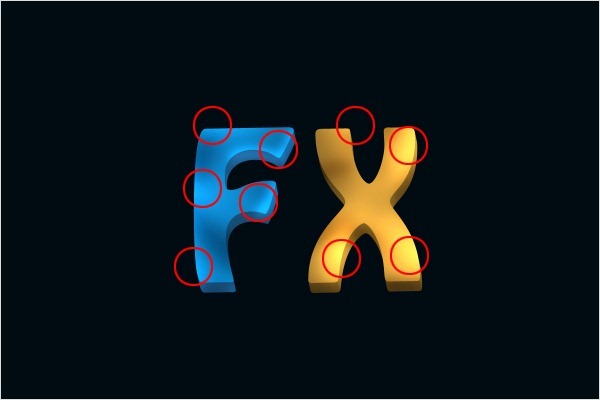
Step 11 - Adding Shadows
Once you´re done with highlights, you need to create shadows on the opposite side of the shape. Select the Burn Tool (O) from the tools and paint the shadows.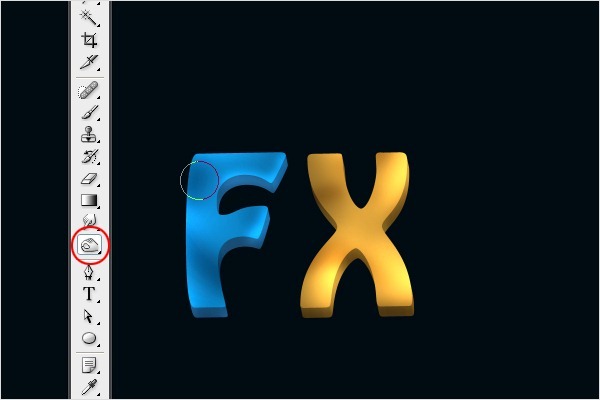
Step 12 - Adding More Shadows
Follow the step 11 and continue with adding even more shadows into the circled areas.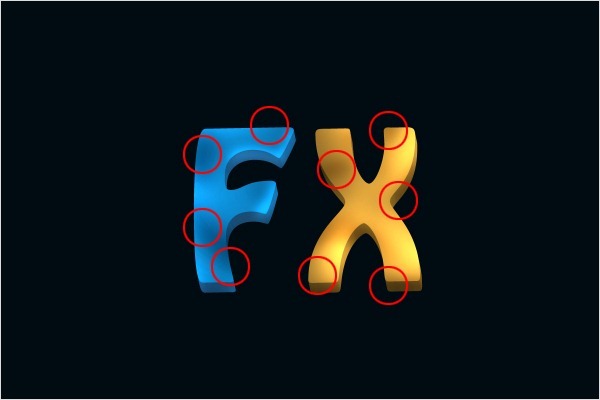
Step 13 - Increasing Intensity
To add more contrast to the text select the Dodge Tool (O). Increase the brush size to 800px and click over the whole letter "F" and then over the "X" to get the same result as in the image below.
Step 14 - Adding Corner Spotlights
Now you are going to add some spotlights to make the corners of the text shining. Select the Brush Tool (B). Select soft round with Master Diameter on 90px. Choose white foreground color and create a new layer. Paint over the corners of the text. See image below how it should look.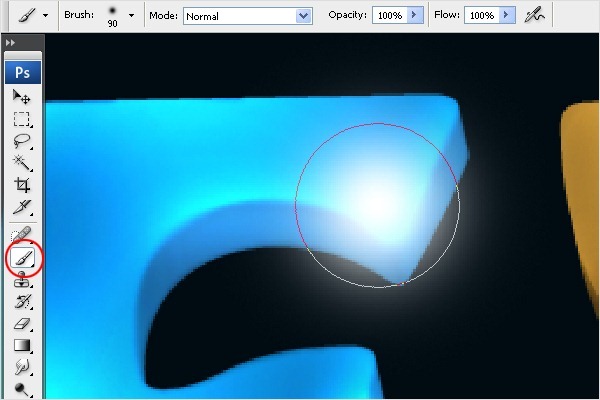
Step 15 - Erasing Feather
Erase parts of the glow which are not in the text but in the background.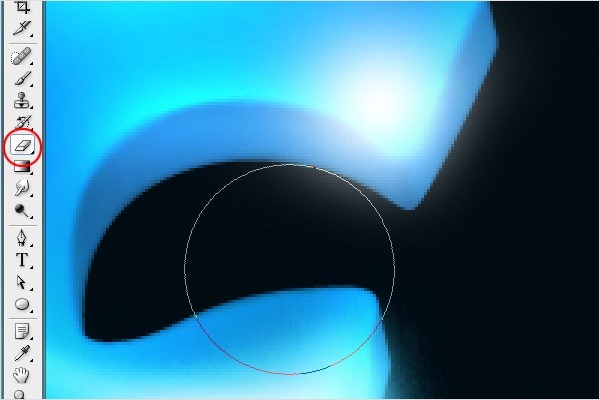
Step 16 - Adding Outer Glow
To add Outer Glow to the spotlights click on the button Add a layer style. You can find that button in the bottom part of your Layers palette. If you don´t see the palette simply press F7 and it will appear. Select the option Outer Glow and make following settings. Press OK.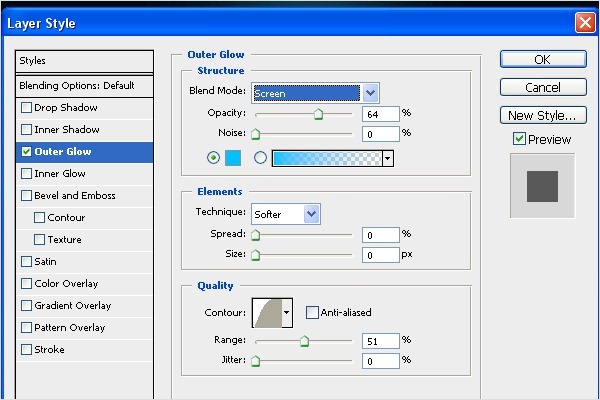
Step 17 - Duplicating Spotlight Glow
Now duplicate the glow you’ve created in the step 14. Select the Smudge tool (R) and drag the brush from right to left, so the glow spreads over the text. See image below to know what I mean.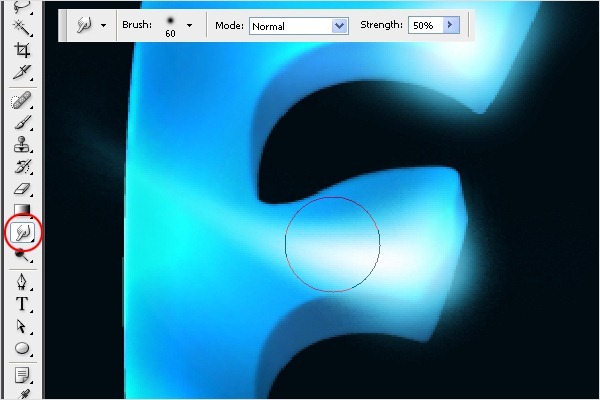
Step 18 - Blending the Glow
Select the Smudge Tool (R) and drag the glow around the text corners. See image below.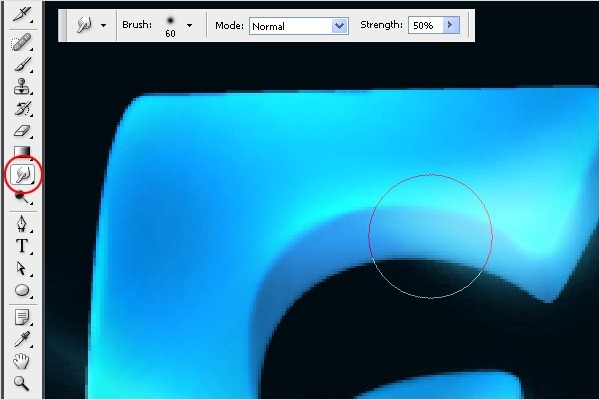

Step 19 - Adding the Feather Glow
Now you are going to add some glow to the corners of the text. Select the Brush tool (B). Choose soft rounded brush and set the Master Diameter on 90px. Create a new layer and paint some glow around the edges as you can see bellow.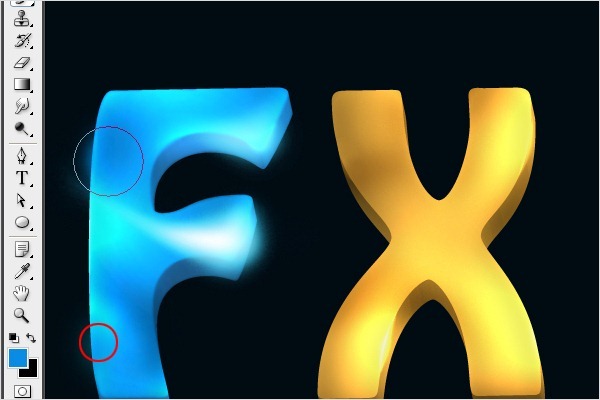
Step 20 - Placing Highlights to "X"
In this step we will focus on the letter "X". Place the spotlights. Do it the same way as you did it in the step 14 and 15. See the image below for a reference.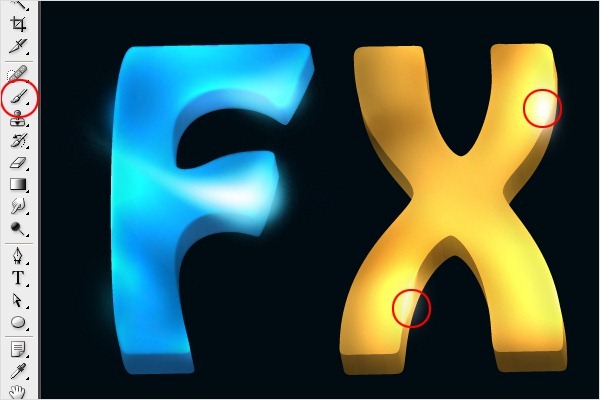
Step 21 - Adding Outer Glow
Add Outer Glow to the spotlights. Click on the button Add a layer style, select Outer Glow and make following settings.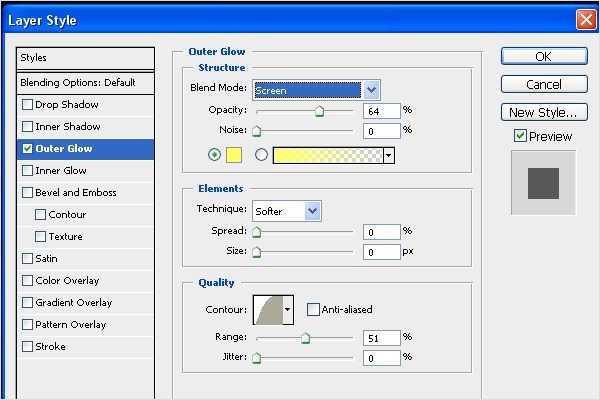
Step 22 - Choosing the Brush
Select the Brush Tool (B). Choose hard round brush and set the Master Diameter on 3px. You will need it in following steps.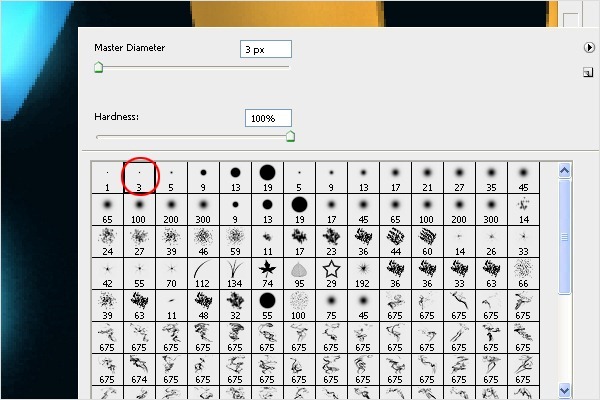
Step 23 - Creating Path
Grab the Pen Tool (P) and create a path as you can see in the image below.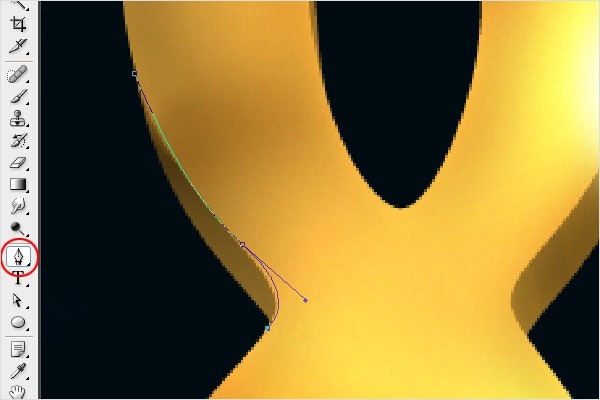
Step 24 - Adding Stroke Path
Now right click on the screen and choose the option Stroke Path...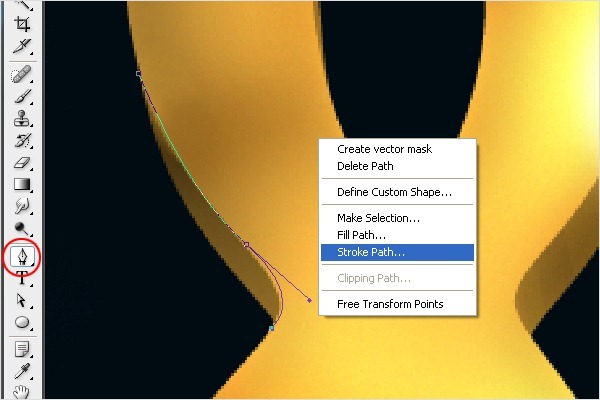
Step 25 - Adding Brush Stroke
Choose the option Brush from the list and press OK.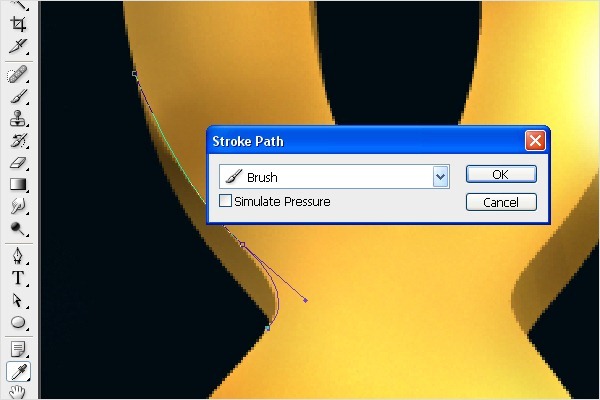
Step 26 - Adding More Stroke Path
Repeat the steps 22 - 25 to add more strokes.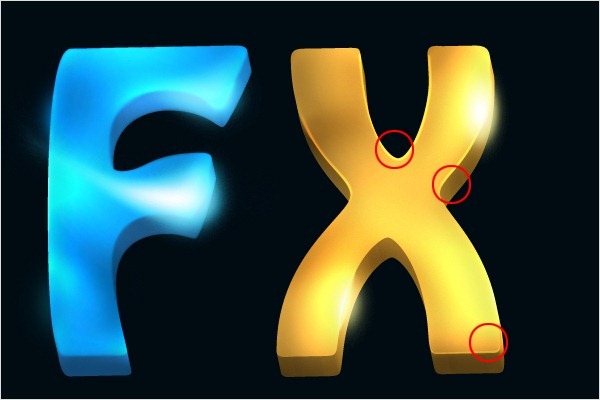
Step 27 - Creating Highlights in the Areas with Shadows
In this step you´re going to add some glow in the dark areas to create a reflection. Choose the Pen Tool (P) and make a path as you see in the image below. Press Ctrl + Enter to make a selection and fill it with brown color (#614717).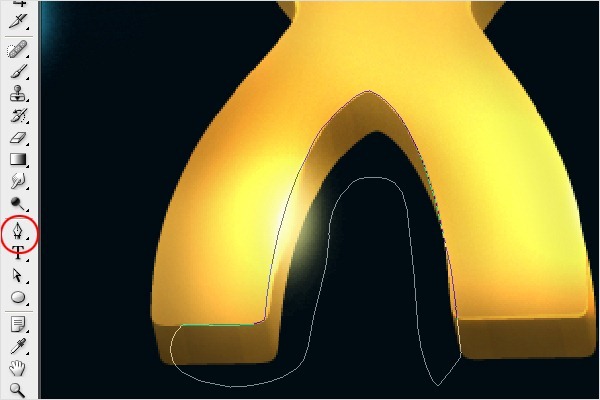
Step 28 - Changing the Blending Mode
Now group the selected layer with the text. To do that place the layer above text layer & press Ctrl+Alt+G to group the layer inside the text layer. Once we done go to layer blending mode & choose "Color Dodge"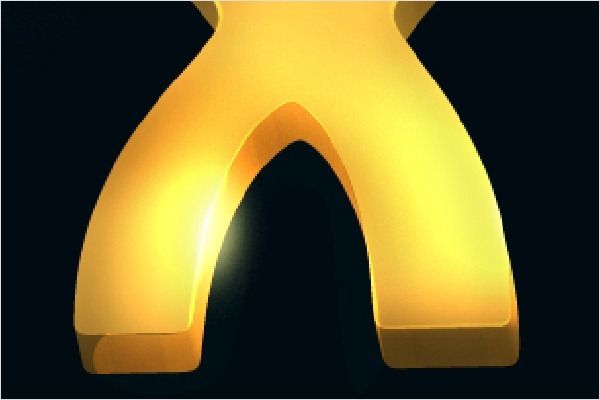
Step 29 - Erasing the Corners
Select the Eraser tool (E). Choose some soft round brush and set Master Diameter on 100px. Erase the corners of the shape. See image below.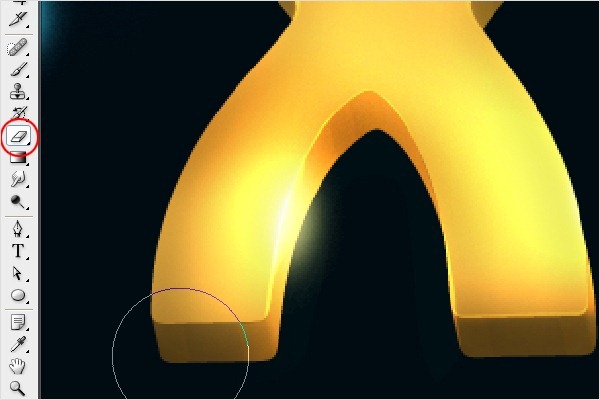
Step 30 - Adding More Stroke Path
Continue with adding more strokes by following the steps 22 - 25.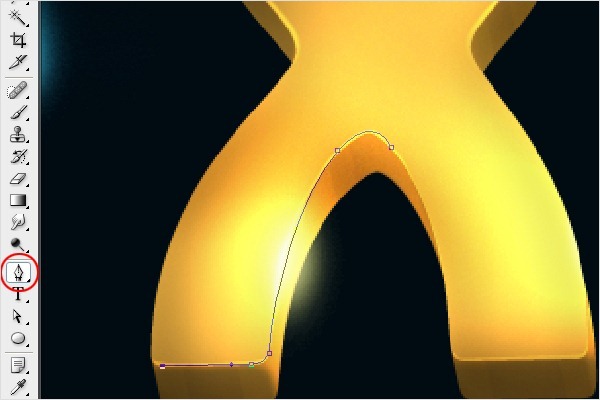

Step 31 - Adding Stroke Path to "F"
Let’s focus on the letter "F" again. Follow the steps 22 - 25 again to add strokes to that letter.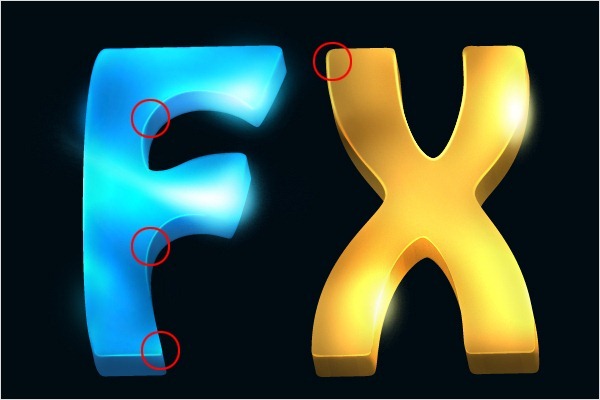
Step 32 - Creating the Spotlight in the Background
In the following steps we will focus on the background. You´re going to add light under the letters. To do that choose the Brush Tool (B). Select soft round brush and set Master Diamter on 300px. Pick blue color (#546876). Create a new layer below the layers with text and paint one big dot. You can see what I mean in the picture below.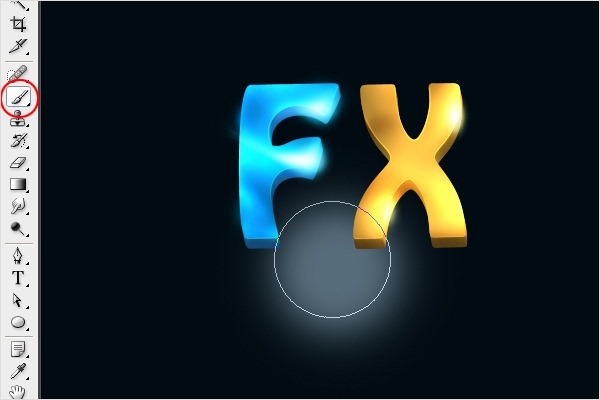
Step 33 - Transforming the Dot
Press Ctrl+T and transform the layer to the shape which can be seen below. Press Enter.
Step 34 - Adding the Shadow
Create a new layer under the layers with the text. Ctrl + click on the thumbnail of the layer with the letter "F" to activate mask of that layer. Then click on the layer you’ve just created and grab the Gradient Tool (G). Pick the black color and fill the mask with it.Do the same with the letter "X".
Then press Ctrl + T and transform this layer with black letters as on the picture bellow. Press Enter.
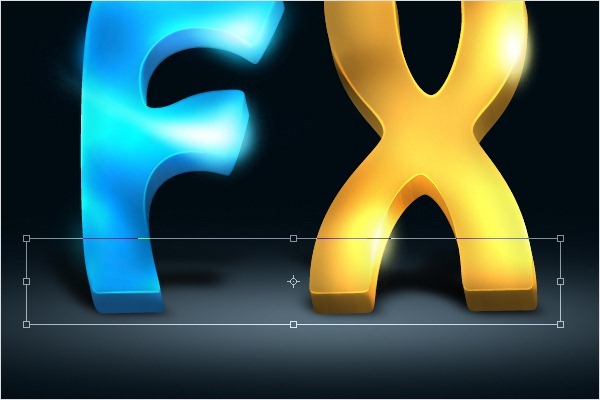
Step 35 - Adding Gaussian Blur
The shadow should have more blur to look realistic. To fix it go to Menu > Filter > Blur > Gaussian Blur...and set Radius on 5.0px. Press OK.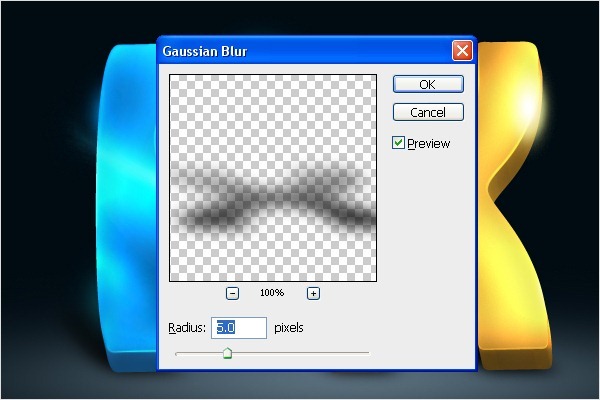

Step 36 - Creating Star Glow
In this step you’re going to add some star glow. To do that select the Pen Tool (P) and create a path as you can see in the image below. Right click on the screen and choose Stroke Path... Select the option Brush and check the box Simulate Pressure. Press OK.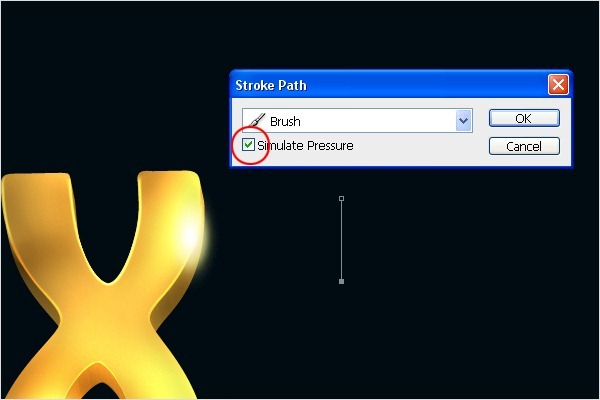
Step 37 - Duplicating the Star Path
Select the path and press Ctrl + J to duplicate it.Then press Ctrl + T and rotate it. Repeat it till you get the star similar as on the picture below.
Step 38 - Adjusting Star Direction
Now select all the star layers. Press Ctrl+T and rotate it to it has the same direction as the letter "X". See the image below.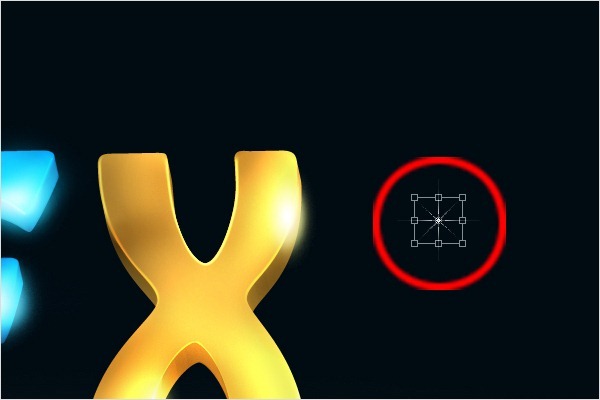
Step 39 - Placing the Star
Duplicate and move the stars to the highlighted areas.
Step 40 - Adding Particles
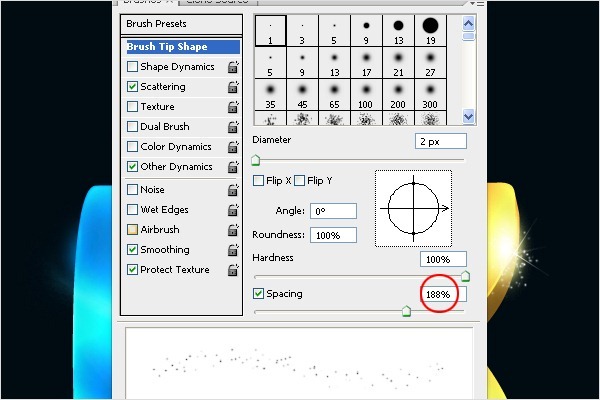
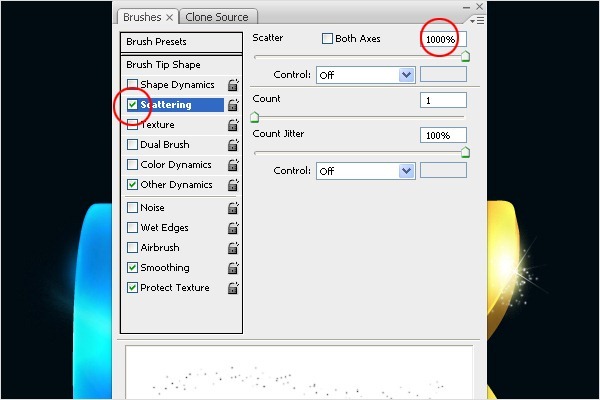
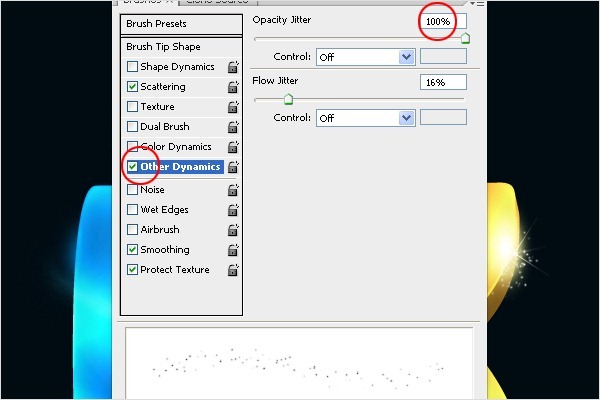
Now you´re going to add some particles near the stars. Select the Brush Tool (B) and follow the brush settings below (if you don´t know where to find this palette simply press F5).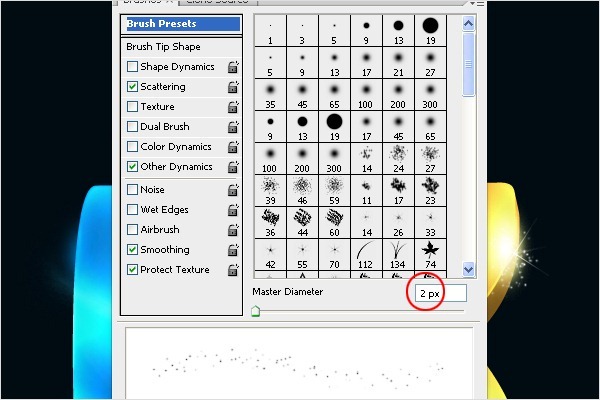
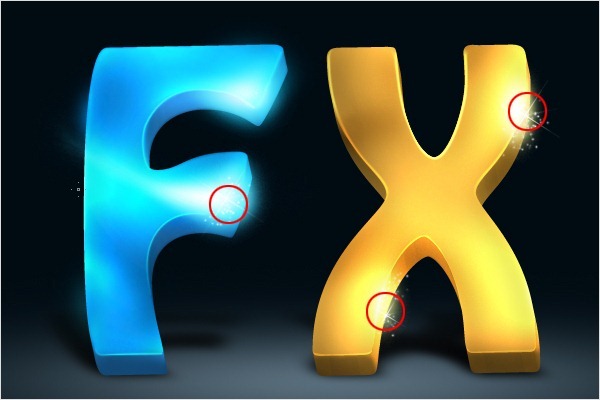
Step 41 - Adding Semi Transparent Screen
Download the smoke brush (Real Smoke (675 pixels)) and install it to Photoshop. Choose the brush shown in the picture below.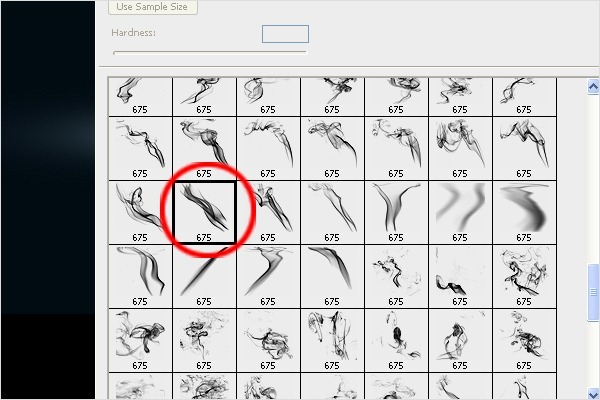
Step 42 - Placing the Brush
Increase the brush size and paint with it on a new layer.
Step 43 - Adding Colors
Create a new layer above the layer with the screen. Right click on this new layer and select the option Create Clipping Mask. Grab the Brush Tool (B), change the Mode on Color and paint to get similar result as on the picture below. Use following colors: Blue = #0a5689, Yellow = #ffd44e, Green = #c2e01f.

Step 44 - Duplicate & Transform
Duplicate the layer with screen and colors and flip it. To do that go to Edit > Transform Flip Horizontal and then Edit > Transform > Flip Vertical. Place this new layers on right side of the image.. See image below.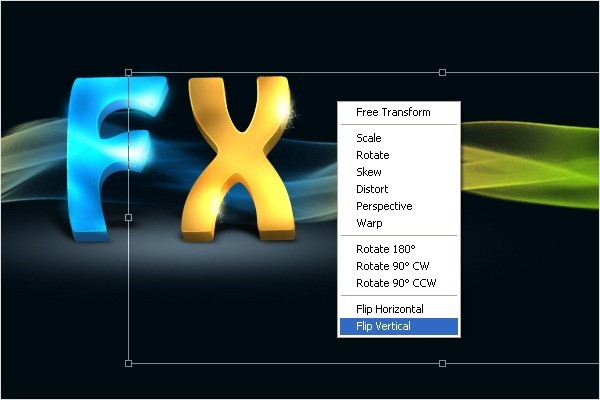
Step 45 - Changing Colors
Now change the colors of the right screen. Click on the layer with colors and press Ctrl+U to activate the Hue/Saturation adjustment. Follow the setting below.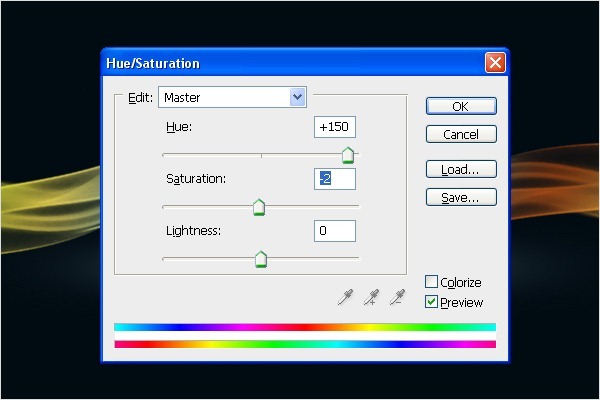

Step 46 - Adding Particles
Now we will add some particles above the screen. Create a new layer. Select the Pen Tool (P) and create a path as you can see in the image below.
Step 47 - Brush Settings
Select the Brush Tool (B) and follow the brush settings bellow.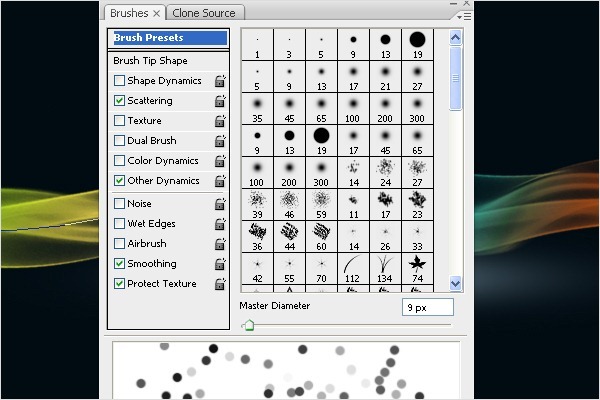
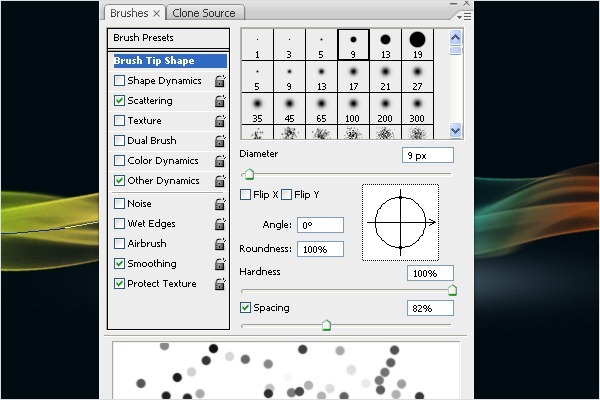
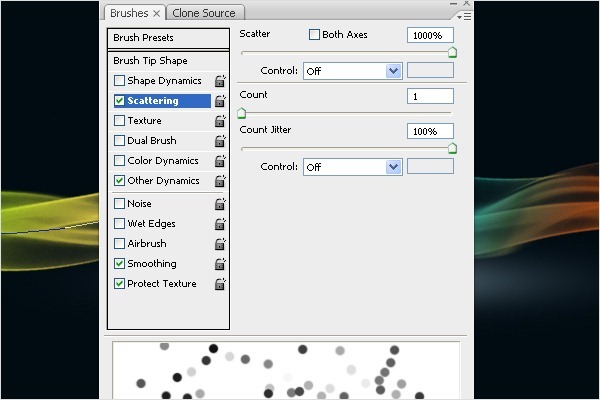
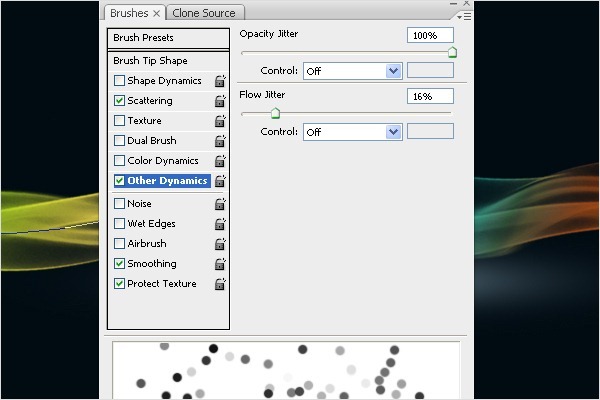
Step 48 - Placing Particles
After you´re done with the brush settings, select the Pen Tool (P) again. Right click on the screen and choose Stroke Path. Select the option Brush and check the box Simulate Pressure. Press OK.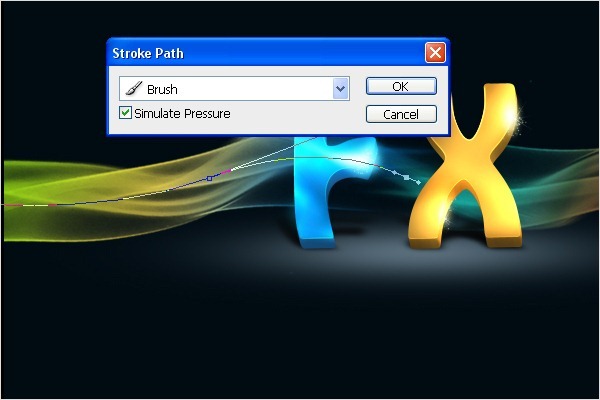

Step 49 - Duplicate And Transform the Particles
Duplicate the particles and flip them horizontal and vertical. Place them on right side of the screen.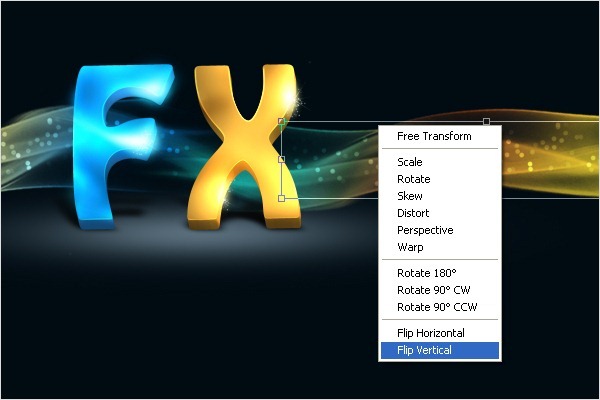
Step 50 - Adding Shadow to the Screen
Now you will add some shadows to the screen. Select both layers with the screen and duplicate them. Press Ctrl+T and transform them as in the picture below. Ctrl + click on this new layer to activate the mask and then go to Edit > Fill... (or press Shift + F5) and fill it with black color.
Step 51 - Adding Gaussian Blur
Now you need to add some blur to the shadow. Go to Menu > Filter > Blur > Gaussian Blur... and set Radius on 1px. Press OK.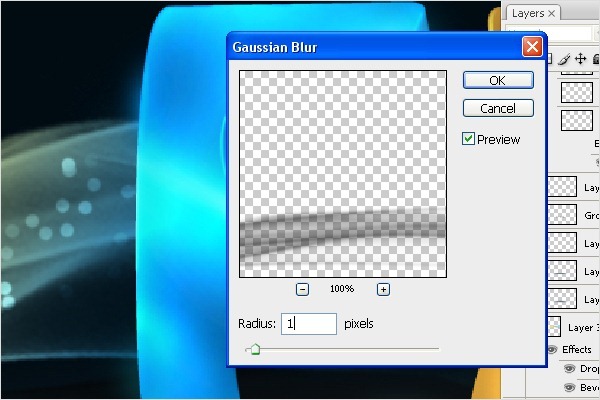
Final Results
Here is the final design of the wallpaper. Thank you very much for reading the tutorial. Hope it was useful for you!![Final[1] Final[1]](http://photoshoptutorials.ws/images/stories/3DTextFXinPhotoshopTutorial_FDCA/Final1.jpg)

Tidak ada komentar:
Posting Komentar